Unterkategorien
EarMaster Cloud user list uploads can contain either students or teachers, can be uploaded as .csv files or directly from a browser, and can work as reusable master lists or single-use additive lists.
You can combine the options available according to the list you are uploading

To upload a user list, go to cloud.earmaster.com and click on Users-->Bulk Add/Edit Internal Users

Master list upload
You can add, edit, and remove EarMaster Cloud users in bulk with a Master list. This means that you will be updating and uploading the same file each time you need to add or remove students to or from your account.
After each upload, EarMaster Cloud will compare the new list with the users already in your account, and will operate the detected changes:
- new users will be added
- users that are currently in your account but who have been removed from the uploaded list will be deleted
- users already in your account will not be modified (unless their details have been updated in the file, in which case the modified fields will be updated)
You can edit your master list and re-upload it when new students are added or when former students are removed. The updated file that is uploaded should include both current users and new users. Students that are not listed in the file will be removed from your EarMaster Cloud account.
Additive list upload
Instead of maintaining a master list for your school, you can choose to upload lists that only add users: Additive lists. You can choose to upload either a list of students or a list of teachers.
These users can be added to the root of the account, or to specific classes. To upload users to a specific class, choose a target class in the drop-down menu "Add to class".
How to create, edit and save a user list
1) Create and edit your lists with Excel, Notepad (Windows), Numbers (Mac), TextEdit (Mac), Google Sheet or other editors that can export CSV files in UTF-8 format.
2) Add one student per line using this format:
<first name>,<last name>,<email>
You can use a header in your file, and fields can be separated by either a column ( , ), a semi-column ( ; ) or a TAB.
Example:
Jorge,Lopez,jlopez@email.ear
Ella,Jensen,ejensen@email.ear
Kim,Lua,klua@email.ear
* You can optionally add a <username> and <password> for each user: <first name>,<last name>,<email>,<username>,<password>. If they are not specified, they will be created automatically by EarMaster Cloud for each student. You can also specify just the <username> and let the password be generated.
* Users are identified by their email. It is therefore very important that each user has his own email. 2 users with the same email will be handled as duplicates by EarMaster Cloud. You can however "trick" the software into treating identical emails as unique ones. To do that, add ?[some text] after the alias. For example if a family uses the email family@email.ear and the kids' names are Elizabeth, Peter and Ophelia, you can construct the addresses family?liz@email.ear, family?pete@email.ear and family?ophie@email.ear and all emails sent to those constructs will end in the inbox of family@email.ear.
3) Save or export the file as .csv in UTF-8 format.
Uploading the list
When you upload a user list, EarMaster Cloud pre-processes it first and then shows you a detailed summary of the changes that are about to occur in your account. Look closely at this summary and make sure that your file was interpreted correctly by EarMaster Cloud before applying any changes to your account.
If everything looks as it should, click PROCESS to apply the changes.
New users will instantly receive their user credentials by email, updated users a notice about their account being updated, and removed users a notivation that their access tot he software has been revoked.
If you find problems in the pre-processed results, then click on the BACK button and fix your file or contact our support team.
EarMaster Cloud consists of 2 distinct areas:
-
The administrative website at cloud.earmaster.com: this is where the administrator of the account of a school manages users, credits and classes.
-
The EarMaster application for Windows, Mac, iOS, Android and Chromebook, which is where the exercises are made and assigned (Teachers on PC/Mac) and completed (Students on all platforms). Students and teachers connect the app to the EarMaster Cloud account of their school using their personal EarMaster Cloud user credentials, which they have received by email when their account was created by the Admin of the school account. As soon as the app is connected, it will fetch class and course data from the cloud, and upload all results automatically as the students complete their assignments.
If your school is paying for student access with an annual school subscription or EarMaster Cloud credits, then you can watch this video tutorial or read the step-by-step instructions below to learn how to set up your school account:
How to proceed - school-paid user access
If your school has bought credits to give students access to EarMaster, then please follow the instructions below. If students are expected to pay for their own access to the system, then please refer to the section titled "How to proceed - student-paid subscriptions" further down.
1. Log into your Admin dashboard
Go to cloud.earmaster.com and log in with your administrator login, which was sent to you by e-mail and consists of:
- School account ID
- Password
The first thing you see when you have logged in is the Dashboard. It will display information on how many credits are available for your account, how many users and classes are active, etc.
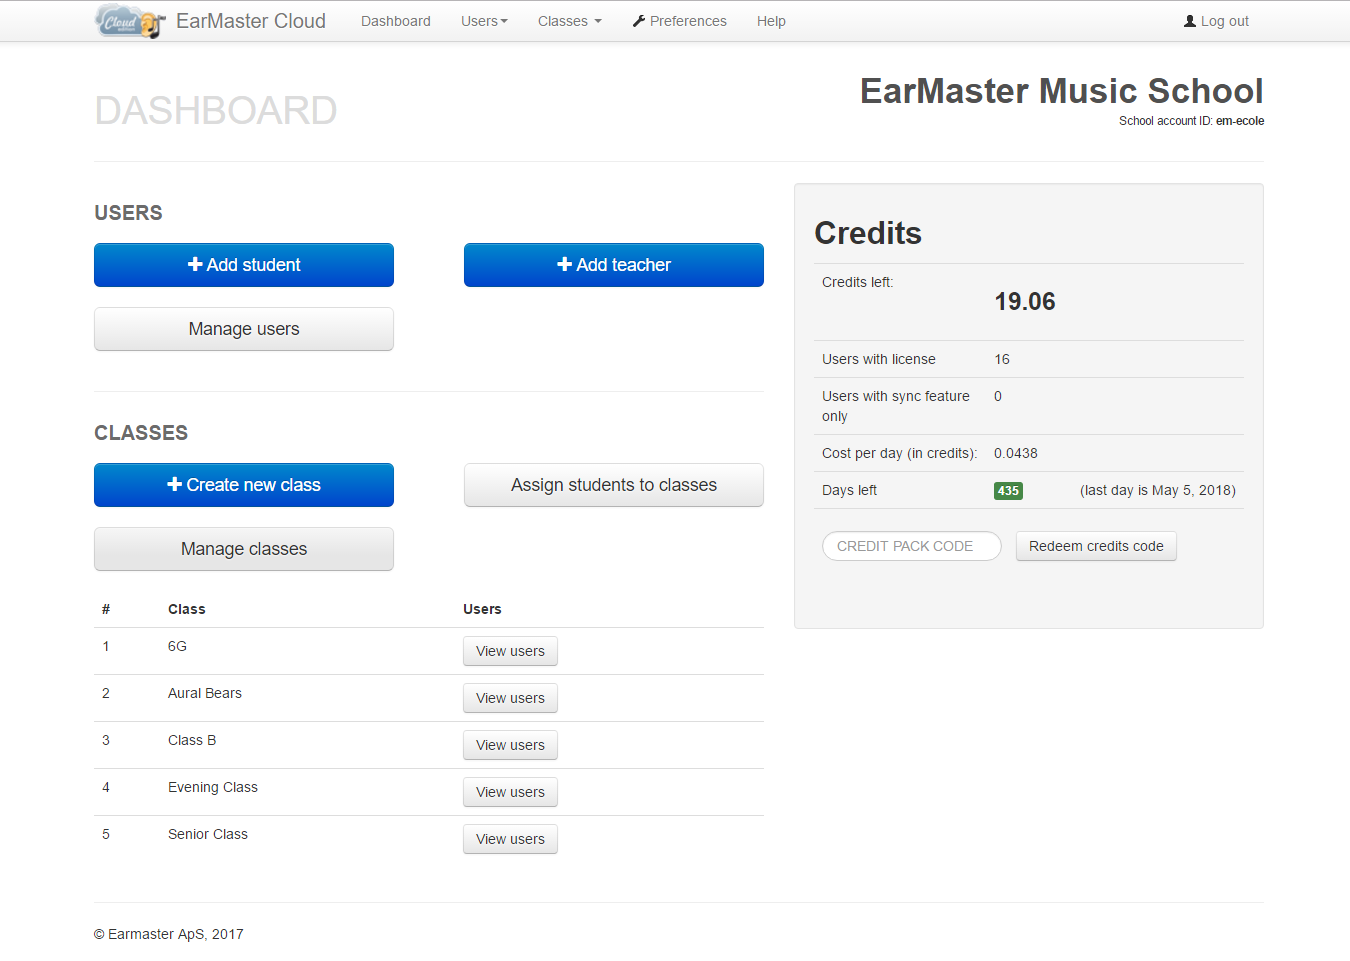
2. [Optional] Create classes
In EarMaster, a class is a group of students that will work on the same assignments. If you use classes, make sure to add at least one teacher to each class. The teachers of a class are the only ones who can give assignments and see the results for that class.
To add a class, click on Create new class in your dashboard. This step is optional, but even with only a few students, it will make it much easier to assign workbooks later on.
3. Add users
You can add users in two ways:
a. In bulk by uploading a user list (see "Upload user lists" tab above)
b. Manually one by one (read below)
To add users manually, click on Add Student or Add Teacher from the Dashboard or in the Manage Users page.
Please notice:
- You have an Admin login to manage the account of your school now, but If you also want to use the software as a Teacher to make assignments and monitor student results, then you need to create a user with Teacher access level for yourself.
- All the users you add receive an email with a download link and their user credentials. So make sure that your students are aware that an email from EarMaster Cloud is incoming before you add them to your account. Otherwise they might delete the email by mistake or oversee it.
- If users have forgotten or lost their user credentials, you can resend them by using the Resend email function in Manage Users, or they can request a new one here: www.earmaster.com/support/earmaster-cloud-login-recovery.html
- You can also delete the users that shouldn't be active any longer by checking boxes in the left column, and then by clicking on the Delete button.
Note: if your students don't have email addresses or if you would like to manage their account for them, you can add ?[user name] at the end of your email alias for each user you add. Then you will receive all the system emails sent to these users in your own inbox.
For example:
4. [Optional] Enroll students and teachers into classes
If you have created classes, you can now dispatch your students and teachers into them using the Enroll users into classes button from the Dashboard, or via the Manage Users page by selecting users and clicking on the Classes button.
5. Users connect EarMaster to the Cloud
Users should now have received their user credentials, so they can connect the EarMaster app on all platforms to the Cloud. You can follow the status of the email sending and last login time of each user in the "Manage Users" section of your Admin dashboard. For more info about this step, please refer to the Connect EarMaster to the Cloud tab in the Teacher and Student sections of these Cloud support pages.
If you have a Teacher account, you will have access to a special section in the PC/Mac version of EarMaster 7 (not available on iOS, Android and Chromebook). Read tutorials here
How to proceed - student-paid subscriptions
If your students are going to pay for their own access by subscribing to EarMaster Cloud on a private basis, then here is how to proceed:
1. Go to your Admin dashboard at cloud.earmaster.com, find the USERS menu and click on EXTERNAL USERS.
2. Click on the button labelled INVITE STUDENTS and type the email addresses of the students you want to invite to subscribe. Type one email address per line, and then click SAVE to send out all invites. You should see a list of the invited students by setting the USER FILTER to INVITED and clicking on FETCH.
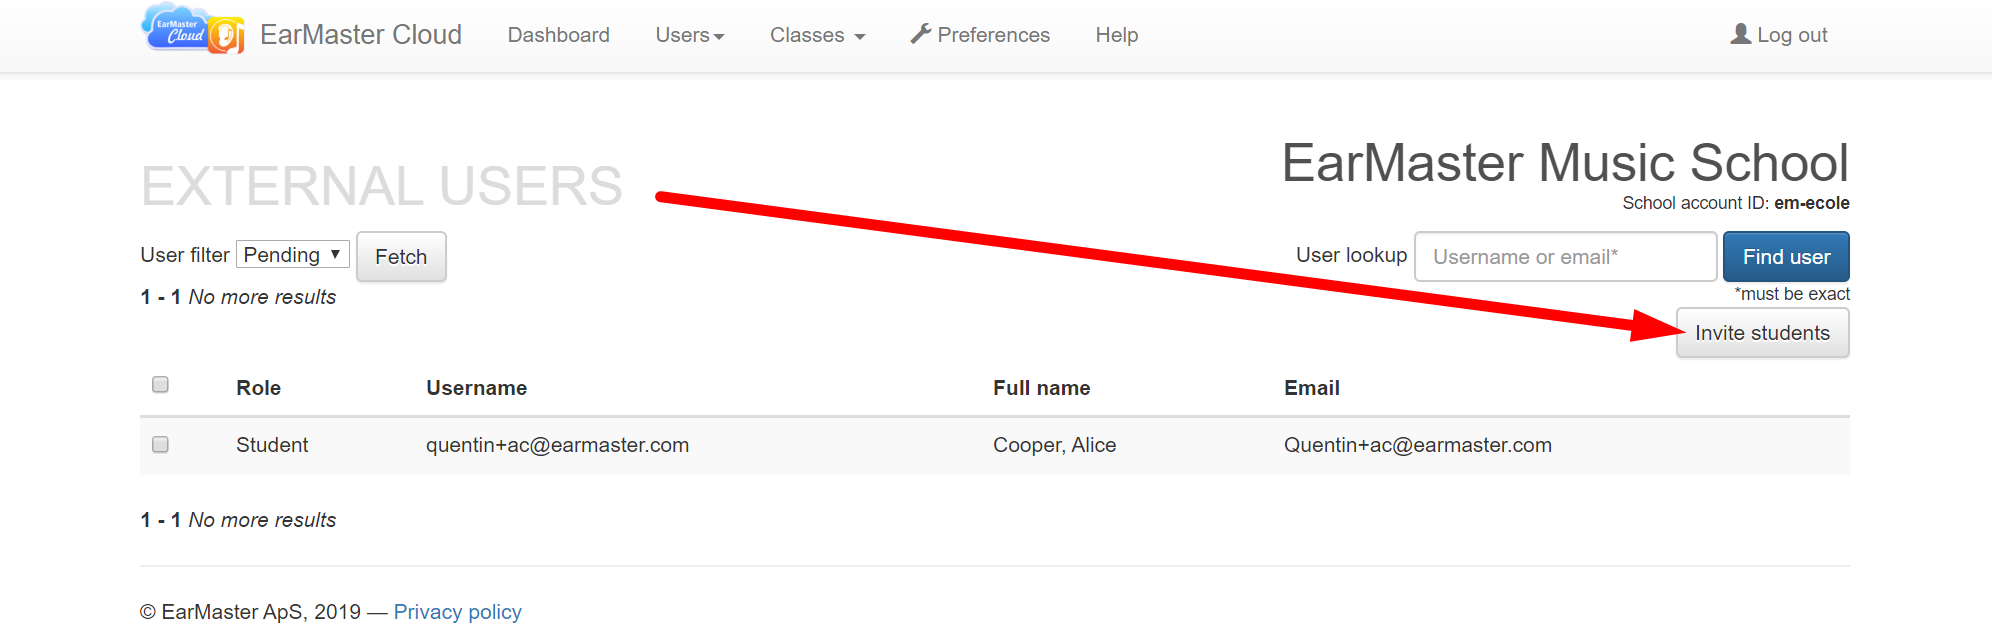
3. Your students will now receive an email with a link which will enable them to subscribe to EarMaster Cloud on a private basis while linking their account to your school account. As soon as a student has subscribed, you will see his/her name appear in the MANAGER USERS section of your Admin dashboard.
Notice: If your school is not paying for student licenses, you should not use the "ADD STUDENT" feature visible in the main screen of the dashboard and in MANAGE USERS. The only thing you need to do is invite students as describe above. The rest is handled automatically.
Video Guides
Find out how to use the educational features of EarMaster Cloud
[module-302]Courses and workshops available in EarMaster
Click on a course or workshop title to view its full content.
Notice that the availability of the courses and workshops listed below depends on the license that you purchased. For more information, please refer to this Version comparison.
Beginner's Course |
|
1: Welcome to the Beginner's Course |
|
| 1.1 Introduction to the course | |
2: Pitch |
|
| 2.1 Musical Pitch | |
| 2.2 Pitch Matching: One Note (any note in range) | |
| 2.3 Introduction to Pitch Intervals | |
| 2.4 More Pitch Intervals | |
| 2.5 Pitch Interval Names | |
| 2.6 Pitch Matching: Two Notes (C, D) | |
| 2.7 Module Recap | |
3: Pulse |
|
| 3.1 Beat (Pulse) | |
| 3.2 Tapping with the Metronome | |
| 3.3 Skipping Beats | |
| 3.4 Introduction to Beat Notation | |
| 3.5 Beat Error Detections | |
| 3.6 Beat Dictation | |
| 3.7 Module Recap | |
4: Pitch Notation |
|
| 4.1 Pitch Sight-Singing | |
| 4.2 Pitch Dictation with 2 notes | |
| 4.3 Pitch Dictation with 3 notes | |
| 4.4 Pitch Dictation with 4 notes | |
| 4.5 Melodic Dictation | |
| 4.6 Module Recap | |
5: Duration |
|
| 5.1 Rhythmic Duration | |
| 5.2 Performing Note Onsets and Offsets | |
| 5.3 Rhythm Error Detection | |
| 5.4 Rhythm Sight-Reading | |
| 5.5 Rhythm Dictation | |
| 5.6 Clapping Back Rhythms with Half Rests | |
| 5.7 Half Rest Error Detection | |
| 5.8 Sight-Reading Rhythms with Half Rests | |
| 5.9 Rhythmic Dictation with Half Rests | |
| 5.10 Module Recap | |
6: Tonality |
|
| 6.1 Tonality | |
| 6.2 Pitch Matching | |
| 6.3 Three Melodic Intervals | |
| 6.4 Interval Identification | |
| 6.5 Interval Singing | |
| 6.6 Tonal Threads (3 notes) | |
| 6.7 Pitch Dictation | |
| 6.8 Singing Melodic Fragments by ear | |
| 6.9 Singing Melodic Fragments by sight | |
| 6.10 Melodic Dictation | |
| 6.11 Singing a Tune: Tchaikovsky's 1812 Overture | |
| 6.12 Module Recap | |
7: Measures |
|
| 7.1 Whole Notes & Rests | |
| 7.2 Whole notes & whole rests | |
| 7.3 Whole Note Error Detection | |
| 7.4 Whole Note Sight-Reading | |
| 7.5 Whole Note Rhythmic Dictation | |
| 7.6 Two Beat Measures: Clapback | |
| 7.7 Two Beat Measures: Error detection | |
| 7.8 Two Beat Measures: Sight-Reading | |
| 7.9 Two Beat Measures: Dictation | |
| 7.10 Singing a Tune | |
| 7.11 Module Recap | |
8: The Sub-dominant |
|
| 8.1 The Sub-dominant Scale Degree | |
| 8.2 Interval Learning (Perfect 4th) | |
| 8.3 Melodic Interval Identification | |
| 8.4 Singing within the Major Scale | |
| 8.5 Tonal Threads (3 notes) | |
| 8.6 Pitch Dictation (4 notes) | |
| 8.7 Singing Melodic Fragments (by ear) | |
| 8.8 Singing Melodic Fragments (by sight) | |
| 8.9 Dictating Melodies | |
| 8.10 Singing A Tune | |
| 8.11 Module Recap | |
9: Dotted Half Note Rhythms |
|
| 9.1 Dotted Rhythms | |
| 9.2 Dotted Half Notes & Dotted Half Rests | |
| 9.3 Dotted Half Note Error Detection | |
| 9.4 Dotted Half Note Sight-Reading | |
| 9.5 Dotted Half Note Rhythmic Dictation | |
| 9.6 Three Beat Measures: Clapback | |
| 9.7 Three Beat Measures: Error Detection | |
| 9.8 Three Beat Measures: Sight-Reading | |
| 9.9 Three Beat Measures: Dictation | |
| 9.10 Module Recap | |
10: The Dominant |
|
| 10.1 The Dominant | |
| 10.2 The Perfect 5th | |
| 10.3 Interval Identification | |
| 10.4 Interval Singing | |
| 10.5 Tonal Threads (3 notes) | |
| 10.6 Pitch Dictation (4 notes) | |
| 10.7 Pitch Dictation (5 notes) | |
| 10.8 Singing Melodic Fragments (by ear) | |
| 10.9 Singing Melodic Fragments (by sight) | |
| 10.10 Dictating Melodies | |
| 10.11 Singing A Tune: Frère Jacques | |
| 10.12 Module Recap | |
11: Consonance & Dissonance |
|
| 11.1 Hearing Harmonically | |
| 11.2 Dissonance & Consonance | |
| 11.3 Dissonance & Consonance | |
| 11.4 Consonant & Dissonant Chords | |
| 11.5 Chords in context | |
| 11.6 Chords in context (3 chord progressions) | |
| 11.7 Singing a Tune: Beethoven's Ode to Joy | |
| 11.8 Module Recap | |
12: Simple Subdivisions |
|
| 12.1 Subdivisions of the Beat | |
| 12.2 Constant Subdivisions | |
| 12.3 Eighth Note Clapback | |
| 12.4 Eighth Note Error Detection | |
| 12.5 Eighth Note Sight-Reading | |
| 12.6 Eighth Note Rhythmic Dictation | |
| 12.7 Rhythmic Dictation: Joy to the World | |
| 12.8 Singing a Tune: Simple Gifts | |
| 12.9 Module Recap | |
13: The Leading Tone |
|
| 13.1 The Leading Tone | |
| 13.2 Interval Comparison | |
| 13.3 Interval Identification | |
| 13.4 Interval Singing | |
| 13.5 Tonal Threads (3 notes) | |
| 13.6 Pitch Dictation (4 notes) | |
| 13.7 Pitch Dictation (5 notes) | |
| 13.8 Singing Melodic Fragments (by ear) | |
| 13.9 Singing Melodic Fragments (by sight) | |
| 13.10 Transcribing Melodies | |
| 13.11 Singing a Tune: Haydn's Surprise Symphony | |
| 13.12 Module Recap | |
14: Triads |
|
| 14.1 Triads | |
| 14.2 Ascending Melodic Thirds | |
| 14.3 Ascending Melodic Thirds: Identification | |
| 14.4 Ascending Melodic Triads | |
| 14.5 Descending Melodic Thirds: Learning | |
| 14.6 Descending Melodic Thirds: Identification | |
| 14.7 Descending Melodic Triads: Identification | |
| 14.8 Harmonic Thirds: Learning | |
| 14.9 Harmonic Thirds: Identification | |
| 14.10 Harmonic Triads: Identification | |
| 14.11 Singing A Tune: Rossini's William Tell Overture | |
| 14.12 Module Recap | |
15: Syncopation |
|
| 15.1 Syncopation | |
| 15.2 Basic Syncopated Rhythms | |
| 15.3 Syncopation Clapback | |
| 15.4 Syncopation Error Detection | |
| 15.5 Syncopation Error Detection (2) | |
| 15.6 Syncopated Sight-Reading | |
| 15.7 Syncopation Rhythmic Dictation | |
| 15.8 Tapping a Tune: Panama | |
| 15.9 Singing A Tune: Mozart's Eine Kleine Nachtmusik | |
| 15.10 Module Recap | |
16: The Submediant |
|
| 16.1 The Submediant | |
| 16.2 The Submediant Scale Degree | |
| 16.3 Interval Identification | |
| 16.4 Interval Singing | |
| 16.5 Tonal Threads (3 notes) | |
| 16.6 Pitch Dictation (4 notes) | |
| 16.7 Pitch Dictation (5 notes) | |
| 16.8 Singing Melodic Fragments (by ear) | |
| 16.9 Singing Melodic Fragments (by sight) | |
| 16.10 Transcribing Melodies | |
| 16.11 Singing a Tune: Twinkle, Twinkle Little Star | |
| 16.12 Module Recap | |
17: Other Triad Types |
|
| 17.1 Augmented and Diminished Triads | |
| 17.2 Review of Ascending Thirds | |
| 17.3 The Four Triads (ascending) | |
| 17.4 Review of Descending Thirds | |
| 17.5 The Four Triads (descending) | |
| 17.6 Review of Harmonic Thirds | |
| 17.7 The Four Triads (harmonic) | |
| 17.8 Review of thirds (mixed) | |
| 17.9 The Four Triad types (mixed) | |
| 17.10 Singing a Tune: Home on the Range | |
| 17.11 Module Recap | |
18: Ties |
|
| 18.1 Rhythmic Ties | |
| 18.2 Clapping Back Rhythms with Ties | |
| 18.3 Clapping Back Rhythms with Ties (2) | |
| 18.4 Detecting Errors in Rhythms with Ties | |
| 18.5 Detecting Errors in Rhythms with Ties (2) | |
| 18.6 Sight-Reading Rhythms with Ties | |
| 18.7 Transcribing Rhythms with Ties | |
| 18.8 Tapping a Tune: All the Girls Go Crazy | |
| 18.9 Singing a Tune: Rock-A My Soul | |
| 18.10 Module Recap | |
19: Harmonic Progressions |
|
| 19.1 Introduction to Harmonic Progressions | |
| 19.2 Singing Bass Patterns | |
| 19.3 Bass Pattern Dictation | |
| 19.4 Singing a Tune: Pachabel's Canon in D | |
| 19.5 Chord Quality Review (Major & Minor) | |
| 19.6 Chord Progressions (I, ii, V) | |
| 19.7 Chord Progressions (I, ii, V) | |
| 19.8 Subdominant Bass Patterns | |
| 19.9 Subdominant Bass Pattern Dictation | |
| 19.10 Two-Chord Progressions (I, ii, IV, V) | |
| 19.11 Chord Progressions (I, ii, IV, V) | |
| 19.12 Module Recap | |
20: Compound Subdivisions |
|
| 20.1 Compound Beat Subdivisions | |
| 20.2 Introduction to Compound Beat Subdivisions | |
| 20.3 Clapping Back Compound Beat Subdivisions | |
| 20.4 Detecting Errors in Compound Beat Subdivisions | |
| 20.5 Detecting Errors in Compound Beat Subdivisions (2) | |
| 20.6 Sight-Reading Rhythms with Compound Subdivisions | |
| 20.7 Transcribing Rhythms with Compound Subdivisions | |
| 20.8 Tapping a Tune: Courenta dei Butei | |
| 20.9 Singing a Tune: Bach's Jesu, Joy of Man's Desiring | |
| 20.10 Module Recap | |
21: The Complete Major Scale |
|
| 21.1 The Complete Major Scale | |
| 21.2 Interval Comparison | |
| 21.3 Interval Identification | |
| 21.4 Interval Singing | |
| 21.5 Tonal Threads (3 notes) | |
| 21.6 Pitch Dictation (4 notes) | |
| 21.7 Pitch Dictation (5 Notes) | |
| 21.8 Singing Melodic Fragments (by ear) | |
| 21.9 Singing Melodic Fragments (by sight) | |
| 21.10 Transcribing Melodies | |
| 21.11 Singing a Tune: Row, Row, Row Your Boat | |
| 21.12 Module Recap | |
22: Course Mastery Tests |
|
| 22.1 The Mastery Module | |
| 22.2 Interval Comparison Mastery | |
| 22.3 Interval Identification Mastery | |
| 22.4 Triad Identification Mastery | |
| 22.5 Chord Progression Mastery | |
| 22.6 Rhythmic Sight-reading Mastery | |
| 22.7 Rhythmic Dictation Mastery | |
| 22.8 Pitch Sight-Singing Mastery | |
| 22.9 Pitch Dictation Mastery | |
| 22.10 Melodic Sight-Reading Mastery | |
| 22.11 Melodic Dictation Mastery | |
| 22.12 Tapping a Tune: Mastery | |
| 22.13 Learning A Tune: Mastery | |
| 22.14 Course Completion | |
Vocal Trainer |
|
1: Foreword |
|
| 1.1 Welcome | |
2: Level 1: Technical Exercises |
|
| 2.1 Technical Exercise 1 (preparatory lesson) | |
| 2.2 Technical Exercise 1 | |
| 2.3 Technical Exercise 2 (preparatory lesson) | |
| 2.4 Technical Exercise 2 | |
| 2.5 Technical Exercise 3 (preparatory lesson) | |
| 2.6 Technical Exercise 3 | |
| 2.7 Technical Exercises 1–3 (preparatory lesson) | |
| 2.8 Technical exercises 1–3 | |
3: Level 1: Clapback |
|
| 3.1 2/4 Rhythms: one measure, no syncopation | |
| 3.2 2/4 Rhythms: one measure, with syncopation | |
| 3.3 2/4 Rhythms: three measures, no syncopation | |
| 3.4 2/4 Rhythms: three measures, with syncopation | |
| 3.5 2/4 Melodies: four measures | |
| 3.6 3/4 Rhythms: one measure | |
| 3.7 3/4 Melodies: two measures | |
| 3.8 3/4 Melodies: three measures | |
| 3.9 2/4 and 3/4 melodies | |
4: Level 1: Intervals |
|
| 4.1 Ascending Intervals: major 3rd, perfect 5th, perfect octave | |
| 4.2 Ascending Interval: major 3rd | |
| 4.3 Ascending Interval: major 3rd | |
| 4.4 Ascending Interval: perfect 5th | |
| 4.5 Ascending Interval: perfect 5th | |
| 4.6 Ascending Interval: perfect octave | |
| 4.7 Ascending Interval: perfect octave | |
| 4.8 Ascending intervals: all intervals | |
| 4.9 Ascending Intervals: all intervals | |
| 4.10 Descending intervals: minor 3rd, perfect 4th, perfect octave | |
| 4.11 Descending Interval: minor 3rd | |
| 4.12 Descending Interval: minor 3rd | |
| 4.13 Descending Interval: perfect 4th | |
| 4.14 Descending Interval: perfect 4th | |
| 4.15 Descending Interval: perfect octave | |
| 4.16 Descending Interval: perfect octave | |
| 4.17 Descending Intervals: all intervals | |
| 4.18 Descending Intervals: all intervals | |
| 4.19 All intervals | |
| 4.20 All intervals | |
5: Level 1: Sight Singing |
|
| 5.1 2/4 Melodies: three measures | |
| 5.2 2/4 Melodies: four measures | |
| 5.3 3/4 Melodies: three measures | |
| 5.4 2/4 and 3/4 melodies | |
6: Level 1: Final Step |
|
| 6.1 Technical Exercises | |
| 6.2 Clapback | |
| 6.3 Intervals | |
| 6.4 Sight Singing | |
7: Level 2: Technical Exercises |
|
| 7.1 Technical Exercise 1 (preparatory lesson) | |
| 7.2 Technical Exercise 1 | |
| 7.3 Technical Exercise 2 (preparatory lesson) | |
| 7.4 Technical Exercise 2 | |
| 7.5 Technical Exercise 3 (preparatory lesson) | |
| 7.6 Technical Exercise 3 | |
| 7.7 Technical Exercise 4 (preparatory lesson) | |
| 7.8 Technical Exercise 4 | |
| 7.9 Technical Exercises 1–4 (preparatory lesson) | |
| 7.10 Technical exercises 1–4 | |
8: Level 2: Clapback |
|
| 8.1 2/4 Melodies (review) | |
| 8.2 2/4 Rhythms | |
| 8.3 2/4 Melodies | |
| 8.4 3/4 Melodies (review) | |
| 8.5 3/4 Rhythms | |
| 8.6 3/4 Melodies | |
| 8.7 2/4 and 3/4 melodies | |
9: Level 2: Intervals |
|
| 9.1 Ascending intervals: major 2nd, major 3rd | |
| 9.2 Ascending Interval: major 3rd (review) | |
| 9.3 Ascending Interval: major 2nd | |
| 9.4 Ascending Interval: major 2nd | |
| 9.5 Ascending intervals: perfect 4th, perfect 5th, perfect octave | |
| 9.6 Ascending Interval: perfect 5th (review) | |
| 9.7 Ascending Interval: perfect octave (review) | |
| 9.8 Ascending Interval: perfect 4th | |
| 9.9 Ascending Interval: perfect 4th | |
| 9.10 Ascending Intervals: all intervals | |
| 9.11 Ascending Intervals: all intervals | |
| 9.12 Descending intervals: minor 3rd, perfect 4th, perfect octave (review) | |
| 9.13 Descending Interval: minor 3rd (review) | |
| 9.14 Descending Interval: perfect 4th (review) | |
| 9.15 Descending Interval: perfect octave (review) | |
| 9.16 Descending Intervals: all intervals | |
| 9.17 Descending Intervals: all intervals | |
| 9.18 All intervals | |
| 9.19 All intervals | |
10: Level 2: Sight Singing |
|
| 10.1 2/4 Melodies (review) | |
| 10.2 2/4 Melodies | |
| 10.3 3/4 Melodies (review) | |
| 10.4 3/4 Melodies | |
| 10.5 2/4 and 3/4 melodies | |
11: Level 2: Final Step |
|
| 11.1 Technical Exercises | |
| 11.2 Clapback | |
| 11.3 Intervals | |
| 11.4 Sight Singing | |
12: Level 3: Technical Exercises |
|
| 12.1 Technical Exercise 1 (preparatory lesson) | |
| 12.2 Technical Exercise 1 | |
| 12.3 Technical Exercise 2 (preparatory lesson) | |
| 12.4 Technical Exercise 2 | |
| 12.5 Technical Exercise 3 (preparatory lesson) | |
| 12.6 Technical Exercise 3 | |
| 12.7 Technical Exercise 4 (preparatory lesson) | |
| 12.8 Technical Exercise 4 | |
| 12.9 Technical Exercise 5 (preparatory lesson) | |
| 12.10 Technical Exercise 5 | |
| 12.11 Technical Exercises 1–5 (preparatory lesson) | |
| 12.12 Technical exercises 1–5 | |
13: Level 3: Clapback |
|
| 13.1 2/4 Melodies (review) | |
| 13.2 2/4 Rhythms | |
| 13.3 2/4 Melodies | |
| 13.4 3/4 Melodies (review) | |
| 13.5 3/4 Rhythms | |
| 13.6 3/4 Melodies | |
| 13.7 2/4 and 3/4 melodies | |
14: Level 3: Intervals |
|
| 14.1 Ascending intervals: major 2nd, major 3rd, major 6th | |
| 14.2 Ascending Interval: major 2nd (review) | |
| 14.3 Ascending Interval: major 3rd (review) | |
| 14.4 Ascending Interval: major 6th | |
| 14.5 Ascending Interval: major 6th | |
| 14.6 Ascending intervals: perfect 4th, perfect 5th, perfect octave (review) | |
| 14.7 Ascending Intervals: perfect 4th, perfect 5th, perfect octave (review) | |
| 14.8 Ascending Intervals: all intervals | |
| 14.9 Ascending Intervals: all intervals | |
| 14.10 Descending intervals: perfect 4th, perfect 5th | |
| 14.11 Descending intervals: all intervals | |
| 14.12 Descending Interval: minor 3rd (review) | |
| 14.13 Descending Interval: perfect 4th (review) | |
| 14.14 Descending Interval: perfect 5th | |
| 14.15 Descending Interval: perfect 5th | |
| 14.16 Descending Interval: perfect octave (review) | |
| 14.17 Descending Intervals: all intervals | |
| 14.18 Descending Intervals: all intervals | |
| 14.19 All intervals | |
| 14.20 All intervals | |
15: Level 3: Sight Singing |
|
| 15.1 2/4 Melodies (review) | |
| 15.2 3/4 Melodies (review) | |
| 15.3 4/4 Melodies: two measures | |
| 15.4 Final Step: 4/4 Melodies: four measures | |
16: Level 3: Final Step |
|
| 16.1 Technical Exercises | |
| 16.2 Clapback | |
| 16.3 Intervals | |
| 16.4 Sight Singing | |
17: Level 4: Technical Exercises |
|
| 17.1 Technical Exercise 1 (preparatory lesson) | |
| 17.2 Technical Exercise 1 | |
| 17.3 Technical Exercise 2 (preparatory lesson) | |
| 17.4 Technical Exercise 2 | |
| 17.5 Technical Exercise 3 (preparatory lesson) | |
| 17.6 Technical Exercise 3 | |
| 17.7 Technical Exercise 4 (preparatory lesson) | |
| 17.8 Technical Exercise 4 | |
| 17.9 Technical Exercise 5 (preparatory lesson) | |
| 17.10 Technical Exercise 5 | |
| 17.11 Technical Exercises 1–5 (preparatory lesson) | |
| 17.12 Technical exercises 1–5 | |
18: Level 4: Clapback |
|
| 18.1 2/4 Melodies (review) | |
| 18.2 2/4 Rhythms | |
| 18.3 2/4 Melodies | |
| 18.4 6/8 Rhythms | |
| 18.5 6/8 Melodies | |
| 18.6 2/4 and 6/8 melodies | |
19: Level 4: Intervals |
|
| 19.1 Ascending Intervals: minor and major 3rds | |
| 19.2 Ascending Interval: major 2nd (review) | |
| 19.3 Ascending Interval: major 3rd (review) | |
| 19.4 Ascending Interval: minor 3rd | |
| 19.5 Ascending Interval: minor 3rd | |
| 19.6 Ascending Interval: major 6th (review) | |
| 19.7 Ascending Intervals: perfect 4th, perfect 5th, perfect octave (review) | |
| 19.8 Ascending Intervals: all intervals | |
| 19.9 Ascending Intervals: all intervals | |
| 19.10 Ascending Intervals: all intervals | |
| 19.11 Descending intervals: perfect 5th, minor 6th | |
| 19.12 Descending Interval: minor 3rd (review) | |
| 19.13 Descending Interval: minor 6th | |
| 19.14 Descending Interval: minor 6th | |
| 19.15 Descending Interval: perfect 4th, perfect 5th, perfect octave (review) | |
| 19.16 Descending intervals: all intervals | |
| 19.17 Descending Intervals: all intervals | |
| 19.18 Descending Intervals: all intervals | |
| 19.19 All intervals | |
| 19.20 All intervals | |
20: Level 4: Sight Singing |
|
| 20.1 6/8 Melodies: two measures | |
| 20.2 Final Step: 6/8 Melodies: four measures | |
21: Level 4: Final Step |
|
| 21.1 Technical Exercises | |
| 21.2 Clapback | |
| 21.3 Intervals | |
| 21.4 Sight Singing | |
22: Level 5: Technical Exercises |
|
| 22.1 Technical Exercise 1 (preparatory lesson) | |
| 22.2 Technical Exercise 1 | |
| 22.3 Technical Exercise 2 (preparatory lesson) | |
| 22.4 Technical Exercise 2 | |
| 22.5 Technical Exercise 3 (preparatory lesson) | |
| 22.6 Technical Exercise 3 | |
| 22.7 Technical Exercise 4 (preparatory lesson) | |
| 22.8 Technical Exercise 4 | |
| 22.9 Technical Exercise 5 (preparatory lesson) | |
| 22.10 Technical Exercise 5 | |
| 22.11 Technical Exercises 1–5 (preparatory lesson) | |
| 22.12 Technical exercises 1–5 | |
23: Level 5: Singback |
|
| 23.1 6/8 Melodies | |
| 23.2 3/4 Melodies | |
| 23.3 6/8 and 3/4 melodies | |
24: Level 5: Intervals |
|
| 24.1 Ascending Intervals: minor and major 6ths | |
| 24.2 Ascending Interval: major 2nd (review) | |
| 24.3 Ascending Interval: minor and major 3rds (review) | |
| 24.4 Ascending Interval: major 6th (review) | |
| 24.5 Ascending Interval: minor 6th | |
| 24.6 Ascending Interval: minor 6th | |
| 24.7 Ascending Intervals: perfect 4th, perfect 5th, perfect octave (review) | |
| 24.8 Ascending intervals: all intervals | |
| 24.9 Ascending Intervals: all intervals | |
| 24.10 Ascending Intervals: all intervals | |
| 24.11 Descending intervals: minor and major 3rds | |
| 24.12 Descending intervals: major 2nd, minor and major 3rds | |
| 24.13 Descending intervals: minor and major 6ths | |
| 24.14 Descending Interval: minor 3rd (review) | |
| 24.15 Descending Interval: minor 6th (review) | |
| 24.16 Descending Interval: perfect 4th, perfect 5th, perfect octave (review) | |
| 24.17 Descending Interval: major 2nd | |
| 24.18 Descending Interval: major 2nd | |
| 24.19 Descending Interval: major 3rd | |
| 24.20 Descending Interval: major 3rd | |
| 24.21 Descending Interval: major 6th | |
| 24.22 Descending Interval: major 6th | |
| 24.23 Descending intervals: all intervals | |
| 24.24 Descending Intervals: all intervals | |
| 24.25 Descending Intervals: all intervals | |
| 24.26 All intervals | |
| 24.27 All intervals | |
25: Level 5: Chord Identification |
|
| 25.1 Major and Minor Triads: ascending/harmonic | |
| 25.2 Major and Minor Triads: harmonic | |
26: Level 5: Sight Singing |
|
| 26.1 3/4 Melodies: two measures | |
| 26.2 3/4 Melodies: two measures | |
| 26.3 3/4 Melodies: four measures | |
| 26.4 3/4 Melodies: four measures | |
| 26.5 2/4 Melodies: three measures | |
| 26.6 2/4 Melodies: three measures | |
| 26.7 2/4 Melodies: six measures | |
| 26.8 2/4 Melodies: six measures | |
| 26.9 2/4 and 3/4 Melodies | |
| 26.10 2/4 and 3/4 Melodies | |
27: Level 5: Final Step |
|
| 27.1 Technical Exercises | |
| 27.2 Singback | |
| 27.3 Intervals | |
| 27.4 Chord Identification | |
| 27.5 Sight Singing Part 1: rhythm | |
| 27.6 Sight Singing Part 2: melody | |
28: Level 6: Technical Exercises |
|
| 28.1 Technical Exercise 1 (preparatory lesson) | |
| 28.2 Technical Exercise 1 | |
| 28.3 Technical Exercise 2 (preparatory lesson) | |
| 28.4 Technical Exercise 2 | |
| 28.5 Technical Exercise 3 (preparatory lesson) | |
| 28.6 Technical Exercise 3 | |
| 28.7 Technical Exercise 4 (preparatory lesson) | |
| 28.8 Technical Exercise 4 | |
| 28.9 Technical Exercise 5 (preparatory lesson) | |
| 28.10 Technical Exercise 5 | |
| 28.11 Technical Exercise 6 (preparatory lesson) | |
| 28.12 Technical Exercise 6 | |
| 28.13 Technical Exercises 1–6 (preparatory lesson) | |
| 28.14 Technical Exercises 1–6 | |
29: Level 6: Singback |
|
| 29.1 6/8 Melodies (review) | |
| 29.2 3/4 Melodies (review) | |
| 29.3 6/8 melodies (short) | |
| 29.4 6/8 melodies | |
| 29.5 3/4 melodies (short) | |
| 29.6 3/4 melodies | |
| 29.7 6/8 and 3/4 melodies | |
30: Level 6: Intervals |
|
| 30.1 Ascending Intervals: minor and major 2nds | |
| 30.2 Ascending Intervals: minor and major 6ths, major 7th | |
| 30.3 Ascending interval: major 2nd (review) | |
| 30.4 Ascending Intervals: minor and major 3rds (review) | |
| 30.5 Ascending Intervals: minor and major 6ths (review) | |
| 30.6 Ascending Intervals: perfect 4th, perfect 5th, perfect octave (review) | |
| 30.7 Ascending Interval: minor 2nd | |
| 30.8 Ascending Interval: minor 2nd | |
| 30.9 Ascending Interval: minor 7th | |
| 30.10 Ascending Interval: minor 7th | |
| 30.11 Ascending intervals: all intervals | |
| 30.12 Ascending Intervals: all intervals | |
| 30.13 Ascending Intervals: all intervals | |
| 30.14 Descending intervals: minor and major 2nds | |
| 30.15 Descending intervals: minor and major 6ths, minor 7th | |
| 30.16 Descending Interval: major 2nd (review) | |
| 30.17 Descending intervals: minor and major 3rds (review) | |
| 30.18 Descending Intervals: minor and major 6ths (review) | |
| 30.19 Descending Intervals: perfect 4th, perfect 5th, perfect octave (review) | |
| 30.20 Descending Interval: minor 2nd | |
| 30.21 Descending Interval: minor 2nd | |
| 30.22 Descending Interval: minor 7th | |
| 30.23 Descending Interval: minor 7th | |
| 30.24 Descending intervals: all intervals | |
| 30.25 Descending Intervals: all intervals | |
| 30.26 Descending Intervals: all intervals | |
| 30.27 All intervals | |
| 30.28 All intervals | |
31: Level 6: Chord Identification |
|
| 31.1 Major and Minor Triads: harmonic (review) | |
| 31.2 Major and Minor Triads, Dominant 7th: ascending/harmonic | |
| 31.3 Major and Minor Triads, Dominant 7th: harmonic | |
32: Level 6: Sight Singing |
|
| 32.1 4/4 Melodies: two measures | |
| 32.2 4/4 Melodies: two measures | |
| 32.3 4/4 Melodies: four measures | |
| 32.4 4/4 Melodies: four measures | |
| 32.5 3/4 Melodies: three measures | |
| 32.6 3/4 Melodies: three measures | |
| 32.7 3/4 Melodies: six measures | |
| 32.8 3/4 Melodies: six measures | |
| 32.9 3/4 and 4/4 Melodies | |
| 32.10 3/4 and 4/4 Melodies | |
33: Level 6: Final Step |
|
| 33.1 Technical Exercises | |
| 33.2 Singback | |
| 33.3 Intervals | |
| 33.4 Chord Identification | |
| 33.5 Sight Singing Part 1: rhythm | |
| 33.6 Sight Singing Part 2: melody | |
34: Course wrap-up |
|
| 34.1 Congratulations! | |
RCM Voice |
|
1: Foreword |
|
| 1.1 Welcome | |
2: Preparatory: Technical Tests |
|
| 2.1 Technical Test 1 (Preparatory Lesson) | |
| 2.2 Technical Test 1 | |
| 2.3 Technical Test 2 (Preparatory Lesson) | |
| 2.4 Technical Test 2 | |
| 2.5 Technical Test 1–2 (Preparatory Lesson) | |
| 2.6 Technical Test 1–2 | |
3: Preparatory: Clapback |
|
| 3.1 Clapback: 4/4, One Bar | |
| 3.2 Clapback: 4/4, Two Bars | |
| 3.3 Clapback: 3/4, One Bar | |
| 3.4 Clapback: 3/4, Two Bars | |
| 3.5 Clapback: 3/4 and 4/4 Melody, Two Bars | |
4: Preparatory: Chords |
|
| 4.1 Chords: Major Triad Singback | |
| 4.2 Chords: Minor Triad Singback | |
| 4.3 Chords: Major & Minor Triads | |
5: Preparatory: Singback |
|
| 5.1 Singback: Major Scale, First Three Notes | |
| 5.2 Singback: Minor Scale, First Three Notes | |
| 5.3 Singback: Major & Minor Scales, First Three Notes | |
6: Preparatory: Sight-Reading |
|
| 6.1 Rhythm: 4/4, One Bar | |
| 6.2 Rhythm: 4/4, Two Bars | |
| 6.3 Melody: 4/4, Two Bars | |
7: Preparatory: Final Step |
|
| 7.1 Technical Tests | |
| 7.2 Clapback | |
| 7.3 Chords | |
| 7.4 Singback | |
| 7.5 Sight-Reading (Rhythm) | |
| 7.6 Sight-Reading (Melody) | |
8: Level 1: Technical Tests |
|
| 8.1 Technical Test 1 (Preparatory Lesson) | |
| 8.2 Technical Test 1 | |
| 8.3 Technical Test 2 (Preparatory Lesson) | |
| 8.4 Technical Test 2 | |
| 8.5 Technical Test 3 (Preparatory Lesson) | |
| 8.6 Technical Test 3 | |
| 8.7 Technical Test 4 (Preparatory Lesson) | |
| 8.8 Technical Test 4 | |
| 8.9 Technical Test 1–4 (Preparatory Lesson) | |
| 8.10 Technical Test 1–4 | |
9: Level 1: Clapback |
|
| 9.1 Clapback: 4/4, One Bar | |
| 9.2 Clapback: 4/4, Two Bars | |
| 9.3 Clapback: 3/4, One Bar | |
| 9.4 Clapback: 3/4, Two Bars | |
| 9.5 Clapback: 3/4 or 4/4 Melody | |
10: Level 1: Intervals |
|
| 10.1 Interval Identification: Major and Minor 3rd | |
| 10.2 Interval Singback: Major 3rd | |
| 10.3 Interval Singing: Major 3rd | |
| 10.4 Interval Singback: Minor 3rd | |
| 10.5 Interval Singing: Minor 3rd | |
| 10.6 Interval Singback: Major and Minor 3rd | |
| 10.7 Interval Singing: Major and Minor 3rd | |
11: Level 1: Chords |
|
| 11.1 Chords: Major Triad Singback | |
| 11.2 Chords: Minor Triad Singback | |
| 11.3 Chords: Major & Minor Triads | |
12: Level 1: Singback |
|
| 12.1 Singback: Major Scale, First Five Notes | |
| 12.2 Singback: Minor Scale, First Five Notes | |
| 12.3 Singback: Major & Minor Scales, First Five Notes | |
13: Level 1: Sight-Reading |
|
| 13.1 Rhythm: 4/4, One Bar | |
| 13.2 Rhythm: 4/4, Two Bars | |
| 13.3 Melody: 4/4, Two Bars | |
14: Level 1: Final Step |
|
| 14.1 Technical Tests | |
| 14.2 Clapback | |
| 14.3 Intervals (Interval ID) | |
| 14.4 Intervals (Interval Singing) | |
| 14.5 Chords | |
| 14.6 Singback | |
| 14.7 Sight-Reading (Rhythm) | |
| 14.8 Sight-Reading (Melody) | |
15: Level 2: Technical Tests |
|
| 15.1 Technical Test 1 (Preparatory Lesson) | |
| 15.2 Technical Test 1 | |
| 15.3 Technical Test 2 (Preparatory Lesson) | |
| 15.4 Technical Test 2 | |
| 15.5 Technical Test 3 (Preparatory Lesson) | |
| 15.6 Technical Test 3 | |
| 15.7 Technical Test 4 (Preparatory Lesson) | |
| 15.8 Technical Test 4 | |
| 15.9 Technical Test 5 (Preparatory Lesson) | |
| 15.10 Technical Test 5 | |
| 15.11 Technical Test 1–5 (Preparatory Lesson) | |
| 15.12 Technical Test 1–5 | |
16: Level 2: Clapback |
|
| 16.1 Clapback: 4/4, One Bar | |
| 16.2 Clapback: 4/4, Two Bars | |
| 16.3 Clapback: 3/4, One Bar | |
| 16.4 Clapback: 3/4, Two Bars | |
| 16.5 Clapback: 3/4 or 4/4 Melody | |
17: Level 2: Intervals |
|
| 17.1 Interval Identification: Major and Minor 3rd, Perfect 5th | |
| 17.2 Interval Singback: Major and Minor 3rd | |
| 17.3 Interval Singing: Major and Minor 3rd | |
| 17.4 Interval Singback: Perfect 5th | |
| 17.5 Interval Singing: Perfect 5ths | |
| 17.6 Interval Singback: All Intervals | |
| 17.7 Interval Singing: All Intervals | |
18: Level 2: Chords |
|
| 18.1 Chords: Major Triad Singback | |
| 18.2 Chords: Minor Triad Singback | |
| 18.3 Chords: Major & Minor Triads | |
19: Level 2: Singback |
|
| 19.1 Singback: Major | |
| 19.2 Singback: Minor | |
| 19.3 Singback: Major, Minor | |
20: Level 2: Sight-Reading |
|
| 20.1 Rhythm: 4/4, Two Bars | |
| 20.2 Rhythm: 4/4, Three Bars | |
| 20.3 Rhythm: 3/4, Two Bars | |
| 20.4 Rhythm: 3/4, Four Bars | |
| 20.5 Melody: 3/4 | |
| 20.6 Melody: 4/4 | |
| 20.7 Melody: 3/4 and 4/4 | |
21: Level 2: Final Step |
|
| 21.1 Technical Tests | |
| 21.2 Clapback | |
| 21.3 Intervals (Interval ID) | |
| 21.4 Intervals (Interval Singing) | |
| 21.5 Chords | |
| 21.6 Singback | |
| 21.7 Sight-Reading (Rhythm: 4/4) | |
| 21.8 Sight-Reading (Rhythm: 3/4) | |
| 21.9 Sight-Reading (Melody) | |
22: Level 3: Technical Tests |
|
| 22.1 Technical Test 1 (Preparatory Lesson) | |
| 22.2 Technical Test 1 | |
| 22.3 Technical Test 2 (Preparatory Lesson) | |
| 22.4 Technical Test 2 | |
| 22.5 Technical Test 3 (Preparatory Lesson) | |
| 22.6 Technical Test 3 | |
| 22.7 Technical Test 4 (Preparatory Lesson) | |
| 22.8 Technical Test 4 | |
| 22.9 Technical Test 5 (Preparatory Lesson) | |
| 22.10 Technical Test 5 | |
| 22.11 Technical Test 1–5 (Preparatory Lesson) | |
| 22.12 Technical Test 1–5 | |
23: Level 3: Clapback |
|
| 23.1 Clapback: 4/4, One Bar | |
| 23.2 Clapback: 4/4, Two Bars | |
| 23.3 Clapback: 3/4, One Bar | |
| 23.4 Clapback: 3/4, Two Bars | |
| 23.5 Clapback: 3/4 or 4/4 Melody | |
24: Level 3: Intervals |
|
| 24.1 Interval Identification: Major and Minor 3rd | |
| 24.2 Interval Identification: Perfect 4th, Perfect 5th | |
| 24.3 Interval Identification: All Intervals | |
| 24.4 Interval Singback: Perfect 5th | |
| 24.5 Interval Singing: Perfect 5ths | |
| 24.6 Interval Singback: Perfect Fourth | |
| 24.7 Interval Singing: Perfect Fourth | |
| 24.8 Interval Singback: Perfect 4th, Perfect 5th | |
| 24.9 Interval Singing: Perfect 4th, Perfect 5th | |
| 24.10 Interval Singback: All Intervals | |
| 24.11 Interval Singing: All Intervals | |
25: Level 3: Chords |
|
| 25.1 Chords: Major Triad Singback | |
| 25.2 Chords: Minor Triad Singback | |
| 25.3 Chords: Major & Minor Triads | |
| 25.4 Chords: Chord Tone Identification | |
26: Level 3: Singback |
|
| 26.1 Singback: 3/4 - Major | |
| 26.2 Singback: 4/4 - Major | |
| 26.3 Singback: 3/4, 4/4 - Major | |
| 26.4 Singback: 3/4 - Minor | |
| 26.5 Singback: 4/4 - Minor | |
| 26.6 Singback: 3/4, 4/4 - Minor | |
| 26.7 Singback: 3/4, 4/4 - Major, Minor | |
27: Level 3: Sight-Reading |
|
| 27.1 Rhythm: 4/4, Two Bars | |
| 27.2 Rhythm: 4/4, Four Bars | |
| 27.3 Rhythm: 3/4, Two Bars | |
| 27.4 Rhythm: 3/4, Four Bars | |
| 27.5 Melody: 3/4 | |
| 27.6 Melody: 4/4 | |
| 27.7 Melody: 3/4 and 4/4 | |
28: Level 3: Final Step |
|
| 28.1 Technical Tests | |
| 28.2 Clapback | |
| 28.3 Intervals (Interval ID) | |
| 28.4 Intervals (Interval Singing) | |
| 28.5 Chords (Chord ID) | |
| 28.6 Chords (Chord Tone ID) | |
| 28.7 Singback | |
| 28.8 Sight-Reading (Rhythm: 4/4) | |
| 28.9 Sight-Reading (Rhythm: 3/4) | |
| 28.10 Sight-Reading (Melody) | |
29: Level 4: Technical Tests |
|
| 29.1 Technical Test 1 (Preparatory Lesson) | |
| 29.2 Technical Test 1 | |
| 29.3 Technical Test 2 (Preparatory Lesson) | |
| 29.4 Technical Test 2 | |
| 29.5 Technical Test 3 (Preparatory Lesson) | |
| 29.6 Technical Test 3 | |
| 29.7 Technical Test 4 (Preparatory Lesson) | |
| 29.8 Technical Test 4 | |
| 29.9 Technical Test 5 (Preparatory Lesson) | |
| 29.10 Technical Test 5 | |
| 29.11 Technical Test 1–5 (Preparatory Lesson) | |
| 29.12 Technical Test 1–5 | |
30: Level 4: Clapback |
|
| 30.1 Clapback: 4/4, One Bar | |
| 30.2 Clapback: 4/4, Two Bars | |
| 30.3 Clapback: 3/4, Two Bars | |
| 30.4 Clapback: 3/4, Four Bars | |
| 30.5 Clapback: 6/8, One Bar | |
| 30.6 Clapback: 6/8, Two Bars | |
| 30.7 Clapback: 3/4, 4/4, or 6/8 Melody | |
31: Level 4: Intervals |
|
| 31.1 Interval Identification: Major and Minor 3rd | |
| 31.2 Interval Identification: Perfect 4th, Perfect 5th, 8ve | |
| 31.3 Interval Identification: All Intervals | |
| 31.4 Interval Singback: 8ve | |
| 31.5 Interval Singing: 8ve | |
| 31.6 Interval Singback: Perfect 4th, Perfect 5th, 8ve | |
| 31.7 Interval Singing: Perfect 4th, Perfect 5th, 8ve | |
| 31.8 Interval Singback: All Intervals | |
| 31.9 Interval Singing: All Intervals | |
32: Level 4: Chords |
|
| 32.1 Chords: major triad singback | |
| 32.2 Chords: minor triad singback | |
| 32.3 Chords: major & minor triads | |
| 32.4 Chords: chord tone identification | |
33: Level 4: Singback |
|
| 33.1 Singback: 3/4 - Major | |
| 33.2 Singback: 4/4 - Major | |
| 33.3 Singback: 3/4, 4/4 - Major | |
| 33.4 Singback: 3/4 - Minor | |
| 33.5 Singback: 4/4 - Minor | |
| 33.6 Singback: 3/4, 4/4 - Minor | |
| 33.7 Singback: 3/4, 4/4 - Major, Minor | |
34: Level 4: Sight-Reading |
|
| 34.1 Rhythm: 4/4, Two Bars | |
| 34.2 Rhythm: 4/4, Four Bars | |
| 34.3 Rhythm: 3/4, Two Bars | |
| 34.4 Rhythm: 3/4, Four Bars | |
| 34.5 Melody: 3/4 | |
| 34.6 Melody: 4/4 | |
| 34.7 Melody: 3/4 and 4/4 | |
35: Level 4: Final Step |
|
| 35.1 Technical Tests | |
| 35.2 Clapback | |
| 35.3 Intervals (Interval ID) | |
| 35.4 Intervals (Interval singing) | |
| 35.5 Chords (Chord ID) | |
| 35.6 Chords (Chord tone ID) | |
| 35.7 Singback | |
| 35.8 Sight-Singing (Rhythm: 4/4) | |
| 35.9 Sight-Reading (Rhythm: 3/4) | |
| 35.10 Sight-Reading (Melody) | |
36: Level 5: Technical Tests |
|
| 36.1 Technical Test 1 (Preparatory Lesson) | |
| 36.2 Technical Test 1 | |
| 36.3 Technical Test 2 (Preparatory Lesson) | |
| 36.4 Technical Test 2 | |
| 36.5 Technical Test 3 (Preparatory Lesson) | |
| 36.6 Technical Test 3 | |
| 36.7 Technical Test 4 (Preparatory Lesson) | |
| 36.8 Technical Test 4 | |
| 36.9 Technical Test 5 (Preparatory Lesson) | |
| 36.10 Technical Test 5 | |
| 36.11 Technical Test 6 (Preparatory Lesson) | |
| 36.12 Technical Test 6 | |
| 36.13 Technical Test 7 (Preparatory Lesson) | |
| 36.14 Technical Test 7 | |
| 36.15 Technical Test 1–7 (Preparatory Lesson) | |
| 36.16 Technical Test 1–7 | |
37: Level 5: Intervals |
|
| 37.1 Interval Identification: major and minor 3rd | |
| 37.2 Interval Identification: perfect 4th, perfect 5th, 8ve | |
| 37.3 Interval Identification: major and minor 6th | |
| 37.4 Interval Identification: All Intervals | |
| 37.5 Interval Singback: major 6th | |
| 37.6 Interval Singing: major 6th | |
| 37.7 Interval Singback: minor 6th | |
| 37.8 Interval Singing: minor 6th | |
| 37.9 Interval Singback: major and minor 6th | |
| 37.10 Interval Singing: major and minor 6th | |
| 37.11 Interval Singback: perfect 4th, perfect 5th, 8ve | |
| 37.12 Interval Singing: perfect 4th, perfect 5th, 8ve | |
| 37.13 Interval Singback: All Intervals | |
| 37.14 Interval Singing: All Intervals | |
38: Level 5: Chords |
|
| 38.1 Chords: major triad singback | |
| 38.2 Chords: minor triad singback | |
| 38.3 Chords: dominant 7th singback | |
| 38.4 Chords: major & minor triads, dominant 7th | |
39: Level 5: Chord Progressions |
|
| 39.1 I-IV-I and I-V-I, major key | |
40: Level 5: Singback |
|
| 40.1 Singback: 3/4 - Major | |
| 40.2 Singback: 4/4 - Major | |
| 40.3 Singback: 3/4, 4/4, Major | |
| 40.4 Singback: 3/4 - Minor | |
| 40.5 Singback: 4/4 - Minor | |
| 40.6 Singback: 3/4, 4/4 - Minor | |
| 40.7 Singback: 3/4, 4/4 - Major, Minor | |
41: Level 5: Sight-Reading |
|
| 41.1 Melody: 3/4 - Major | |
| 41.2 Melody: 4/4 - Major | |
| 41.3 Melody: 6/8 - Major | |
| 41.4 Melody: 3/4, 4/4, 6/8 - Major | |
| 41.5 Melody: 3/4 - Minor | |
| 41.6 Melody: 4/4 - Minor | |
| 41.7 Melody: 6/8 - Minor | |
| 41.8 Melody: 3/4, 4/4, 6/8 - Minor | |
| 41.9 Melody: 3/4, 4/4, 6/8 - Major , Minor | |
42: Level 5: Final Step |
|
| 42.1 Technical Tests | |
| 42.2 Intervals (Interval ID) | |
| 42.3 Intervals (Interval Singing) | |
| 42.4 Chords | |
| 42.5 Chord Progressions | |
| 42.6 Singback | |
| 42.7 Sight-Reading | |
43: Level 6: Technical Tests |
|
| 43.1 Technical Test 1 (Preparatory Lesson) | |
| 43.2 Technical Test 1 | |
| 43.3 Technical Test 2 (Preparatory Lesson) | |
| 43.4 Technical Test 2 | |
| 43.5 Technical Test 3 (Preparatory Lesson) | |
| 43.6 Technical Test 3 | |
| 43.7 Technical Test 4 (Preparatory Lesson) | |
| 43.8 Technical Test 4 | |
| 43.9 Technical Test 5 (Preparatory Lesson) | |
| 43.10 Technical Test 5 | |
| 43.11 Technical Test 6 (Preparatory Lesson) | |
| 43.12 Technical Test 6 | |
| 43.13 Technical Test 7 (Preparatory Lesson) | |
| 43.14 Technical Test 7 | |
| 43.15 Technical Test 8 (Preparatory Lesson) | |
| 43.16 Technical Test 8 | |
| 43.17 Technical Test 1–8 (Preparatory Lesson) | |
| 43.18 Technical Test 1–8 | |
44: Level 6: Intervals |
|
| 44.1 Interval Identification: major and minor 3rd | |
| 44.2 Interval Identification: perfect 4th, perfect 5th, 8ve | |
| 44.3 Interval Identification: major and minor 6th | |
| 44.4 Interval Identification: major and minor 2nd | |
| 44.5 Interval Identification: All Intervals | |
| 44.6 Interval Singback: major 2nd | |
| 44.7 Interval Singing: major 2nd | |
| 44.8 Interval Singback: minor 2nd | |
| 44.9 Interval Singing: minor 2nd | |
| 44.10 Interval Singback: major and minor 2nd | |
| 44.11 Interval Singing: major and minor 2nd | |
| 44.12 Interval Singback: major and minor 2nd, major and minor 3rd, perfect 4th | |
| 44.13 Interval Singing: major and minor 2nd, major and minor 3rd, perfect 4th | |
| 44.14 Interval Singback: perfect 5th, major and minor 6th, 8ve | |
| 44.15 Interval Singing: perfect 4th, perfect 5th, 8ve | |
| 44.16 Interval Singback: All Intervals | |
| 44.17 Interval Singing: All Intervals | |
45: Level 6: Chords |
|
| 45.1 Chords: major triad singback | |
| 45.2 Chords: minor triad singback | |
| 45.3 Chords: dominant 7th singback | |
| 45.4 Chords: diminished 7th singback | |
| 45.5 Chords: major & minor triads, dominant & diminished 7th | |
46: Level 6: Chord Progressions |
|
| 46.1 I-IV-I and I-V-I, major key | |
| 46.2 i-iv-i and i-V-i, minor key | |
| 46.3 All chord progressions | |
47: Level 6: Singback |
|
| 47.1 Singback: 3/4 - Major | |
| 47.2 Singback: 4/4 - Major | |
| 47.3 Singback: 3/4, 4/4 - Major | |
| 47.4 Singback: 3/4 - Minor | |
| 47.5 Singback: 4/4 - Minor | |
| 47.6 Singback: 3/4, 4/4 - Minor | |
| 47.7 Singback: 3/4, 4/4 - Major, Minor | |
48: Level 6: Sight-Reading |
|
| 48.1 Melody: 2/4 - Major | |
| 48.2 Melody: 3/4 - Major | |
| 48.3 Melody: 4/4 - Major | |
| 48.4 Melody: 6/8 - Major | |
| 48.5 Melody: 2/4, 3/4, 4/4, 6/8 - Major | |
| 48.6 Melody: 2/4 - Minor | |
| 48.7 Melody: 3/4 - Minor | |
| 48.8 Melody: 4/4 - Minor | |
| 48.9 Melody: 6/8 - Minor | |
| 48.10 Melody: 2/4, 3/4, 4/4, 6/8 - Minor | |
| 48.11 Melody: 2/4, 3/4, 4/4, 6/8 - Major, Minor | |
49: Level 6: Final Step |
|
| 49.1 Technical Tests | |
| 49.2 Intervals (Interval ID) | |
| 49.3 Intervals (Interval Singing) | |
| 49.4 Chords | |
| 49.5 Chord Progressions | |
| 49.6 Singback | |
| 49.7 Sight-Reading | |
50: Level 7: Technical Tests |
|
| 50.1 Technical Test 1 (Preparatory Lesson) | |
| 50.2 Technical Test 1 | |
| 50.3 Technical Test 2 (Preparatory Lesson) | |
| 50.4 Technical Test 2 | |
| 50.5 Technical Test 3 (Preparatory Lesson) | |
| 50.6 Technical Test 3 | |
| 50.7 Technical Test 4 (Preparatory Lesson) | |
| 50.8 Technical Test 4 | |
| 50.9 Technical Test 5 (Preparatory Lesson) | |
| 50.10 Technical Test 5 | |
| 50.11 Technical Test 6 (Preparatory Lesson) | |
| 50.12 Technical Test 6 | |
| 50.13 Technical Test 7 (Preparatory Lesson) | |
| 50.14 Technical Test 7 | |
| 50.15 Technical Test 8 | |
| 50.16 Technical Test 1–7 (Preparatory Lesson) | |
| 50.17 Technical Test 1–7 | |
51: Level 7: Intervals |
|
| 51.1 Interval Identification: major and minor 2nd | |
| 51.2 Interval Identification: major and minor 3rd | |
| 51.3 Interval Identification: perfect 4th, perfect 5th, 8ve | |
| 51.4 Interval Identification: major and minor 6th | |
| 51.5 Interval Identification: major and minor 7th | |
| 51.6 Interval Identification: All Intervals | |
| 51.7 Interval Singback: major 7th | |
| 51.8 Interval Singing: major 7th | |
| 51.9 Interval Singback: minor 7th | |
| 51.10 Interval Singing: minor 7th | |
| 51.11 Interval Singback: major and minor 7th | |
| 51.12 Interval Singing: major and minor 7th | |
| 51.13 Interval Singback: major and minor 2nd, major and minor 3rd, perfect 4th, perfect 5th | |
| 51.14 Interval Singing: major and minor 2nd, major and minor 3rd, perfect 4th, perfect 5th | |
| 51.15 Interval Singback: major and minor 6th, major and minor 7th, 8ve | |
| 51.16 Interval Singing: major and minor 6th, major and minor 7th, 8ve | |
| 51.17 Interval Singback: All Intervals | |
| 51.18 Interval Singing: All Intervals | |
52: Level 7: Chords |
|
| 52.1 Chords: major triad singback | |
| 52.2 Chords: minor triad singback | |
| 52.3 Chords: augmented triad singback | |
| 52.4 Chords: dominant 7th singback | |
| 52.5 Chords: diminished 7th singback | |
| 52.6 Chords: Major, Minor & Augmented Triads - Dominant & Diminished 7th | |
53: Level 7: Chord Progressions |
|
| 53.1 I-IV-I, I-V-I, I-IV-V, major key | |
| 53.2 i-iv-i and i-V-i, i-iv-V, minor key | |
| 53.3 All chord progressions | |
54: Level 7: Singback |
|
| 54.1 Singback: 2/4 - Major | |
| 54.2 Singback: 3/4 - Major | |
| 54.3 Singback: 6/8 - Major | |
| 54.4 Singback: 2/4, 3/4, 6/8 - Major | |
| 54.5 Singback: 2/4 - Minor | |
| 54.6 Singback: 3/4 - Minor | |
| 54.7 Singback: 6/8 - Minor | |
| 54.8 Singback: 2/4, 3/4, 6/8 - Minor | |
| 54.9 Singback: 2/4, 3/4, 6/8 - Major, Minor | |
55: Level 7: Sight-Reading |
|
| 55.1 Melody: 2/4 - Major | |
| 55.2 Melody: 3/4 - Major | |
| 55.3 Melody: 4/4 - Major | |
| 55.4 Melody: 6/8 - Major | |
| 55.5 Melody: 2/4, 3/4, 4/4, 6/8 - Major | |
| 55.6 Melody: 2/4 - Minor | |
| 55.7 Melody: 3/4 - Minor | |
| 55.8 Melody: 4/4 - Minor | |
| 55.9 Melody: 6/8 - Minor | |
| 55.10 Melody: 2/4, 3/4, 4/4, 6/8 - Minor | |
| 55.11 Melody: 2/4, 3/4, 4/4, 6/8 - Major, Minor | |
56: Level 7: Final Step |
|
| 56.1 Technical Tests | |
| 56.2 Intervals (Interval ID) | |
| 56.3 Intervals (Interval singing) | |
| 56.4 Chords | |
| 56.5 Chord Progressions | |
| 56.6 Singback | |
| 56.7 Sight-Singing | |
57: Level 8: Technical Tests |
|
| 57.1 Technical Test 1 (Preparatory Lesson) | |
| 57.2 Technical Test 1 | |
| 57.3 Technical Test 2 (Preparatory Lesson) | |
| 57.4 Technical Test 2 | |
| 57.5 Technical Test 3 (Preparatory Lesson) | |
| 57.6 Technical Test 3 | |
| 57.7 Technical Test 4 (Preparatory Lesson) | |
| 57.8 Technical Test 4 | |
| 57.9 Technical Test 5 (Preparatory Lesson) | |
| 57.10 Technical Test 5 | |
| 57.11 Technical Test 6 (Preparatory Lesson) | |
| 57.12 Technical Test 6 | |
| 57.13 Technical Test 7 (Preparatory Lesson) | |
| 57.14 Technical Test 7 | |
| 57.15 Technical Test 8 (Preparatory Lesson) | |
| 57.16 Technical Test 8 | |
| 57.17 Technical Test 1–8 (Preparatory Lesson) | |
| 57.18 Technical Test 1–8 | |
58: Level 8: Intervals |
|
| 58.1 Interval Identification: perfect 4th, augmented 4th/diminished 5th, perfect 5th | |
| 58.2 Interval Identification: Major and Minor 2nd, Major and Minor 3rd | |
| 58.3 Interval Identification: Major and Minor 6th, Major and Minor 7th | |
| 58.4 Interval Identification: All Intervals | |
| 58.5 Interval Singback: Augmented 4th/Diminished 5th | |
| 58.6 Interval Singing: Augmented 4th/Diminished 5th | |
| 58.7 Interval Singback: Perfect 4th, Augmented 4th/Diminished 5th, Perfect 5th | |
| 58.8 Interval Singing: Perfect 4th, Augmented 4th/Diminished 5th, Perfect 5th | |
| 58.9 Interval Singback: Major and Minor 2nd, Major and Minor 3rd | |
| 58.10 Interval Singing: Major and Minor 2nd, Major and Minor 3rd | |
| 58.11 Interval Singback: Major and Minor 6th, Major and Minor 7th, Octave | |
| 58.12 Interval Singing: Major And Minor 6th, Major and Minor 7th, 8ve | |
| 58.13 Interval Singback: All Intervals | |
| 58.14 Interval Singing: All Intervals | |
59: Level 8: Chords |
|
| 59.1 Chords: Major Triad Singback | |
| 59.2 Chords: Minor Triad Singback | |
| 59.3 Chords: Augmented Triad Singback | |
| 59.4 Chords: Dominant 7th Singback | |
| 59.5 Chords: Diminished 7th Singback | |
| 59.6 Chords: Major, Minor & Augmented Triads - Dominant & Diminished 7th | |
60: Level 8: Chord Progressions |
|
| 60.1 I-IV-V-I and I-IV-V-vi, Major Key | |
| 60.2 i-iv-V-i and i-iv-V-vi, Minor Key | |
| 60.3 I-vi-IV-V and I-vi-IV-I, Major Keyy | |
| 60.4 i-vi-iv-V and i-vi-iv-i, Minor Key | |
| 60.5 All Chord Progressions | |
61: Level 8: Singback |
|
| 61.1 Singback: 2/4 - Major | |
| 61.2 Singback: 3/4 - Major | |
| 61.3 Singback: 4/4 - Major | |
| 61.4 Singback: 6/8 - Major | |
| 61.5 Singback: 2/4, 3/4, 4/4, 6/8 - Major | |
| 61.6 Singback: 2/4 - Minor | |
| 61.7 Singback: 3/4 - Minor | |
| 61.8 Singback: 4/4 - Minor | |
| 61.9 Singback: 6/8 - Minor | |
| 61.10 Singback: 2/4, 3/4, 4/4, 6/8 - Minor | |
| 61.11 Singback: 2/4, 3/4, 4/4, 6/8 - Major, Minor | |
62: Level 8: Sight-Reading |
|
| 62.1 Melody: 2/4 - Major | |
| 62.2 Melody: 3/4 - Major | |
| 62.3 Melody: 4/4 - Major | |
| 62.4 Melody: 6/8 - Major | |
| 62.5 Melody: 2/4, 3/4, 4/4, 6/8 - Major | |
| 62.6 Melody: 2/4 - Minor | |
| 62.7 Melody: 3/4 - Minor | |
| 62.8 Melody: 4/4 - Minor | |
| 62.9 Melody: 6/8 - Minor | |
| 62.10 Melody: 2/4, 3/4, 4/4, 6/8 - Minor | |
| 62.11 Melody: 2/4, 3/4, 4/4, 6/8 - Major, Minor | |
63: Level 8: Final Step |
|
| 63.1 Technical Tests | |
| 63.2 Intervals (Interval ID) | |
| 63.3 Intervals (Interval singing) | |
| 63.4 Chord ID | |
| 63.5 Chord Progressions | |
| 63.6 Singback | |
| 63.7 Sight-Reading | |
| 63.8 Congratulations! | |
General Workshops - Chord Identification |
|
1: Identify the Major & the Minor Chords |
|
| 1.1 Major & Minor - Ascending | |
| 1.2 Major & Minor - Descending | |
| 1.3 Major & Minor - Harmonic | |
| 1.4 Major & Minor - Harmonic, Ascending & Descending | |
2: Identify the Major, Minor & Sus4 Chords |
|
| 2.1 Major, Minor & Sus4 - Ascending | |
| 2.2 Major, Minor & Sus4 - Descending | |
| 2.3 Major, Minor & Sus4 - Harmonic | |
| 2.4 Major, Minor & Sus4 - Harmonic, Ascending & Descending | |
3: Major Chords with Alternating 5th |
|
| 3.1 Major, Major(b5) & Aug - Ascending | |
| 3.2 Major, Major(b5) & Aug - Descending | |
| 3.3 Major, Major(b5) & Aug - Harmonic | |
| 3.4 Major, Major(b5) & Aug - Harmonic, Ascending & Descending | |
4: Identify the Minor & the Minor(b5) Chords |
|
| 4.1 Minor & Dim - Ascending | |
| 4.2 Minor & Dim - Descending | |
| 4.3 Minor & Dim - Harmonic | |
| 4.4 Minor & Dim - Harmonic, Ascending & Descending | |
5: Identify the Sus Chords |
|
| 5.1 Sus2 & Sus4 - Ascending | |
| 5.2 Sus2 & Sus4 - Descending | |
| 5.3 Sus2 & Sus4 - Harmonic | |
| 5.4 Sus2 & Sus4 - Harmonic, Ascending & Descending | |
6: Triads with an Altered 5th |
|
| 6.1 Dim, Major(b5) & Aug - Ascending | |
| 6.2 Dim, Major(b5) & Aug - Descending | |
| 6.3 Dim, Major(b5) & Aug - Harmonic | |
| 6.4 Dim, Major(b5) & Aug - Harmonic, Ascending & Descending | |
7: Identify All Triads |
|
| 7.1 Major, Minor, Dim, Major(b5), Aug, Sus2 & Sus4 - Ascending | |
| 7.2 Major, Minor, Dim, Major(b5), Aug, Sus2 & Sus4 - Descending | |
| 7.3 Major, Minor, Dim, Major(b5), Aug, Sus2 & Sus4 - Harmonic | |
| 7.4 Major, Minor, Dim, Major(b5), Aug, Sus2 & Sus4 - Harmonic, Ascending & Descending | |
8: Major Triad with an Added Chord Tone |
|
| 8.1 7, Maj7 & Add6 - Ascending | |
| 8.2 7, Maj7 & Add6 - Descending | |
| 8.3 7, Maj7 & Add6 - Harmonic | |
| 8.4 7, Maj7 & Add6 - Harmonic, Ascending & Descending | |
9: Minor Triad with an Added Chord Tone |
|
| 9.1 Mi7, Mi,maj7 & Mi,add6 - Ascending | |
| 9.2 Mi7, Mi,maj7 & Mi,add6 - Descending | |
| 9.3 Mi7, Mi,maj7 & Mi,add6 - Harmonic | |
| 9.4 Mi7, Mi,maj7 & Mi,add6 - Harmonic, Ascending & Descending | |
10: Minor(b5) with an Added Chord Tone |
|
| 10.1 Dim7, Mi7(b5) & dim,maj7 - Ascending | |
| 10.2 Dim7, Mi7(b5) & dim,maj7 - Descending | |
| 10.3 Dim7, Mi7(b5) & dim,maj7 - Harmonic | |
| 10.4 Dim7, Mi7(b5) & dim,maj7 - Harmonic, Ascending & Descending | |
11: Major(b5) with an Added Chord Tone |
|
| 11.1 7(b5) & maj7(b5) - Ascending | |
| 11.2 7(b5) & maj7(b5) - Descending | |
| 11.3 7(b5) & maj7(b5) - Harmonic | |
| 11.4 7(b5) & maj7(b5) - Harmonic, Ascending & Descending | |
12: Major(#5) with an Added Chord Tone |
|
| 12.1 7(#5) & maj7(#5) - Ascending | |
| 12.2 7(#5) & maj7(#5) - Descending | |
| 12.3 7(#5) & maj7(#5) - Harmonic | |
| 12.4 7(#5) & maj7(#5) - Harmonic, Ascending & Descending | |
13: Sus Triads with an Added Minor 7th |
|
| 13.1 7(sus4) & 7(sus2) - Ascending | |
| 13.2 7(sus4) & 7(sus2) - Descending | |
| 13.3 7(sus4) & 7(sus2) - Harmonic | |
| 13.4 7(sus4) & 7(sus2) - Harmonic, Ascending & Descending | |
14: Sus Triads with an Added Major 7th |
|
| 14.1 maj7(sus2) & maj7(sus4) - Ascending | |
| 14.2 maj7(sus2) & maj7(sus4) - Descending | |
| 14.3 maj7(sus2) & maj7(sus4) - Harmonic | |
| 14.4 maj7(sus2) & maj7(sus4) - Harmonic, Ascending & Descending | |
15: Sus Seventh Chords |
|
| 15.1 7(sus4), 7(sus2), maj7(sus2) & maj7(sus4) - Ascending | |
| 15.2 7(sus4), 7(sus2), maj7(sus2) & maj7(sus4) - Descending | |
| 15.3 7(sus4), 7(sus2), maj7(sus2) & maj7(sus4) - Harmonic | |
| 15.4 7(sus4), 7(sus2), maj7(sus2) & maj7(sus4) - Harmonic, Ascending & Descending | |
16: Maj7 Chords with a Perfect or Altered 5th |
|
| 16.1 Maj7, maj7(b5) & maj7(#5) - Ascending | |
| 16.2 Maj7, maj7(b5) & maj7(#5) - Descending | |
| 16.3 Maj7, maj7(b5) & maj7(#5) - Harmonic | |
| 16.4 Maj7, maj7(b5) & maj7(#5) - Harmonic, Ascending & Descending | |
17: 7th Chords with a Perfect or Altered 5th |
|
| 17.1 7, 7(b5) & 7(#5) - Ascending | |
| 17.2 7, 7(b5) & 7(#5) - Descending | |
| 17.3 7, 7(b5) & 7(#5) - Harmonic | |
| 17.4 7, 7(b5) & 7(#5) - Harmonic, Ascending & Descending | |
18: Minor7 and Maj7 Chords with a Perfect or Altered 5th |
|
| 18.1 Mi7, Mi,maj7, Dim7, Mi7(b5) & dim,maj7 - Ascending | |
| 18.2 Mi7, Mi,maj7, Dim7, Mi7(b5) & dim,maj7 - Descending | |
| 18.3 Mi7, Mi,maj7, Dim7, Mi7(b5) & dim,maj7 - Harmonic | |
| 18.4 Mi7, Mi,maj7, Dim7, Mi7(b5) & dim,maj7 - Harmonic, Ascending & Descending | |
19: All the Maj7 Chords |
|
| 19.1 All the Maj7 chords - Ascending | |
| 19.2 All the Maj7 chords - Descending | |
| 19.3 All the Maj7 chords - Harmonic | |
| 19.4 All the Maj7 chords - Harmonic, Ascending & Descending | |
20: All Chords with a Minor 7th |
|
| 20.1 All chords with a minor 7th - Ascending | |
| 20.2 All chords with a minor 7th - Descending | |
| 20.3 All chords with a minor 7th - Harmonic | |
| 20.4 All chords with a minor 7th - Harmonic, Ascending & Descending | |
21: Chords with a Major 6th or Diminished 7 |
|
| 21.1 Dim7, Add6 & Mi,add6 - Ascending | |
| 21.2 Dim7, Add6 & Mi,add6 - Descending | |
| 21.3 Dim7, Add6 & Mi,add6 - Harmonic | |
| 21.4 Dim7, Add6 & Mi,add6 - Harmonic, Ascending & Descending | |
22: All 7th Chords |
|
| 22.1 All 7th chords - Ascending | |
| 22.2 All 7th chords - Descending | |
| 22.3 All 7th chords - Harmonic | |
| 22.4 All 7th chords - Harmonic, Ascending & Descending | |
General Workshops - Chord Inversions |
|
1: Module 1 |
|
| 1.1 Inversions of the Major chord - Ascending | |
| 1.2 Inversions of the Major chord - Descending | |
| 1.3 Inversions of the Major chord - Harmonic | |
| 1.4 Inversions of the Major chord - Harmonic, Ascending & Descending | |
2: Module 2 |
|
| 2.1 Inversions of the Minor chord - Ascending | |
| 2.2 Inversions of the Minor chord - Descending | |
| 2.3 Inversions of the Minor chord - Harmonic | |
| 2.4 Inversions of the Minor chord - Harmonic, Ascending & Descending | |
3: Module 3 |
|
| 3.1 Inversions of the Sus4 chord - Ascending | |
| 3.2 Inversions of the Sus4 chord - Descending | |
| 3.3 Inversions of the Sus4 chord - Harmonic | |
| 3.4 Inversions of the Sus4 chord - Harmonic, Ascending & Descending | |
4: Module 4 |
|
| 4.1 Inversions of the Major(b5) chord - Ascending | |
| 4.2 Inversions of the Major(b5) chord - Descending | |
| 4.3 Inversions of the Major(b5) chord - Harmonic | |
| 4.4 Inversions of the Major(b5) chord - Harmonic, Ascending & Descending | |
5: Module 5 |
|
| 5.1 Inversions of the Dim chord - Ascending | |
| 5.2 Inversions of the Dim chord - Descending | |
| 5.3 Inversions of the Dim chord - Harmonic | |
| 5.4 Inversions of the Dim chord - Harmonic, Ascending & Descending | |
6: Major with Perfect or Altered 5th |
|
| 6.1 Major, Aug & Major(b5) - Ascending | |
| 6.2 Major, Aug & Major(b5) - Descending | |
| 6.3 Major, Aug & Major(b5) - Harmonic | |
| 6.4 Major, Aug & Major(b5) - Harmonic, Ascending & Descending | |
7: Minor with Perfect or Altered 5th |
|
| 7.1 Inversions of the Minor & Dim chords - Ascending | |
| 7.2 Inversions of the Minor & Dim chords - Descending | |
| 7.3 Inversions of the Minor & Dim chords - Harmonic | |
| 7.4 Inversions of the Minor & Dim chords - Harmonic, Ascending & Descending | |
8: Minor & Major with Altered 5th |
|
| 8.1 Inversions of the Dim, Aug & Major(b5) chords - Ascending | |
| 8.2 Inversions of the Dim, Aug & Major(b5) chords - Descending | |
| 8.3 Inversions of the Dim, Aug & Major(b5) chords - Harmonic | |
| 8.4 Inversions of the Dim, Aug & Major(b5) chords - Harmonic, Ascending & Descending | |
9: All the Triads |
|
| 9.1 Major, Minor, Dim, Aug, Sus4 & Major(b5) - Ascending | |
| 9.2 Major, Minor, Dim, Aug, Sus4 & Major(b5) - Descending | |
| 9.3 Major, Minor, Dim, Aug, Sus4 & Major(b5) - Harmonic | |
| 9.4 Major, Minor, Dim, Aug, Sus4 & Major(b5) - Harmonic, Ascending & Descending | |
10: Module 10 |
|
| 10.1 Inversions of the Maj7 & 7 chords - Ascending | |
| 10.2 Inversions of the Maj7 & 7 chords - Descending | |
| 10.3 Inversions of the Maj7 & 7 chords - Harmonic | |
| 10.4 Inversions of the Maj7 & 7 chords - Harmonic, Ascending & Descending | |
11: Module 11 |
|
| 11.1 Inversions of the Mi7 & Mi,maj7 chords - Ascending | |
| 11.2 Inversions of the Mi7 & Mi,maj7 chords - Descending | |
| 11.3 Inversions of the Mi7 & Mi,maj7 chords - Harmonic | |
| 11.4 Inversions of the Mi7 & Mi,maj7 chords - Harmonic, Ascending & Descending | |
12: Module 12 |
|
| 12.1 Inversions of the Mi7(b5), Dim7 & chords - Ascending | |
| 12.2 Inversions of the Mi7(b5), Dim7 & chords - Descending | |
| 12.3 Inversions of the Mi7(b5), Dim7 & chords - Harmonic | |
| 12.4 Inversions of the Mi7(b5), Dim7 & chords - Harmonic, Ascending & Descending | |
13: Module 13 |
|
| 13.1 Inversions of the 7(b5) & chords - Ascending | |
| 13.2 Inversions of the 7(b5) & chords - Descending | |
| 13.3 Inversions of the 7(b5) & chords - Harmonic | |
| 13.4 Inversions of the 7(b5) & chords - Harmonic, Ascending & Descending | |
14: Module 14 |
|
| 14.1 Inversions of the 7(#5) & chords - Ascending | |
| 14.2 Inversions of the 7(#5) & chords - Descending | |
| 14.3 Inversions of the 7(#5) & chords - Harmonic | |
| 14.4 Inversions of the 7(#5) & chords - Harmonic, Ascending & Descending | |
15: Module 15 |
|
| 15.1 Inversions of the 7, 7(b5) & 7(#5) chords - Ascending | |
| 15.2 Inversions of the 7, 7(b5) & 7(#5) chords - Descending | |
| 15.3 Inversions of the 7, 7(b5) & 7(#5) chords - Harmonic | |
| 15.4 Inversions of the 7, 7(b5) & 7(#5) chords - Harmonic, Ascending & Descending | |
16: Module 16 |
|
| 16.1 Inversions of the Maj7, & chords - Ascending | |
| 16.2 Inversions of the Maj7, & chords - Descending | |
| 16.3 Inversions of the Maj7, & chords - Harmonic | |
| 16.4 Inversions of the Maj7, & chords - Harmonic, Ascending & Descending | |
17: Module 17 |
|
| 17.1 Mi7, Mi7(b5), Dim7, & Mi,maj7 - Ascending | |
| 17.2 Mi7, Mi7(b5), Dim7, & Mi,maj7 - Descending | |
| 17.3 Mi7, Mi7(b5), Dim7, & Mi,maj7 - Harmonic | |
| 17.4 Mi7, Mi7(b5), Dim7, & Mi,maj7 - Harmonic, Ascending & Descending | |
18: All the 7 Chords |
|
| 18.1 Maj7, 7, Mi7, Mi7(b5), Dim7, , 7(b5), , 7(#5), & Mi,maj7 - Ascending | |
| 18.2 Maj7, 7, Mi7, Mi7(b5), Dim7, , 7(b5), , 7(#5), & Mi,maj7 - Descending | |
| 18.3 Maj7, 7, Mi7, Mi7(b5), Dim7, , 7(b5), , 7(#5), & Mi,maj7 - Harmonic | |
| 18.4 Maj7, 7, Mi7, Mi7(b5), Dim7, , 7(b5), , 7(#5), & Mi,maj7 - Harmonic, Ascending & Descending | |
General Workshops - Chord Progressions |
|
1: Module 1 |
|
| 1.1 Identify major and minor tonic in V-I | |
| 1.2 Dominants with and without 7 | |
| 1.3 VIIdim7 - in Major and minor | |
| 1.4 Common dominant - tonic combinations | |
| 1.5 Major/minor subdominant (IV) and supertonic (II) | |
| 1.6 Various dominant-tonic combinations | |
| 1.7 II - V - I combinations | |
| 1.8 II - V - I and II - bII - I combinations | |
| 1.9 IV - I combinations (Plagal cadences) | |
| 1.10 Two mediant combinations | |
| 1.11 Four mediant combinations | |
| 1.12 Three part plagal cadences | |
| 1.13 Extended tonal cadences | |
| 1.14 Fifth sequences | |
| 1.15 Folk progressions | |
| 1.16 Progressions with bVII7(b5) | |
| 1.17 Interrupted cadences | |
| 1.18 Modulations #1 | |
| 1.19 Modulations #2 | |
| 1.20 Modulations to bIII and bVI | |
| 1.21 Last step! | |
General Workshops - Interval Comparison |
|
1: Compare the Perfect Intervals - Common 1st Tone |
|
| 1.1 Introduction to perfect intervals | |
| 1.2 Perfect 4th & Octave - Ascending (common tone) | |
| 1.3 Perfect 4th & Octave - Descending (common tone) | |
| 1.4 Perfect 4th & Octave - Harmonic (common tone) | |
| 1.5 Perfect 5th & Octave - Ascending (common tone) | |
| 1.6 Perfect 5th & Octave - Descending (common tone) | |
| 1.7 Perfect 5th & Octave - Harmonic (common tone) | |
| 1.8 Perfect 4th & Perfect 5th - Ascending (common tone) | |
| 1.9 Perfect 4th & Perfect 5th - Descending (common tone) | |
| 1.10 Perfect 4th & Perfect 5th - Harmonic (common tone) | |
| 1.11 Test : Perfect intervals with a common 1st tone | |
2: Compare the Imperfect Consonant Intervals - Common 1st Tone |
|
| 2.1 Introduction to imperfect consonant intervals | |
| 2.2 Major 3rd & Minor 6th - Ascending (common tone) | |
| 2.3 Major 3rd & Minor 6th - Descending (common tone) | |
| 2.4 Major 3rd & Minor 6th - Harmonic (common tone) | |
| 2.5 Minor 3rd & Major 6th - Ascending (common tone) | |
| 2.6 Minor 3rd & Major 6th - Descending (common tone) | |
| 2.7 Minor 3rd & Major 6th - Harmonic (common tone) | |
| 2.8 Minor 3rd & Major 3rd - Ascending (common tone) | |
| 2.9 Minor 3rd & Major 3rd - Descending (common tone) | |
| 2.10 Minor 3rd & Major 3rd - Harmonic (common tone) | |
| 2.11 Minor 6th & Major 6th - Ascending (common tone) | |
| 2.12 Minor 6th & Major 6th - Descending (common tone) | |
| 2.13 Minor 6th & Major 6th - Harmonic (common tone) | |
| 2.14 Test: Imperfect consonant intervals with a common 1st tone | |
3: Compare the Dissonant Intervals - Common 1st Tone |
|
| 3.1 Introduction to dissonant intervals | |
| 3.2 Major 2nd & Minor 7th - Ascending (common tone) | |
| 3.3 Major 2nd & Minor 7th - Descending (common tone) | |
| 3.4 Major 2nd & Minor 7th - Harmonic (common tone) | |
| 3.5 Minor 2nd & Major 7th - Ascending (common tone) | |
| 3.6 Minor 2nd & Major 7th - Descending (common tone) | |
| 3.7 Minor 2nd & Major 7th - Harmonic (common tone) | |
| 3.8 Major 2nd, Dim 5th & Minor 7th - Ascending (common tone) | |
| 3.9 Major 2nd, Dim 5th & Minor 7th - Descending (common tone) | |
| 3.10 Major 2nd, Dim 5th & Minor 7th - Harmonic (common tone) | |
| 3.11 Minor 2nd, Dim 5th & Major 7th - Ascending (common tone) | |
| 3.12 Minor 2nd, Dim 5th & Major 7th - Descending (common tone) | |
| 3.13 Minor 2nd, Dim 5th & Major 7th - Harmonic (common tone) | |
| 3.14 Minor 2nd & Major 2nd - Ascending (common tone) | |
| 3.15 Minor 2nd & Major 2nd - Descending (common tone) | |
| 3.16 Minor 2nd & Major 2nd - Harmonic (common tone) | |
| 3.17 Minor 7th & Major 7th - Ascending (common tone) | |
| 3.18 Minor 7th & Major 7th - Descending (common tone) | |
| 3.19 Minor 7th & Major 7th - Harmonic (common tone) | |
| 3.20 Test: Dissonant intervals with a common 1st tone | |
4: Compare All Simple Intervals - Common Common 1st Tone |
|
| 4.1 All intervals from Minor 6th to Major 7th - Ascending (common tone) | |
| 4.2 All intervals from Minor 6th to Major 7th - Descending (common tone) | |
| 4.3 All intervals from Minor 6th to Major 7th - Harmonic (common tone) | |
| 4.4 All intervals from Perfect 5th to Octave - Ascending (common tone) | |
| 4.5 All intervals from Perfect 5th to Octave - Descending (common tone) | |
| 4.6 All intervals from Perfect 5th to Octave - Harmonic (common tone) | |
| 4.7 All intervals from Minor 2nd to Major 3rd - Ascending (common tone) | |
| 4.8 All intervals from Minor 2nd to Major 3rd - Descending (common tone) | |
| 4.9 All intervals from Minor 2nd to Major 3rd - Harmonic (common tone) | |
| 4.10 All intervals from Minor 2nd to Dim 5th - Ascending (common tone) | |
| 4.11 All intervals from Minor 2nd to Dim 5th - Descending (common tone) | |
| 4.12 All intervals from Minor 2nd to Dim 5th - Harmonic (common tone) | |
| 4.13 Test: Simple intervals with a common 1st tone | |
5: Compare Compound Intervals Up to 2 Octaves - Common 1st Tone |
|
| 5.1 Introduction to Compound intervals | |
| 5.2 Perfect 11th, Perfect 12th & Two Octaves - Ascending (common tone) | |
| 5.3 Perfect 11th, Perfect 12th & Two Octaves - Descending (common tone) | |
| 5.4 Perfect 11th, Perfect 12th & Two Octaves - Harmonic (common tone) | |
| 5.5 Minor 10th, Major 10th, Minor 13th & Major 13th - Ascending (common tone) | |
| 5.6 Minor 10th, Major 10th, Minor 13th & Major 13th - Descending (common tone) | |
| 5.7 Minor 10th, Major 10th, Minor 13th & Major 13th - Harmonic (common tone) | |
| 5.8 Minor 9th, Major 9th, Perfect 12th, Minor 14th & Major 14th - Ascending (common tone) | |
| 5.9 Minor 9th, Major 9th, Perfect 12th, Minor 14th & Major 14th - Descending (common tone) | |
| 5.10 Minor 9th, Major 9th, Perfect 12th, Minor 14th & Major 14th - Harmonic (common tone) | |
| 5.11 Test: Compound intervals with a common 1st tone | |
6: Compare the Perfect Intervals - Common 1st or 2nd tone |
|
| 6.1 Perfect 4th & Octave - Ascending (common tone) | |
| 6.2 Perfect 4th & Octave - Descending (common tone) | |
| 6.3 Perfect 4th & Octave - Harmonic (common tone) | |
| 6.4 Perfect 5th & Octave - Ascending (common tone) | |
| 6.5 Perfect 5th & Octave - Descending (common tone) | |
| 6.6 Perfect 5th & Octave - Harmonic (common tone) | |
| 6.7 Perfect 4th & Perfect 5th - Ascending (common tone) | |
| 6.8 Perfect 4th & Perfect 5th - Descending (common tone) | |
| 6.9 Perfect 4th & Perfect 5th - Harmonic (common tone) | |
| 6.10 Test : Perfect intervals with a common 1st or 2nd tone | |
7: Compare the Imperfect Consonant Intervals - Common 1st or 2nd tone |
|
| 7.1 Major 3rd & Minor 6th - Ascending (common tone) | |
| 7.2 Major 3rd & Minor 6th - Descending (common tone) | |
| 7.3 Major 3rd & Minor 6th - Harmonic (common tone) | |
| 7.4 Minor 3rd & Major 6th - Ascending (common tone) | |
| 7.5 Minor 3rd & Major 6th - Descending (common tone) | |
| 7.6 Minor 3rd & Major 6th - Harmonic (common tone) | |
| 7.7 Minor 3rd & Major 3rd - Ascending (common tone) | |
| 7.8 Minor 3rd & Major 3rd - Descending (common tone) | |
| 7.9 Minor 3rd & Major 3rd - Harmonic (common tone) | |
| 7.10 Minor 6th & Major 6th - Ascending (common tone) | |
| 7.11 Minor 6th & Major 6th - Descending (common tone) | |
| 7.12 Minor 6th & Major 6th - Harmonic (common tone) | |
| 7.13 Test: Imperfect consonant intervals with a common 1st or 2nd tone | |
8: Compare the Dissonant Intervals - Common 1st or 2nd tone |
|
| 8.1 Major 2nd & Minor 7th - Ascending (common tone) | |
| 8.2 Major 2nd & Minor 7th - Descending (common tone) | |
| 8.3 Major 2nd & Minor 7th - Harmonic (common tone) | |
| 8.4 Minor 2nd & Major 7th - Ascending (common tone) | |
| 8.5 Minor 2nd & Major 7th - Descending (common tone) | |
| 8.6 Minor 2nd & Major 7th - Harmonic (common tone) | |
| 8.7 Major 2nd, Dim 5th & Minor 7th - Ascending (common tone) | |
| 8.8 Major 2nd, Dim 5th & Minor 7th - Descending (common tone) | |
| 8.9 Major 2nd, Dim 5th & Minor 7th - Harmonic (common tone) | |
| 8.10 Minor 2nd, Dim 5th & Major 7th - Ascending (common tone) | |
| 8.11 Minor 2nd, Dim 5th & Major 7th - Descending (common tone) | |
| 8.12 Minor 2nd, Dim 5th & Major 7th - Harmonic (common tone) | |
| 8.13 Minor 2nd & Major 2nd - Ascending (common tone) | |
| 8.14 Minor 2nd & Major 2nd - Descending (common tone) | |
| 8.15 Minor 2nd & Major 2nd - Harmonic (common tone) | |
| 8.16 Minor 7th & Major 7th - Ascending (common tone) | |
| 8.17 Minor 7th & Major 7th - Descending (common tone) | |
| 8.18 Minor 7th & Major 7th - Harmonic (common tone) | |
| 8.19 Test: Dissonant intervals with a common 1st or 2nd tone | |
9: Compare All Simple Intervals - Common 1st or 2nd tone |
|
| 9.1 All intervals from Minor 6th to Major 7th - Ascending (common tone) | |
| 9.2 All intervals from Minor 6th to Major 7th - Descending (common tone) | |
| 9.3 All intervals from Minor 6th to Major 7th - Harmonic (common tone) | |
| 9.4 All intervals from Perfect 5th to Octave - Ascending (common tone) | |
| 9.5 All intervals from Perfect 5th to Octave - Descending (common tone) | |
| 9.6 All intervals from Perfect 5th to Octave - Harmonic (common tone) | |
| 9.7 All intervals from Minor 2nd to Major 3rd - Ascending (common tone) | |
| 9.8 All intervals from Minor 2nd to Major 3rd - Descending (common tone) | |
| 9.9 All intervals from Minor 2nd to Major 3rd - Harmonic (common tone) | |
| 9.10 All intervals from Minor 2nd to Dim 5th - Ascending (common tone) | |
| 9.11 All intervals from Minor 2nd to Dim 5th - Descending (common tone) | |
| 9.12 All intervals from Minor 2nd to Dim 5th - Harmonic (common tone) | |
| 9.13 Test: Simple intervals with a common 1st or 2nd tone | |
10: Compare Compound Intervals Up to 2 Octaves - Common 1st or 2nd tone |
|
| 10.1 Perfect 11th, Perfect 12th & Two Octaves - Ascending (common tone) | |
| 10.2 Perfect 11th, Perfect 12th & Two Octaves - Descending (common tone) | |
| 10.3 Perfect 11th, Perfect 12th & Two Octaves - Harmonic (common tone) | |
| 10.4 Minor 10th, Major 10th, Minor 13th & Major 13th - Ascending (common tone) | |
| 10.5 Minor 10th, Major 10th, Minor 13th & Major 13th - Descending (common tone) | |
| 10.6 Minor 10th, Major 10th, Minor 13th & Major 13th - Harmonic (common tone) | |
| 10.7 Minor 9th, Major 9th, Perfect 12th, Minor 14th & Major 14th - Ascending (common tone) | |
| 10.8 Minor 9th, Major 9th, Perfect 12th, Minor 14th & Major 14th - Descending (common tone) | |
| 10.9 Minor 9th, Major 9th, Perfect 12th, Minor 14th & Major 14th - Harmonic (common tone) | |
| 10.10 Test: Compound intervals with a common 1st or 2nd tone | |
11: Compare the Perfect Intervals - Nearby 1st tones |
|
| 11.1 Perfect 4th & Octave - Ascending (nearby common tone) | |
| 11.2 Perfect 4th & Octave - Descending (nearby common tone) | |
| 11.3 Perfect 4th & Octave - Harmonic (nearby common tone) | |
| 11.4 Perfect 5th & Octave - Ascending (nearby common tone) | |
| 11.5 Perfect 5th & Octave - Descending (nearby common tone) | |
| 11.6 Perfect 5th & Octave - Harmonic (nearby common tone) | |
| 11.7 Perfect 4th & Perfect 5th - Ascending (nearby common tone) | |
| 11.8 Perfect 4th & Perfect 5th - Descending (nearby common tone) | |
| 11.9 Perfect 4th & Perfect 5th - Harmonic (nearby common tone) | |
| 11.10 Test : Perfect intervals with nearby first tones | |
12: Compare the Imperfect Consonant Intervals - Nearby 1st tones |
|
| 12.1 Major 3rd & Minor 6th - Ascending (nearby common tone) | |
| 12.2 Major 3rd & Minor 6th - Descending (nearby common tone) | |
| 12.3 Major 3rd & Minor 6th - Harmonic (nearby common tone) | |
| 12.4 Minor 3rd & Major 6th - Ascending (nearby common tone) | |
| 12.5 Minor 3rd & Major 6th - Descending (nearby common tone) | |
| 12.6 Minor 3rd & Major 6th - Harmonic (nearby common tone) | |
| 12.7 Minor 3rd & Major 3rd - Ascending (nearby common tone) | |
| 12.8 Minor 3rd & Major 3rd - Descending (nearby common tone) | |
| 12.9 Minor 3rd & Major 3rd - Harmonic (nearby common tone) | |
| 12.10 Minor 6th & Major 6th - Ascending (nearby common tone) | |
| 12.11 Minor 6th & Major 6th - Descending (nearby common tone) | |
| 12.12 Minor 6th & Major 6th - Harmonic (nearby common tone) | |
| 12.13 Test: Imperfect consonant intervals with nearby first tones | |
13: Compare the Dissonant Intervals - Nearby 1st tones |
|
| 13.1 Major 2nd & Minor 7th - Ascending (nearby common tone) | |
| 13.2 Major 2nd & Minor 7th - Descending (nearby common tone) | |
| 13.3 Major 2nd & Minor 7th - Harmonic (nearby common tone) | |
| 13.4 Minor 2nd & Major 7th - Ascending (nearby common tone) | |
| 13.5 Minor 2nd & Major 7th - Descending (nearby common tone) | |
| 13.6 Minor 2nd & Major 7th - Harmonic (nearby common tone) | |
| 13.7 Major 2nd, Dim 5th & Minor 7th - Ascending (nearby common tone) | |
| 13.8 Major 2nd, Dim 5th & Minor 7th - Descending (nearby common tone) | |
| 13.9 Major 2nd, Dim 5th & Minor 7th - Harmonic (nearby common tone) | |
| 13.10 Minor 2nd, Dim 5th & Major 7th - Ascending (nearby common tone) | |
| 13.11 Minor 2nd, Dim 5th & Major 7th - Descending (nearby common tone) | |
| 13.12 Minor 2nd, Dim 5th & Major 7th - Harmonic (nearby common tone) | |
| 13.13 Minor 2nd & Major 2nd - Ascending (nearby common tone) | |
| 13.14 Minor 2nd & Major 2nd - Descending (nearby common tone) | |
| 13.15 Minor 2nd & Major 2nd - Harmonic (nearby common tone) | |
| 13.16 Minor 7th & Major 7th - Ascending (nearby common tone) | |
| 13.17 Minor 7th & Major 7th - Descending (nearby common tone) | |
| 13.18 Minor 7th & Major 7th - Harmonic (nearby common tone) | |
| 13.19 Test: Dissonant intervals with nearby first tones | |
14: Compare All Simple Intervals - Nearby 1st tones |
|
| 14.1 All intervals from Minor 6th to Major 7th - Ascending (nearby common tone) | |
| 14.2 All intervals from Minor 6th to Major 7th - Descending (nearby common tone) | |
| 14.3 All intervals from Minor 6th to Major 7th - Harmonic (nearby common tone) | |
| 14.4 All intervals from Perfect 5th to Octave - Ascending (nearby common tone) | |
| 14.5 All intervals from Perfect 5th to Octave - Descending (nearby common tone) | |
| 14.6 All intervals from Perfect 5th to Octave - Harmonic (nearby common tone) | |
| 14.7 All intervals from Minor 2nd to Major 3rd - Ascending (nearby common tone) | |
| 14.8 All intervals from Minor 2nd to Major 3rd - Descending (nearby common tone) | |
| 14.9 All intervals from Minor 2nd to Major 3rd - Harmonic (nearby common tone) | |
| 14.10 All intervals from Minor 2nd to Dim 5th - Ascending (nearby common tone) | |
| 14.11 All intervals from Minor 2nd to Dim 5th - Descending (nearby common tone) | |
| 14.12 All intervals from Minor 2nd to Dim 5th - Harmonic (nearby common tone) | |
| 14.13 Test: Simple intervals with nearby first tones | |
15: Compare Compound Intervals up to 2 octaves - Nearby 1st tones |
|
| 15.1 Perfect 11th, Perfect 12th & Two Octaves - Ascending (nearby common tone) | |
| 15.2 Perfect 11th, Perfect 12th & Two Octaves - Descending (nearby common tone) | |
| 15.3 Perfect 11th, Perfect 12th & Two Octaves - Harmonic (nearby common tone) | |
| 15.4 Minor 10th, Major 10th, Minor 13th & Major 13th - Ascending (nearby common tone) | |
| 15.5 Minor 10th, Major 10th, Minor 13th & Major 13th - Descending (nearby common tone) | |
| 15.6 Minor 10th, Major 10th, Minor 13th & Major 13th - Harmonic (nearby common tone) | |
| 15.7 Minor 9th, Major 9th, Perfect 12th, Minor 14th & Major 14th - Ascending (nearby common tone) | |
| 15.8 Minor 9th, Major 9th, Perfect 12th, Minor 14th & Major 14th - Descending (nearby common tone) | |
| 15.9 Minor 9th, Major 9th, Perfect 12th, Minor 14th & Major 14th - Harmonic (nearby common tone) | |
| 15.10 Test: Compound intervals with nearby first tones | |
16: Compare the Perfect Intervals - No common tones |
|
| 16.1 Perfect 4th & Octave - Ascending (no common tone) | |
| 16.2 Perfect 4th & Octave - Descending (no common tone) | |
| 16.3 Perfect 4th & Octave - Harmonic (no common tone) | |
| 16.4 Perfect 5th & Octave - Ascending (no common tone) | |
| 16.5 Perfect 5th & Octave - Descending (no common tone) | |
| 16.6 Perfect 5th & Octave - Harmonic (no common tone) | |
| 16.7 Perfect 4th & Perfect 5th - Ascending (no common tone) | |
| 16.8 Perfect 4th & Perfect 5th - Descending (no common tone) | |
| 16.9 Perfect 4th & Perfect 5th - Harmonic (no common tone) | |
| 16.10 Test : Perfect intervals without common tone | |
17: Compare the Imperfect Consonant Intervals - No common tones |
|
| 17.1 Major 3rd & Minor 6th - Ascending (no common tone) | |
| 17.2 Major 3rd & Minor 6th - Descending (no common tone) | |
| 17.3 Major 3rd & Minor 6th - Harmonic (no common tone) | |
| 17.4 Minor 3rd & Major 6th - Ascending (no common tone) | |
| 17.5 Minor 3rd & Major 6th - Descending (no common tone) | |
| 17.6 Minor 3rd & Major 6th - Harmonic (no common tone) | |
| 17.7 Minor 3rd & Major 3rd - Ascending (no common tone) | |
| 17.8 Minor 3rd & Major 3rd - Descending (no common tone) | |
| 17.9 Minor 3rd & Major 3rd - Harmonic (no common tone) | |
| 17.10 Minor 6th & Major 6th - Ascending (no common tone) | |
| 17.11 Minor 6th & Major 6th - Descending (no common tone) | |
| 17.12 Minor 6th & Major 6th - Harmonic (no common tone) | |
| 17.13 Test: Imperfect consonant intervals without common tone | |
18: Compare the Dissonant Intervals - No common tones |
|
| 18.1 Major 2nd & Minor 7th - Ascending (no common tone) | |
| 18.2 Major 2nd & Minor 7th - Descending (no common tone) | |
| 18.3 Major 2nd & Minor 7th - Harmonic (no common tone) | |
| 18.4 Minor 2nd & Major 7th - Ascending (no common tone) | |
| 18.5 Minor 2nd & Major 7th - Descending (no common tone) | |
| 18.6 Minor 2nd & Major 7th - Harmonic (no common tone) | |
| 18.7 Major 2nd, Dim 5th & Minor 7th - Ascending (no common tone) | |
| 18.8 Major 2nd, Dim 5th & Minor 7th - Descending (no common tone) | |
| 18.9 Major 2nd, Dim 5th & Minor 7th - Harmonic (no common tone) | |
| 18.10 Minor 2nd, Dim 5th & Major 7th - Ascending (no common tone) | |
| 18.11 Minor 2nd, Dim 5th & Major 7th - Descending (no common tone) | |
| 18.12 Minor 2nd, Dim 5th & Major 7th - Harmonic (no common tone) | |
| 18.13 Minor 2nd & Major 2nd - Ascending (no common tone) | |
| 18.14 Minor 2nd & Major 2nd - Descending (no common tone) | |
| 18.15 Minor 2nd & Major 2nd - Harmonic (no common tone) | |
| 18.16 Minor 7th & Major 7th - Ascending (no common tone) | |
| 18.17 Minor 7th & Major 7th - Descending (no common tone) | |
| 18.18 Minor 7th & Major 7th - Harmonic (no common tone) | |
| 18.19 Test: Dissonant intervals without common tone | |
19: Compare All Simple Intervals - No common tones |
|
| 19.1 All intervals from Minor 6th to Major 7th - Ascending (no common tone) | |
| 19.2 All intervals from Minor 6th to Major 7th - Descending (no common tone) | |
| 19.3 All intervals from Minor 6th to Major 7th - Harmonic (no common tone) | |
| 19.4 All intervals from Perfect 5th to Octave - Ascending (no common tone) | |
| 19.5 All intervals from Perfect 5th to Octave - Descending (no common tone) | |
| 19.6 All intervals from Perfect 5th to Octave - Harmonic (no common tone) | |
| 19.7 All intervals from Minor 2nd to Major 3rd - Ascending (no common tone) | |
| 19.8 All intervals from Minor 2nd to Major 3rd - Descending (no common tone) | |
| 19.9 All intervals from Minor 2nd to Major 3rd - Harmonic (no common tone) | |
| 19.10 All intervals from Minor 2nd to Dim 5th - Ascending (no common tone) | |
| 19.11 All intervals from Minor 2nd to Dim 5th - Descending (no common tone) | |
| 19.12 All intervals from Minor 2nd to Dim 5th - Harmonic (no common tone) | |
| 19.13 Test: Simple intervals without common tone | |
20: Compare Compound Intervals up to 2 octaves - No common tones |
|
| 20.1 Perfect 11th, Perfect 12th & Two Octaves - Ascending (no common tone) | |
| 20.2 Perfect 11th, Perfect 12th & Two Octaves - Descending (no common tone) | |
| 20.3 Perfect 11th, Perfect 12th & Two Octaves - Harmonic (no common tone) | |
| 20.4 Minor 10th, Major 10th, Minor 13th & Major 13th - Ascending (no common tone) | |
| 20.5 Minor 10th, Major 10th, Minor 13th & Major 13th - Descending (no common tone) | |
| 20.6 Minor 10th, Major 10th, Minor 13th & Major 13th - Harmonic (no common tone) | |
| 20.7 Minor 9th, Major 9th, Perfect 12th, Minor 14th & Major 14th - Ascending (no common tone) | |
| 20.8 Minor 9th, Major 9th, Perfect 12th, Minor 14th & Major 14th - Descending (no common tone) | |
| 20.9 Minor 9th, Major 9th, Perfect 12th, Minor 14th & Major 14th - Harmonic (no common tone) | |
| 20.10 Test: Compound intervals without common tone | |
General Workshops - Interval Identification |
|
1: Identify the Minor & Major 2nd Intervals |
|
| 1.1 Minor 2nd & Major 2nd - Ascending | |
| 1.2 Minor 2nd & Major 2nd - Descending | |
| 1.3 Minor 2nd & Major 2nd - Harmonic | |
| 1.4 Minor 2nd & Major 2nd - Harmonic, Ascending & Descending | |
2: Identify the Minor & Major 3rd Intervals |
|
| 2.1 Minor 3rd & Major 3rd - Ascending | |
| 2.2 Minor 3rd & Major 3rd - Descending | |
| 2.3 Minor 3rd & Major 3rd - Harmonic | |
| 2.4 Minor 3rd & Major 3rd - Harmonic, Ascending & Descending | |
3: Identify the Minor & Major 2nds and 3rds |
|
| 3.1 All intervals from Minor 2nd to Major 3rd - Ascending | |
| 3.2 All intervals from Minor 2nd to Major 3rd - Descending | |
| 3.3 All intervals from Minor 2nd to Major 3rd - Harmonic | |
| 3.4 All intervals from Minor 2nd to Major 3rd - Harmonic, Ascending & Descending | |
4: Identify the Perfect 4th & the Tritone |
|
| 4.1 Perfect 4th & Dim 5th - Ascending | |
| 4.2 Perfect 4th & Dim 5th - Descending | |
| 4.3 Perfect 4th & Dim 5th - Harmonic | |
| 4.4 Perfect 4th & Dim 5th - Harmonic, Ascending & Descending | |
5: Identify the Tritone & Perfect 5th |
|
| 5.1 Dim 5th & Perfect 5th - Ascending | |
| 5.2 Dim 5th & Perfect 5th - Descending | |
| 5.3 Dim 5th & Perfect 5th - Harmonic | |
| 5.4 Dim 5th & Perfect 5th - Harmonic, Ascending & Descending | |
6: Identify the Perfect 4th, Tritone and Perfect 5th |
|
| 6.1 Perfect 4th, Dim 5th & Perfect 5th - Ascending | |
| 6.2 Perfect 4th, Dim 5th & Perfect 5th - Descending | |
| 6.3 Perfect 4th, Dim 5th & Perfect 5th - Harmonic | |
| 6.4 Perfect 4th, Dim 5th & Perfect 5th - Harmonic, Ascending & Descending | |
7: Identify All the Intervals from Minor 2nd to Perfect 5th |
|
| 7.1 All intervals from Minor 2nd to Perfect 5th - Ascending | |
| 7.2 All intervals from Minor 2nd to Perfect 5th - Descending | |
| 7.3 All intervals from Minor 2nd to Perfect 5th - Harmonic | |
| 7.4 All intervals from Minor 2nd to Perfect 5th - Harmonic, Ascending & Descending | |
8: Identify the Minor & Major 6th |
|
| 8.1 Minor 6th & Major 6th - Ascending | |
| 8.2 Minor 6th & Major 6th - Descending | |
| 8.3 Minor 6th & Major 6th - Harmonic | |
| 8.4 Minor 6th & Major 6th - Harmonic, Ascending & Descending | |
9: Identify the Minor & Major 7th |
|
| 9.1 Minor 7th & Major 7th - Ascending | |
| 9.2 Minor 7th & Major 7th - Descending | |
| 9.3 Minor 7th & Major 7th - Harmonic | |
| 9.4 Minor 7th & Major 7th - Harmonic, Ascending & Descending | |
10: Identify the Minor & Major 6ths and 7ths |
|
| 10.1 All intervals from Minor 6th to Major 7th - Ascending | |
| 10.2 All intervals from Minor 6th to Major 7th - Descending | |
| 10.3 All intervals from Minor 6th to Major 7th - Harmonic | |
| 10.4 All intervals from Minor 6th to Major 7th - Harmonic, Ascending & Descending | |
11: Identify All Intervals from Perfect 4th to Major 7th |
|
| 11.1 All intervals from Perfect 4th to Major 7th - Ascending | |
| 11.2 All intervals from Perfect 4th to Major 7th - Descending | |
| 11.3 All intervals from Perfect 4th to Major 7th - Harmonic | |
| 11.4 All intervals from Perfect 4th to Major 7th - Harmonic, Ascending & Descending | |
12: Identify All the Intervals from Minor 2nd to Major 7th |
|
| 12.1 All intervals from Minor 2nd to Major 7th - Ascending | |
| 12.2 All intervals from Minor 2nd to Major 7th - Descending | |
| 12.3 All intervals from Minor 2nd to Major 7th - Harmonic | |
| 12.4 All intervals from Minor 2nd to Major 7th - Harmonic, Ascending & Descending | |
13: Practice with the Perfect Intervals within an Octave |
|
| 13.1 Unison & Octave - Harmonic | |
| 13.2 Unison & Octave - Harmonic, Ascending & Descending | |
| 13.3 Perfect 4th & Perfect 5th - Harmonic | |
| 13.4 Perfect 4th & Perfect 5th - Harmonic, Ascending & Descending | |
| 13.5 Unison, Perfect 4th, Perfect 5th & Octave - Ascending | |
| 13.6 Unison, Perfect 4th, Perfect 5th & Octave - Descending | |
| 13.7 Unison, Perfect 4th, Perfect 5th & Octave - Harmonic | |
| 13.8 Unison, Perfect 4th, Perfect 5th & Octave - Harmonic, Ascending & Descending | |
14: Practice with the Consonant Intervals within an Octave |
|
| 14.1 Minor 3rd & Major 6th - Harmonic | |
| 14.2 Minor 3rd & Major 6th - Harmonic, Ascending & Descending | |
| 14.3 Major 3rd & Minor 6th - Harmonic | |
| 14.4 Major 3rd & Minor 6th - Harmonic, Ascending & Descending | |
| 14.5 Minor 3rd, Major 3rd, Minor 6th & Major 6th - Ascending | |
| 14.6 Minor 3rd, Major 3rd, Minor 6th & Major 6th - Descending | |
| 14.7 Minor 3rd, Major 3rd, Minor 6th & Major 6th - Harmonic | |
| 14.8 Minor 3rd, Major 3rd, Minor 6th & Major 6th - Harmonic, Ascending & Descending | |
15: Practice with the Dissonant Intervals within an Octave |
|
| 15.1 Minor 2nd & Major 7th - Harmonic | |
| 15.2 Minor 2nd & Major 7th - Harmonic, Ascending & Descending | |
| 15.3 Major 2nd & Minor 7th - Harmonic | |
| 15.4 Major 2nd & Minor 7th - Harmonic, Ascending & Descending | |
| 15.5 Minor 2nd, Major 2nd, Minor 7th & Major 7th - Ascending | |
| 15.6 Minor 2nd, Major 2nd, Minor 7th & Major 7th - Descending | |
| 15.7 Minor 2nd, Major 2nd, Minor 7th & Major 7th - Harmonic | |
| 15.8 Minor 2nd, Major 2nd, Minor 7th & Major 7th - Harmonic, Ascending & Descending | |
| 15.9 Minor 2nd, Dim 5th & Major 7th - Ascending | |
| 15.10 Minor 2nd, Dim 5th & Major 7th - Descending | |
| 15.11 Minor 2nd, Dim 5th & Major 7th - Harmonic | |
| 15.12 Major 2nd, Dim 5th & Minor 7th - Ascending | |
| 15.13 Major 2nd, Dim 5th & Minor 7th - Descending | |
| 15.14 Major 2nd, Dim 5th & Minor 7th - Harmonic | |
| 15.15 Minor 2nd, Major 2nd, Dim 5th, Minor 7th & Major 7th - Ascending | |
| 15.16 Minor 2nd, Major 2nd, Dim 5th, Minor 7th & Major 7th - Descending | |
| 15.17 Minor 2nd, Major 2nd, Dim 5th, Minor 7th & Major 7th - Harmonic | |
| 15.18 Minor 2nd, Major 2nd, Dim 5th, Minor 7th & Major 7th - Harmonic, Ascending & Descending | |
16: Practice with All Intervals within an Octave |
|
| 16.1 All intervals from Unison to Octave - Ascending | |
| 16.2 All intervals from Unison to Octave - Descending | |
| 16.3 All intervals from Unison to Octave - Harmonic | |
| 16.4 All intervals from Unison to Octave - Harmonic, Ascending & Descending | |
General Workshops - Interval Singing |
|
1: Ascending Intervals from Do |
|
| 1.1 Do - Re (Major 2nd) | |
| 1.2 Do - Mi (Major 3rd) | |
| 1.3 Do - Re and Do - Mi | |
| 1.4 Do - Fa (Perfect 4th) | |
| 1.5 Do - So (Perfect 5th) | |
| 1.6 Do - Fa and Do - So | |
| 1.7 Do to Re, Mi, Fa and So | |
| 1.8 Do - La (Major 6th) | |
| 1.9 Do - Ti (Major 7th) | |
| 1.10 Do - Do (Octave) | |
| 1.11 Do to La, Ti and Do | |
| 1.12 All Ascending Intervals from Do | |
2: Descending Intervals from Do |
|
| 2.1 Do - Ti (Minor 2nd) | |
| 2.2 Do - La (Minor 3rd) | |
| 2.3 Do - Ti and Do - La | |
| 2.4 Do - So (Perfect 4th) | |
| 2.5 Do - Fa (Perfect 5th) | |
| 2.6 Do - So and Do - Fa | |
| 2.7 Do to Ti, La, So and Fa | |
| 2.8 Do - Mi (Minor 6th) | |
| 2.9 Do - Re (Minor 7th) | |
| 2.10 Do - Do (Octave) | |
| 2.11 Do to Mi, Re and Do | |
| 2.12 All Descending Intervals from Do | |
3: Complementary intervals from Do - Ascending and Descending |
|
| 3.1 Do - Re (Major 2nd up or Minor 7th down) | |
| 3.2 Do - Mi (Major 3rd up or Minor 6th down) | |
| 3.3 Do - Re and Do - Mi | |
| 3.4 Do - Fa (Perfect 4th up or Perfect 5th down) | |
| 3.5 Do - So (Perfect 5th up or Perfect 4th down) | |
| 3.6 Do - Fa and Do - So | |
| 3.7 Do to Re, Mi, Fa and So | |
| 3.8 Do - La (Major 6th up or Minor 3rd down) | |
| 3.9 Do - Ti (Major 7th up or Minor 2nd down) | |
| 3.10 Do - Do (Octave up or octave down) | |
| 3.11 Do to La, Ti and Do | |
| 3.12 All intervals from Do | |
General Workshops - Melodic Dictation |
|
1: 3 to 4 Tones from the C Major Scale |
|
| 1.1 Do, Re - 3 tones | |
| 1.2 Do, Re, Mi | |
| 1.3 Do, Re, Mi, Fa | |
| 1.4 Do, Re, Mi, Fa, So | |
| 1.5 Do, Re, Mi, Fa, So, La | |
| 1.6 Do, Re, Mi, Fa, So, La, Ti | |
| 1.7 Do, Re - 4 tones | |
| 1.8 Do, Re, Mi | |
| 1.9 Do, Re, Mi, Fa | |
| 1.10 Do, Re, Mi, Fa, So | |
| 1.11 Do, Re, Mi, Fa, So, La | |
| 1.12 Do, Re, Mi, Fa, So, La, Ti | |
2: 5 to 6 Tones from the C Major Scale |
|
| 2.1 Do, Re - 5 tones | |
| 2.2 Do, Re, Mi | |
| 2.3 Do, Re, Mi, Fa | |
| 2.4 Do, Re, Mi, Fa, So | |
| 2.5 Do, Re, Mi, Fa, So, La | |
| 2.6 Do, Re, Mi, Fa, So, La, Ti | |
| 2.7 Do, Re - 6 tones | |
| 2.8 Do, Re, Mi | |
| 2.9 Do, Re, Mi, Fa | |
| 2.10 Do, Re, Mi, Fa, So | |
| 2.11 Do, Re, Mi, Fa, So, La | |
| 2.12 Do, Re, Mi, Fa, So, La, Ti | |
3: 7 to 8 Tones from the C Major Scale |
|
| 3.1 Do, Re, Mi - 7 tones | |
| 3.2 Do, Re, Mi, Fa | |
| 3.3 Do, Re, Mi, Fa, So | |
| 3.4 Do, Re, Mi, Fa, So, La | |
| 3.5 Do, Re, Mi, Fa, So, La, Ti | |
| 3.6 Do, Re, Mi - 8 tones | |
| 3.7 Do, Re, Mi, Fa | |
| 3.8 Do, Re, Mi, Fa, So | |
| 3.9 Do, Re, Mi, Fa, So, La | |
| 3.10 Do, Re, Mi, Fa, So, La, Ti | |
4: 5 Tones with Only Do Given |
|
| 4.1 Do, Re | |
| 4.2 Do, Re, Mi | |
| 4.3 Do, Re, Mi, Fa | |
| 4.4 Do, Re, Mi, Fa, So | |
| 4.5 Do, Re, Mi, Fa, So, La | |
| 4.6 Do, Re, Mi, Fa, So, La, Ti | |
5: Melodies with Rhythm. 4/4 |
|
| 5.1 Do, Re - 1 bar | |
| 5.2 Do, Re, Mi | |
| 5.3 Do, Re, Mi, Fa | |
| 5.4 Do, Re, Mi, Fa, So | |
| 5.5 Do, Re, Mi, Fa, So, La | |
| 5.6 Do, Re, Mi, Fa, So, La, Ti | |
| 5.7 Do, Re, Mi - 2 bars | |
| 5.8 Do, Re, Mi, Fa | |
| 5.9 Do, Re, Mi, Fa, So | |
| 5.10 Do, Re, Mi, Fa, So, La | |
| 5.11 Do, Re, Mi, Fa, So, La, Ti | |
6: Melodies with Rhythm. 3/4 |
|
| 6.1 Do, Re - 1 bar | |
| 6.2 Do, Re, Mi | |
| 6.3 Do, Re, Mi, Fa | |
| 6.4 Do, Re, Mi, Fa, So | |
| 6.5 Do, Re, Mi, Fa, So, La | |
| 6.6 Do, Re, Mi, Fa, So, La, Ti | |
| 6.7 Do, Re, Mi - 2 bars | |
| 6.8 Do, Re, Mi, Fa | |
| 6.9 Do, Re, Mi, Fa, So | |
| 6.10 Do, Re, Mi, Fa, So, La | |
| 6.11 Do, Re, Mi, Fa, So, La, Ti | |
7: Adding 8th Notes. 4/4 |
|
| 7.1 Do, Re - 1 bar | |
| 7.2 Do, Re, Mi | |
| 7.3 Do, Re, Mi, Fa | |
| 7.4 Do, Re, Mi, Fa, So | |
| 7.5 Do, Re, Mi, Fa, So, La | |
| 7.6 Do, Re, Mi, Fa, So, La, Ti | |
| 7.7 Do, Re, Mi - 2 bars | |
| 7.8 Do, Re, Mi, Fa | |
| 7.9 Do, Re, Mi, Fa, So | |
| 7.10 Do, Re, Mi, Fa, So, La | |
| 7.11 Do, Re, Mi, Fa, So, La, Ti | |
8: Adding 8th Notes. 3/4 |
|
| 8.1 Do, Re - 1 bar | |
| 8.2 Do, Re, Mi | |
| 8.3 Do, Re, Mi, Fa | |
| 8.4 Do, Re, Mi, Fa, So | |
| 8.5 Do, Re, Mi, Fa, So, La | |
| 8.6 Do, Re, Mi, Fa, So, La, Ti | |
| 8.7 Do, Re, Mi - 2 bars | |
| 8.8 Do, Re, Mi, Fa | |
| 8.9 Do, Re, Mi, Fa, So | |
| 8.10 Do, Re, Mi, Fa, So, La | |
| 8.11 Do, Re, Mi, Fa, So, La, Ti | |
9: Different Keys. 4/4 |
|
| 9.1 Do, Re - 1 bar | |
| 9.2 Do, Re, Mi | |
| 9.3 Do, Re, Mi, Fa | |
| 9.4 Do, Re, Mi, Fa, So | |
| 9.5 Do, Re, Mi, Fa, So, La | |
| 9.6 Do, Re, Mi, Fa, So, La, Ti | |
| 9.7 Do, Re, Mi - 2 bars | |
| 9.8 Do, Re, Mi, Fa | |
| 9.9 Do, Re, Mi, Fa, So | |
| 9.10 Do, Re, Mi, Fa, So, La | |
| 9.11 Do, Re, Mi, Fa, So, La, Ti | |
10: Different Keys. 3/4 |
|
| 10.1 Do, Re - 1 bar | |
| 10.2 Do, Re, Mi | |
| 10.3 Do, Re, Mi, Fa | |
| 10.4 Do, Re, Mi, Fa, So | |
| 10.5 Do, Re, Mi, Fa, So, La | |
| 10.6 Do, Re, Mi, Fa, So, La, Ti | |
| 10.7 Do, Re, Mi - 2 bars | |
| 10.8 Do, Re, Mi, Fa | |
| 10.9 Do, Re, Mi, Fa, So | |
| 10.10 Do, Re, Mi, Fa, So, La | |
| 10.11 Do, Re, Mi, Fa, So, La, Ti | |
11: Different Keys. Adding 8th Notes. 4/4 |
|
| 11.1 Do, Re - 1 bar | |
| 11.2 Do, Re, Mi | |
| 11.3 Do, Re, Mi, Fa | |
| 11.4 Do, Re, Mi, Fa, So | |
| 11.5 Do, Re, Mi, Fa, So, La | |
| 11.6 Do, Re, Mi, Fa, So, La, Ti | |
| 11.7 Do, Re, Mi - 2 bars | |
| 11.8 Do, Re, Mi, Fa | |
| 11.9 Do, Re, Mi, Fa, So | |
| 11.10 Do, Re, Mi, Fa, So, La | |
| 11.11 Do, Re, Mi, Fa, So, La, Ti | |
12: Different Keys. Adding 8th Notes. 3/4 |
|
| 12.1 Do, Re - 1 bar | |
| 12.2 Do, Re, Mi | |
| 12.3 Do, Re, Mi, Fa | |
| 12.4 Do, Re, Mi, Fa, So | |
| 12.5 Do, Re, Mi, Fa, So, La | |
| 12.6 Do, Re, Mi, Fa, So, La, Ti | |
| 12.7 Do, Re, Mi - 2 bars | |
| 12.8 Do, Re, Mi, Fa | |
| 12.9 Do, Re, Mi, Fa, So | |
| 12.10 Do, Re, Mi, Fa, So, La | |
| 12.11 Do, Re, Mi, Fa, So, La, Ti | |
13: Melodies in A minor. 4/4 |
|
| 13.1 Do, Re - 1 bar | |
| 13.2 Do, Re, Me | |
| 13.3 Do, Re, Me, Fa | |
| 13.4 Do, Re, Me, Fa, So | |
| 13.5 Do, Re, Me, Fa, So, Le | |
| 13.6 Do, Re, Me, Fa, So, Le, Te | |
| 13.7 Do, Re, Me - 2 bars | |
| 13.8 Do, Re, Me, Fa | |
| 13.9 Do, Re, Me, Fa, So | |
| 13.10 Do, Re, Me, Fa, So, Le | |
| 13.11 Do, Re, Me, Fa, So, Le, Te | |
14: Melodies in A Minor. 3/4 |
|
| 14.1 Do, Re - 1 bar | |
| 14.2 Do, Re, Me | |
| 14.3 Do, Re, Me, Fa | |
| 14.4 Do, Re, Me, Fa, So | |
| 14.5 Do, Re, Me, Fa, So, Le | |
| 14.6 Do, Re, Me, Fa, So, Le, Te | |
| 14.7 Do, Re, Me - 2 bars | |
| 14.8 Do, Re, Me, Fa | |
| 14.9 Do, Re, Me, Fa, So | |
| 14.10 Do, Re, Me, Fa, So, Le | |
| 14.11 Do, Re, Me, Fa, So, Le, Te | |
15: Melodies in A Minor. 4/4 Adding 8th Notes |
|
| 15.1 Do, Re - 1 bar | |
| 15.2 Do, Re, Me | |
| 15.3 Do, Re, Me, Fa | |
| 15.4 Do, Re, Me, Fa, So | |
| 15.5 Do, Re, Me, Fa, So, Le | |
| 15.6 Do, Re, Me, Fa, So, Le, Te | |
| 15.7 Do, Re - 2 bars | |
| 15.8 Do, Re, Me - 2 bars | |
| 15.9 Do, Re, Me, Fa | |
| 15.10 Do, Re, Me, Fa, So | |
| 15.11 Do, Re, Me, Fa, So, Le | |
| 15.12 Do, Re, Me, Fa, So, Le, Te | |
16: Melodies in A Minor. 3/4 Adding 8th Notes |
|
| 16.1 Do, Re, Me - 1 bar | |
| 16.2 Do, Re, Me, Fa | |
| 16.3 Do, Re, Me, Fa, So | |
| 16.4 Do, Re, Me, Fa, So, Le | |
| 16.5 Do, Re, Me, Fa, So, Le, Te | |
| 16.6 Do, Re, Me - 2 bars | |
| 16.7 Do, Re, Me, Fa | |
| 16.8 Do, Re, Me, Fa, So | |
| 16.9 Do, Re, Me, Fa, So, Le | |
| 16.10 Do, Re, Me, Fa, So, Le, Te | |
17: All Minor Keys. 4/4 with 8th Notes. |
|
| 17.1 Do, Re, Me - 1 bar | |
| 17.2 Do, Re, Me, Fa | |
| 17.3 Do, Re, Me, Fa, So | |
| 17.4 Do, Re, Me, Fa, So, Le | |
| 17.5 Do, Re, Me, Fa, So, Le, Te | |
| 17.6 Do, Re, Me - 2 bars | |
| 17.7 Do, Re, Me, Fa | |
| 17.8 Do, Re, Me, Fa, So | |
| 17.9 Do, Re, Me, Fa, So, Le | |
| 17.10 Do, Re, Me, Fa, So, Le, Te | |
18: Harmonic Minor. 4/4 with 8th Notes. |
|
| 18.1 A minor harmonic. 1 bar | |
| 18.2 A minor harmonic. 2 bars | |
| 18.3 A minor harmonic. 4 bars | |
| 18.4 Harmonic minor (all keys). 1 bar | |
| 18.5 Harmonic minor (all keys). 2 bars | |
| 18.6 Harmonic minor (all keys). 4 bars | |
General Workshops - Melodic Sight-Singing |
|
1: 3 to 4 Tones from the C Major Scale |
|
| 1.1 Do, Re - 3 tones | |
| 1.2 Do, Re, Mi | |
| 1.3 Do, Re, Mi, Fa | |
| 1.4 Do, Re, Mi, Fa, So | |
| 1.5 Do, Re, Mi, Fa, So, La | |
| 1.6 Do, Re, Mi, Fa, So, La, Ti | |
| 1.7 Do, Re - 4 tones | |
| 1.8 Do, Re, Mi | |
| 1.9 Do, Re, Mi, Fa | |
| 1.10 Do, Re, Mi, Fa, So | |
| 1.11 Do, Re, Mi, Fa, So, La | |
| 1.12 Do, Re, Mi, Fa, So, La, Ti | |
2: 5 to 6 Tones from the C Major Scale |
|
| 2.1 Do, Re - 5 tones | |
| 2.2 Do, Re, Mi | |
| 2.3 Do, Re, Mi, Fa | |
| 2.4 Do, Re, Mi, Fa, So | |
| 2.5 Do, Re, Mi, Fa, So, La | |
| 2.6 Do, Re, Mi, Fa, So, La, Ti | |
| 2.7 Do, Re - 6 tones | |
| 2.8 Do, Re, Mi | |
| 2.9 Do, Re, Mi, Fa | |
| 2.10 Do, Re, Mi, Fa, So | |
| 2.11 Do, Re, Mi, Fa, So, La | |
| 2.12 Do, Re, Mi, Fa, So, La, Ti | |
3: 7 to 8 Tones from the C Major Scale |
|
| 3.1 Do, Re, Mi - 7 tones | |
| 3.2 Do, Re, Mi, Fa | |
| 3.3 Do, Re, Mi, Fa, So | |
| 3.4 Do, Re, Mi, Fa, So, La | |
| 3.5 Do, Re, Mi, Fa, So, La, Ti | |
| 3.6 Do, Re, Mi - 8 tones | |
| 3.7 Do, Re, Mi, Fa | |
| 3.8 Do, Re, Mi, Fa, So | |
| 3.9 Do, Re, Mi, Fa, So, La | |
| 3.10 Do, Re, Mi, Fa, So, La, Ti | |
4: 5 Tones with Only Do Given |
|
| 4.1 Do, Re | |
| 4.2 Do, Re, Mi | |
| 4.3 Do, Re, Mi, Fa | |
| 4.4 Do, Re, Mi, Fa, So | |
| 4.5 Do, Re, Mi, Fa, So, La | |
| 4.6 Do, Re, Mi, Fa, So, La, Ti | |
5: Melodies with Rhythm. 4/4 - 1, 2 and 4 Bars. |
|
| 5.1 Do, Re - 1 bar | |
| 5.2 Do, Re, Mi | |
| 5.3 Do, Re, Mi, Fa | |
| 5.4 Do, Re, Mi, Fa, So | |
| 5.5 Do, Re, Mi, Fa, So, La | |
| 5.6 Do, Re, Mi, Fa, So, La, Ti | |
| 5.7 Do, Re, Mi - 2 bars | |
| 5.8 Do, Re, Mi, Fa | |
| 5.9 Do, Re, Mi, Fa, So | |
| 5.10 Do, Re, Mi, Fa, So, La | |
| 5.11 Do, Re, Mi, Fa, So, La, Ti | |
| 5.12 Do, Re, Mi - 4 bars | |
| 5.13 Do, Re, Mi, Fa | |
| 5.14 Do, Re, Mi, Fa, So | |
| 5.15 Do, Re, Mi, Fa, So, La | |
| 5.16 Do, Re, Mi, Fa, So, La, Ti | |
6: Melodies with Rhythm. 3/4 - 1, 2 and 4 Bars. |
|
| 6.1 Do, Re - 1 bar | |
| 6.2 Do, Re, Mi | |
| 6.3 Do, Re, Mi, Fa | |
| 6.4 Do, Re, Mi, Fa, So | |
| 6.5 Do, Re, Mi, Fa, So, La | |
| 6.6 Do, Re, Mi, Fa, So, La, Ti | |
| 6.7 Do, Re, Mi - 2 bars | |
| 6.8 Do, Re, Mi, Fa | |
| 6.9 Do, Re, Mi, Fa, So | |
| 6.10 Do, Re, Mi, Fa, So, La | |
| 6.11 Do, Re, Mi, Fa, So, La, Ti | |
| 6.12 Do, Re, Mi - 4 bars | |
| 6.13 Do, Re, Mi, Fa | |
| 6.14 Do, Re, Mi, Fa, So | |
| 6.15 Do, Re, Mi, Fa, So, La | |
| 6.16 Do, Re, Mi, Fa, So, La, Ti | |
7: Adding 8th Notes. 4/4 - 1, 2 and 4 Bars. |
|
| 7.1 Do, Re - 1 bar | |
| 7.2 Do, Re, Mi | |
| 7.3 Do, Re, Mi, Fa | |
| 7.4 Do, Re, Mi, Fa, So | |
| 7.5 Do, Re, Mi, Fa, So, La | |
| 7.6 Do, Re, Mi, Fa, So, La, Ti | |
| 7.7 Do, Re, Mi - 2 bars | |
| 7.8 Do, Re, Mi, Fa | |
| 7.9 Do, Re, Mi, Fa, So | |
| 7.10 Do, Re, Mi, Fa, So, La | |
| 7.11 Do, Re, Mi, Fa, So, La, Ti | |
| 7.12 Do, Re, Mi - 4 bars | |
| 7.13 Do, Re, Mi, Fa | |
| 7.14 Do, Re, Mi, Fa, So | |
| 7.15 Do, Re, Mi, Fa, So, La | |
| 7.16 Do, Re, Mi, Fa, So, La, Ti | |
8: Adding 8th Notes. 3/4 - 1, 2 and 4 Bars. |
|
| 8.1 Do, Re - 1 bar | |
| 8.2 Do, Re, Mi | |
| 8.3 Do, Re, Mi, Fa | |
| 8.4 Do, Re, Mi, Fa, So | |
| 8.5 Do, Re, Mi, Fa, So, La | |
| 8.6 Do, Re, Mi, Fa, So, La, Ti | |
| 8.7 Do, Re, Mi - 2 bars | |
| 8.8 Do, Re, Mi, Fa | |
| 8.9 Do, Re, Mi, Fa, So | |
| 8.10 Do, Re, Mi, Fa, So, La | |
| 8.11 Do, Re, Mi, Fa, So, La, Ti | |
| 8.12 Do, Re, Mi - 4 bars | |
| 8.13 Do, Re, Mi, Fa | |
| 8.14 Do, Re, Mi, Fa, So | |
| 8.15 Do, Re, Mi, Fa, So, La | |
| 8.16 Do, Re, Mi, Fa, So, La, Ti | |
9: Different Keys. 4/4 - 1, 2 and 4 Bars. |
|
| 9.1 Do, Re - 1 bar | |
| 9.2 Do, Re, Mi | |
| 9.3 Do, Re, Mi, Fa | |
| 9.4 Do, Re, Mi, Fa, So | |
| 9.5 Do, Re, Mi, Fa, So, La | |
| 9.6 Do, Re, Mi, Fa, So, La, Ti | |
| 9.7 Do, Re, Mi - 2 bars | |
| 9.8 Do, Re, Mi, Fa | |
| 9.9 Do, Re, Mi, Fa, So | |
| 9.10 Do, Re, Mi, Fa, So, La | |
| 9.11 Do, Re, Mi, Fa, So, La, Ti | |
| 9.12 Do, Re, Mi - 4 bars | |
| 9.13 Do, Re, Mi, Fa | |
| 9.14 Do, Re, Mi, Fa, So | |
| 9.15 Do, Re, Mi, Fa, So, La | |
| 9.16 Do, Re, Mi, Fa, So, La, Ti | |
10: Different Keys. 3/4 - 1, 2 and 4 Bars. |
|
| 10.1 Do, Re - 1 bar | |
| 10.2 Do, Re, Mi | |
| 10.3 Do, Re, Mi, Fa | |
| 10.4 Do, Re, Mi, Fa, So | |
| 10.5 Do, Re, Mi, Fa, So, La | |
| 10.6 Do, Re, Mi, Fa, So, La, Ti | |
| 10.7 Do, Re, Mi - 2 bars | |
| 10.8 Do, Re, Mi, Fa | |
| 10.9 Do, Re, Mi, Fa, So | |
| 10.10 Do, Re, Mi, Fa, So, La | |
| 10.11 Do, Re, Mi, Fa, So, La, Ti | |
| 10.12 Do, Re, Mi - 4 bars | |
| 10.13 Do, Re, Mi, Fa | |
| 10.14 Do, Re, Mi, Fa, So | |
| 10.15 Do, Re, Mi, Fa, So, La | |
| 10.16 Do, Re, Mi, Fa, So, La, Ti | |
11: Different Keys. Adding 8th Notes. 4/4 - 1, 2 and 4 Bars. |
|
| 11.1 Do, Re - 1 bar | |
| 11.2 Do, Re, Mi | |
| 11.3 Do, Re, Mi, Fa | |
| 11.4 Do, Re, Mi, Fa, So | |
| 11.5 Do, Re, Mi, Fa, So, La | |
| 11.6 Do, Re, Mi, Fa, So, La, Ti | |
| 11.7 Do, Re, Mi - 2 bars | |
| 11.8 Do, Re, Mi, Fa | |
| 11.9 Do, Re, Mi, Fa, So | |
| 11.10 Do, Re, Mi, Fa, So, La | |
| 11.11 Do, Re, Mi, Fa, So, La, Ti | |
| 11.12 Do, Re, Mi - 4 bars | |
| 11.13 Do, Re, Mi, Fa | |
| 11.14 Do, Re, Mi, Fa, So | |
| 11.15 Do, Re, Mi, Fa, So, La | |
| 11.16 Do, Re, Mi, Fa, So, La, Ti | |
12: Different Keys. Adding 8th Notes. 3/4 - 1, 2 and 4 Bars. |
|
| 12.1 Do, Re - 1 bar | |
| 12.2 Do, Re, Mi | |
| 12.3 Do, Re, Mi, Fa | |
| 12.4 Do, Re, Mi, Fa, So | |
| 12.5 Do, Re, Mi, Fa, So, La | |
| 12.6 Do, Re, Mi, Fa, So, La, Ti | |
| 12.7 Do, Re, Mi - 2 bars | |
| 12.8 Do, Re, Mi, Fa | |
| 12.9 Do, Re, Mi, Fa, So | |
| 12.10 Do, Re, Mi, Fa, So, La | |
| 12.11 Do, Re, Mi, Fa, So, La, Ti | |
| 12.12 Do, Re, Mi - 4 bars | |
| 12.13 Do, Re, Mi, Fa | |
| 12.14 Do, Re, Mi, Fa, So | |
| 12.15 Do, Re, Mi, Fa, So, La | |
| 12.16 Do, Re, Mi, Fa, So, La, Ti | |
13: Melodies in A minor. 4/4 - 1, 2 and 4 Bars. |
|
| 13.1 Do, Re - 1 bar | |
| 13.2 Do, Re, Me | |
| 13.3 Do, Re, Me, Fa | |
| 13.4 Do, Re, Me, Fa, So | |
| 13.5 Do, Re, Me, Fa, So, Le | |
| 13.6 Do, Re, Me, Fa, So, Le, Te | |
| 13.7 Do, Re, Me - 2 bars | |
| 13.8 Do, Re, Me, Fa | |
| 13.9 Do, Re, Me, Fa, So | |
| 13.10 Do, Re, Me, Fa, So, Le | |
| 13.11 Do, Re, Me, Fa, So, Le, Te | |
| 13.12 Do, Re, Me - 4 bars | |
| 13.13 Do, Re, Me, Fa | |
| 13.14 Do, Re, Me, Fa, So | |
| 13.15 Do, Re, Me, Fa, So, Le | |
| 13.16 Do, Re, Me, Fa, So, Le, Te | |
14: Melodies in A Minor. 3/4 - 1, 2 and 4 Bars. |
|
| 14.1 Do, Re - 1 bar | |
| 14.2 Do, Re, Me | |
| 14.3 Do, Re, Me, Fa | |
| 14.4 Do, Re, Me, Fa, So | |
| 14.5 Do, Re, Me, Fa, So, Le | |
| 14.6 Do, Re, Me, Fa, So, Le, Te | |
| 14.7 Do, Re, Me - 2 bars | |
| 14.8 Do, Re, Me, Fa | |
| 14.9 Do, Re, Me, Fa, So | |
| 14.10 Do, Re, Me, Fa, So, Le | |
| 14.11 Do, Re, Me, Fa, So, Le, Te | |
| 14.12 Do, Re, Me - 4 bars | |
| 14.13 Do, Re, Me, Fa | |
| 14.14 Do, Re, Me, Fa, So | |
| 14.15 Do, Re, Me, Fa, So, Le | |
| 14.16 Do, Re, Me, Fa, So, Le, Te | |
15: Melodies in A Minor. 4/4 Adding 8th Notes |
|
| 15.1 Do, Re - 1 bar | |
| 15.2 Do, Re, Me | |
| 15.3 Do, Re, Me, Fa | |
| 15.4 Do, Re, Me, Fa, So | |
| 15.5 Do, Re, Me, Fa, So, Le | |
| 15.6 Do, Re, Me, Fa, So, Le, Te | |
| 15.7 Do, Re - 2 bars | |
| 15.8 Do, Re, Me - 2 bars | |
| 15.9 Do, Re, Me, Fa | |
| 15.10 Do, Re, Me, Fa, So | |
| 15.11 Do, Re, Me, Fa, So, Le | |
| 15.12 Do, Re, Me, Fa, So, Le, Te | |
| 15.13 Do, Re, Me - 4 bars | |
| 15.14 Do, Re, Me, Fa | |
| 15.15 Do, Re, Me, Fa, So | |
| 15.16 Do, Re, Me, Fa, So, Le | |
| 15.17 Do, Re, Me, Fa, So, Le, Te | |
16: Melodies in A Minor. 3/4 Adding 8th Notes |
|
| 16.1 Do, Re, Me - 1 bar | |
| 16.2 Do, Re, Me, Fa | |
| 16.3 Do, Re, Me, Fa, So | |
| 16.4 Do, Re, Me, Fa, So, Le | |
| 16.5 Do, Re, Me, Fa, So, Le, Te | |
| 16.6 Do, Re, Me - 2 bars | |
| 16.7 Do, Re, Me, Fa | |
| 16.8 Do, Re, Me, Fa, So | |
| 16.9 Do, Re, Me, Fa, So, Le | |
| 16.10 Do, Re, Me, Fa, So, Le, Te | |
| 16.11 Do, Re, Me - 4 bars | |
| 16.12 Do, Re, Me, Fa | |
| 16.13 Do, Re, Me, Fa, So | |
| 16.14 Do, Re, Me, Fa, So, Le | |
| 16.15 Do, Re, Me, Fa, So, Le, Te | |
17: All Minor Keys. 4/4 with 8th Notes. |
|
| 17.1 Do, Re, Me - 1 bar | |
| 17.2 Do, Re, Me, Fa | |
| 17.3 Do, Re, Me, Fa, So | |
| 17.4 Do, Re, Me, Fa, So, Le | |
| 17.5 Do, Re, Me, Fa, So, Le, Te | |
| 17.6 Do, Re, Me - 2 bars | |
| 17.7 Do, Re, Me, Fa | |
| 17.8 Do, Re, Me, Fa, So | |
| 17.9 Do, Re, Me, Fa, So, Le | |
| 17.10 Do, Re, Me, Fa, So, Le, Te | |
| 17.11 Do, Re, Me - 4 bars | |
| 17.12 Do, Re, Me, Fa | |
| 17.13 Do, Re, Me, Fa, So | |
| 17.14 Do, Re, Me, Fa, So, Le | |
| 17.15 Do, Re, Me, Fa, So, Le, Te | |
18: Harmonic Minor. 4/4 with 8th Notes. |
|
| 18.1 A minor harmonic. 1 bar | |
| 18.2 A minor harmonic. 2 bars | |
| 18.3 A minor harmonic. 4 bars | |
| 18.4 Harmonic minor (all keys). 1 bar | |
| 18.5 Harmonic minor (all keys). 2 bars | |
| 18.6 Harmonic minor (all keys). 4 bars | |
General Workshops - Melody Singback |
|
1: 3 to 4 Tones from the C Major Scale |
|
| 1.1 Do, Re - 3 tones | |
| 1.2 Do, Re, Mi | |
| 1.3 Do, Re, Mi, Fa | |
| 1.4 Do, Re, Mi, Fa, So | |
| 1.5 Do, Re, Mi, Fa, So, La | |
| 1.6 Do, Re, Mi, Fa, So, La, Ti | |
| 1.7 Do, Re - 4 tones | |
| 1.8 Do, Re, Mi | |
| 1.9 Do, Re, Mi, Fa | |
| 1.10 Do, Re, Mi, Fa, So | |
| 1.11 Do, Re, Mi, Fa, So, La | |
| 1.12 Do, Re, Mi, Fa, So, La, Ti | |
2: 5 to 6 Tones from the C Major Scale |
|
| 2.1 Do, Re - 5 tones | |
| 2.2 Do, Re, Mi | |
| 2.3 Do, Re, Mi, Fa | |
| 2.4 Do, Re, Mi, Fa, So | |
| 2.5 Do, Re, Mi, Fa, So, La | |
| 2.6 Do, Re, Mi, Fa, So, La, Ti | |
| 2.7 Do, Re - 6 tones | |
| 2.8 Do, Re, Mi | |
| 2.9 Do, Re, Mi, Fa | |
| 2.10 Do, Re, Mi, Fa, So | |
| 2.11 Do, Re, Mi, Fa, So, La | |
| 2.12 Do, Re, Mi, Fa, So, La, Ti | |
3: 7 to 8 Tones from the C Major Scale |
|
| 3.1 Do, Re, Mi - 7 tones | |
| 3.2 Do, Re, Mi, Fa | |
| 3.3 Do, Re, Mi, Fa, So | |
| 3.4 Do, Re, Mi, Fa, So, La | |
| 3.5 Do, Re, Mi, Fa, So, La, Ti | |
| 3.6 Do, Re, Mi - 8 tones | |
| 3.7 Do, Re, Mi, Fa | |
| 3.8 Do, Re, Mi, Fa, So | |
| 3.9 Do, Re, Mi, Fa, So, La | |
| 3.10 Do, Re, Mi, Fa, So, La, Ti | |
4: Melodies in C Major with Rhythm. 4/4 |
|
| 4.1 Do, Re - 1 bar | |
| 4.2 Do, Re, Mi | |
| 4.3 Do, Re, Mi, Fa | |
| 4.4 Do, Re, Mi, Fa, So | |
| 4.5 Do, Re, Mi, Fa, So, La | |
| 4.6 Do, Re, Mi, Fa, So, La, Ti | |
| 4.7 Do, Re, Mi - 2 bars | |
| 4.8 Do, Re, Mi, Fa | |
| 4.9 Do, Re, Mi, Fa, So | |
| 4.10 Do, Re, Mi, Fa, So, La | |
| 4.11 Do, Re, Mi, Fa, So, La, Ti | |
5: Melodies in C Major with Rhythm. 3/4 |
|
| 5.1 Do, Re - 1 bar | |
| 5.2 Do, Re, Mi | |
| 5.3 Do, Re, Mi, Fa | |
| 5.4 Do, Re, Mi, Fa, So | |
| 5.5 Do, Re, Mi, Fa, So, La | |
| 5.6 Do, Re, Mi, Fa, So, La, Ti | |
| 5.7 Do, Re, Mi - 2 bars | |
| 5.8 Do, Re, Mi, Fa | |
| 5.9 Do, Re, Mi, Fa, So | |
| 5.10 Do, Re, Mi, Fa, So, La | |
| 5.11 Do, Re, Mi, Fa, So, La, Ti | |
6: Adding 8th Notes. 4/4 |
|
| 6.1 Do, Re - 1 bar | |
| 6.2 Do, Re, Mi | |
| 6.3 Do, Re, Mi, Fa | |
| 6.4 Do, Re, Mi, Fa, So | |
| 6.5 Do, Re, Mi, Fa, So, La | |
| 6.6 Do, Re, Mi, Fa, So, La, Ti | |
| 6.7 Do, Re, Mi - 2 bars | |
| 6.8 Do, Re, Mi, Fa | |
| 6.9 Do, Re, Mi, Fa, So | |
| 6.10 Do, Re, Mi, Fa, So, La | |
| 6.11 Do, Re, Mi, Fa, So, La, Ti | |
7: Adding 8th Notes. 3/4 |
|
| 7.1 Do, Re - 1 bar | |
| 7.2 Do, Re, Mi | |
| 7.3 Do, Re, Mi, Fa | |
| 7.4 Do, Re, Mi, Fa, So | |
| 7.5 Do, Re, Mi, Fa, So, La | |
| 7.6 Do, Re, Mi, Fa, So, La, Ti | |
| 7.7 Do, Re, Mi - 2 bars | |
| 7.8 Do, Re, Mi, Fa | |
| 7.9 Do, Re, Mi, Fa, So | |
| 7.10 Do, Re, Mi, Fa, So, La | |
| 7.11 Do, Re, Mi, Fa, So, La, Ti | |
8: Around the Circle of Fifths. 4/4 |
|
| 8.1 Do, Re - 1 bar | |
| 8.2 Do, Re, Mi | |
| 8.3 Do, Re, Mi, Fa | |
| 8.4 Do, Re, Mi, Fa, So | |
| 8.5 Do, Re, Mi, Fa, So, La | |
| 8.6 Do, Re, Mi, Fa, So, La, Ti | |
| 8.7 Do, Re, Mi - 2 bars | |
| 8.8 Do, Re, Mi, Fa | |
| 8.9 Do, Re, Mi, Fa, So | |
| 8.10 Do, Re, Mi, Fa, So, La | |
| 8.11 Do, Re, Mi, Fa, So, La, Ti | |
9: Around the Circle of Fifths. 3/4 |
|
| 9.1 Do, Re - 1 bar | |
| 9.2 Do, Re, Mi | |
| 9.3 Do, Re, Mi, Fa | |
| 9.4 Do, Re, Mi, Fa, So | |
| 9.5 Do, Re, Mi, Fa, So, La | |
| 9.6 Do, Re, Mi, Fa, So, La, Ti | |
| 9.7 Do, Re, Mi - 2 bars | |
| 9.8 Do, Re, Mi, Fa | |
| 9.9 Do, Re, Mi, Fa, So | |
| 9.10 Do, Re, Mi, Fa, So, La | |
| 9.11 Do, Re, Mi, Fa, So, La, Ti | |
10: Around the Circle of Fifths. 4/4 with 8th Notes. |
|
| 10.1 Do, Re - 1 bar | |
| 10.2 Do, Re, Mi | |
| 10.3 Do, Re, Mi, Fa | |
| 10.4 Do, Re, Mi, Fa, So | |
| 10.5 Do, Re, Mi, Fa, So, La | |
| 10.6 Do, Re, Mi, Fa, So, La, Ti | |
| 10.7 Do, Re, Mi - 2 bars | |
| 10.8 Do, Re, Mi, Fa | |
| 10.9 Do, Re, Mi, Fa, So | |
| 10.10 Do, Re, Mi, Fa, So, La | |
| 10.11 Do, Re, Mi, Fa, So, La, Ti | |
11: Around the Circle of Fifths. 3/4 with 8th Notes. |
|
| 11.1 Do, Re - 1 bar | |
| 11.2 Do, Re, Mi | |
| 11.3 Do, Re, Mi, Fa | |
| 11.4 Do, Re, Mi, Fa, So | |
| 11.5 Do, Re, Mi, Fa, So, La | |
| 11.6 Do, Re, Mi, Fa, So, La, Ti | |
| 11.7 Do, Re, Mi - 2 bars | |
| 11.8 Do, Re, Mi, Fa | |
| 11.9 Do, Re, Mi, Fa, So | |
| 11.10 Do, Re, Mi, Fa, So, La | |
| 11.11 Do, Re, Mi, Fa, So, La, Ti | |
12: Melodies in A minor. 4/4 |
|
| 12.1 Do, Re - 1 bar | |
| 12.2 Do, Re, Me | |
| 12.3 Do, Re, Me, Fa | |
| 12.4 Do, Re, Me, Fa, So | |
| 12.5 Do, Re, Me, Fa, So, Le | |
| 12.6 Do, Re, Me, Fa, So, Le, Te | |
| 12.7 Do, Re, Me - 2 bars | |
| 12.8 Do, Re, Me, Fa | |
| 12.9 Do, Re, Me, Fa, So | |
| 12.10 Do, Re, Me, Fa, So, Le | |
| 12.11 Do, Re, Me, Fa, So, Le, Te | |
13: Melodies in A minor. 3/4 |
|
| 13.1 Do, Re - 1 bar | |
| 13.2 Do, Re, Me | |
| 13.3 Do, Re, Me, Fa | |
| 13.4 Do, Re, Me, Fa, So | |
| 13.5 Do, Re, Me, Fa, So, Le | |
| 13.6 Do, Re, Me, Fa, So, Le, Te | |
| 13.7 Do, Re, Me - 2 bars | |
| 13.8 Do, Re, Me, Fa | |
| 13.9 Do, Re, Me, Fa, So | |
| 13.10 Do, Re, Me, Fa, So, Le | |
| 13.11 Do, Re, Me, Fa, So, Le, Te | |
14: Melodies in A minor. 4/4 with 8th Notes |
|
| 14.1 Do, Re - 1 bar | |
| 14.2 Do, Re, Me | |
| 14.3 Do, Re, Me, Fa | |
| 14.4 Do, Re, Me, Fa, So | |
| 14.5 Do, Re, Me, Fa, So, Le | |
| 14.6 Do, Re, Me, Fa, So, Le, Te | |
| 14.7 Do, Re - 2 bars | |
| 14.8 Do, Re, Me - 2 bars | |
| 14.9 Do, Re, Me, Fa | |
| 14.10 Do, Re, Me, Fa, So | |
| 14.11 Do, Re, Me, Fa, So, Le | |
| 14.12 Do, Re, Me, Fa, So, Le, Te | |
15: Melodies in A minor. 3/4 with 8th Notes |
|
| 15.1 Do, Re, Me - 1 bar | |
| 15.2 Do, Re, Me, Fa | |
| 15.3 Do, Re, Me, Fa, So | |
| 15.4 Do, Re, Me, Fa, So, Le | |
| 15.5 Do, Re, Me, Fa, So, Le, Te | |
| 15.6 Do, Re, Me - 2 bars | |
| 15.7 Do, Re, Me, Fa | |
| 15.8 Do, Re, Me, Fa, So | |
| 15.9 Do, Re, Me, Fa, So, Le | |
| 15.10 Do, Re, Me, Fa, So, Le, Te | |
16: All Minor Keys. 4/4 with 8th Notes. |
|
| 16.1 Do, Re, Me - 1 bar | |
| 16.2 Do, Re, Me, Fa | |
| 16.3 Do, Re, Me, Fa, So | |
| 16.4 Do, Re, Me, Fa, So, Le | |
| 16.5 Do, Re, Me, Fa, So, Le, Te | |
| 16.6 Do, Re, Me - 2 bars | |
| 16.7 Do, Re, Me, Fa | |
| 16.8 Do, Re, Me, Fa, So | |
| 16.9 Do, Re, Me, Fa, So, Le | |
| 16.10 Do, Re, Me, Fa, So, Le, Te | |
17: Harmonic Minor. 4/4 with 8th Notes. |
|
| 17.1 A minor harmonic. 1 bar | |
| 17.2 A minor harmonic. 2 bars | |
| 17.3 A minor harmonic. 4 bars | |
| 17.4 Harmonic minor (all keys). 1 bar | |
| 17.5 Harmonic minor (all keys). 2 bars | |
| 17.6 Harmonic minor (all keys). 4 bars | |
General Workshops - Rhythm Clapback |
|
1: 4/4 - 1 bar: Whole, Half, Quarter & Eighth Notes |
|
| 1.1 4/4 - 1 bar: Quarter notes - including rests | |
| 1.2 4/4 - 1 bar: 8th & Quarter notes | |
| 1.3 4/4 - 1 bar: 8th notes - including rests | |
| 1.4 4/4 - 1 bar: 8th & Quarter notes - including rests | |
| 1.5 4/4 - 1 bar: Quarter & Half notes - including rests | |
| 1.6 4/4 - 1 bar: Half & Whole notes - including rests | |
| 1.7 4/4 - 1 bar: Quarter, Half & Whole notes - including rests | |
| 1.8 4/4 - 1 bar: 8th, Quarter, Half & Whole notes - including rests | |
2: 3/4 - 1 bar: Half, Quarter & Eighth Notes |
|
| 2.1 3/4 - 1 bar: Quarter notes - including rests | |
| 2.2 3/4 - 1 bar: 8th & Quarter notes | |
| 2.3 3/4 - 1 bar: 8th notes - including rests | |
| 2.4 3/4 - 1 bar: 8th & Quarter notes - including rests | |
| 2.5 3/4 - 1 bar: Quarter & Half notes - including rests | |
| 2.6 3/4 - 1 bar: 8th, Quarter & Half notes - including rests | |
3: 2/4 - 1 bar: Half, Quarter & Eighth Notes |
|
| 3.1 2/4 - 1 bar: Quarter notes - including rests | |
| 3.2 2/4 - 1 bar: 8th & Quarter notes | |
| 3.3 2/4 - 1 bar: 8th notes - including rests | |
| 3.4 2/4 - 1 bar: 8th & Quarter notes - including rests | |
| 3.5 2/4 - 1 bar: Quarter & Half notes - including rests | |
| 3.6 2/4 - 1 bar: 8th, Quarter & Half notes - including rests | |
4: 4/4 - 2 bars: Whole, half, Quarter & Eighth Notes |
|
| 4.1 4/4 - 2 bars: Quarter notes - including rests | |
| 4.2 4/4 - 2 bars: 8th & Quarter notes | |
| 4.3 4/4 - 2 bars: 8th notes - including rests | |
| 4.4 4/4 - 2 bars: 8th & Quarter notes - including rests | |
| 4.5 4/4 - 2 bars: Quarter & Half notes - including rests | |
| 4.6 4/4 - 2 bars: Half & Whole notes - including rests | |
| 4.7 4/4 - 2 bars: Quarter, Half & Whole notes - including rests | |
| 4.8 4/4 - 2 bars: 8th, Quarter, Half & Whole notes - including rests | |
5: 3/4 - 2 bars: Half, Quarter & Eighth Notes |
|
| 5.1 3/4 - 2 bars: Quarter notes - including rests | |
| 5.2 3/4 - 2 bars: 8th & Quarter notes | |
| 5.3 3/4 - 2 bars: 8th notes - including rests | |
| 5.4 3/4 - 2 bars: 8th & Quarter notes - including rests | |
| 5.5 3/4 - 2 bars: Quarter & Half notes - including rests | |
| 5.6 3/4 - 2 bars: 8th, Quarter & Half notes - including rests | |
6: 2/4 - 2 bars: Half, Quarter & Eighth Notes |
|
| 6.1 2/4 - 2 bars: Quarter notes - including rests | |
| 6.2 2/4 - 2 bars: 8th & Quarter notes | |
| 6.3 2/4 - 2 bars: 8th notes - including rests | |
| 6.4 2/4 - 2 bars: 8th & Quarter notes - including rests | |
| 6.5 2/4 - 2 bars: Quarter & Half notes - including rests | |
| 6.6 2/4 - 2 bars: 8th, Quarter & Half notes - including rests | |
7: 4/4: Introducing Sixteenth Note Groupings |
|
| 7.1 4/4 - 1 bar: 16th & Quarter notes | |
| 7.2 4/4 - 1 bar: 16th, 8th & Quarter notes - including rests | |
| 7.3 4/4 - 1 bar: 16th, 8th & Quarter notes - including rests | |
8: 3/4: Sixteenth Note Groupings |
|
| 8.1 3/4 - 1 bar: 16th & Quarter notes | |
| 8.2 3/4 - 1 bar: 16th, 8th & Quarter notes - including rests | |
| 8.3 3/4 - 1 bar: 16th, 8th & Quarter notes - including rests | |
9: 2/4: Sixteenth Note Groupings |
|
| 9.1 2/4 - 1 bar: 16th & Quarter notes | |
| 9.2 2/4 - 1 bar: 16th, 8th & Quarter notes - including rests | |
| 9.3 2/4 - 1 bar: 16th, 8th & Quarter notes - including rests | |
10: Advanced Sixteenth Note Groupings |
|
| 10.1 4/4 - 1 bar: 16th, 8th & Quarter notes | |
| 10.2 3/4 - 1 bar: 16th, 8th & Quarter notes | |
| 10.3 2/4 - 1 bar: 16th, 8th & Quarter notes | |
| 10.4 2/4, 3/4 & 4/4 - 1 bar: 16th, 8th & Quarter notes | |
| 10.5 4/4 - 1 bar: 16th, 8th & Quarter notes | |
| 10.6 3/4 - 1 bar: 16th, 8th & Quarter notes | |
| 10.7 2/4 - 1 bar: 16th, 8th & Quarter notes | |
| 10.8 2/4, 3/4 & 4/4 - 1 bar: 16th, 8th & Quarter notes | |
11: Advanced Sixteenth Note Groupings with Rests |
|
| 11.1 4/4 - 1 bar: 16th, 8th & Quarter notes - including rests | |
| 11.2 3/4 - 1 bar: 16th, 8th & Quarter notes - including rests | |
| 11.3 2/4 - 1 bar: 16th, 8th & Quarter notes - including rests | |
| 11.4 2/4, 3/4 & 4/4 - 1 bar: 16th, 8th & Quarter notes - including rests | |
| 11.5 4/4 - 1 bar: 16th & Quarter notes - including rests | |
| 11.6 3/4 - 1 bar: 16th & Quarter notes - including rests | |
| 11.7 2/4 - 1 bar: 16th & Quarter notes - including rests | |
| 11.8 2/4, 3/4 & 4/4 - 1 bar: 16th & Quarter notes - including rests | |
12: Advanced 16th and 8th Combinations with Rests |
|
| 12.1 4/4 - 1 bar: 16th, 8th & Quarter notes - including rests | |
| 12.2 3/4 - 1 bar: 16th, 8th & Quarter notes - including rests | |
| 12.3 2/4 - 1 bar: 16th, 8th & Quarter notes - including rests | |
| 12.4 2/4, 3/4 & 4/4 - 1 bar: 16th, 8th & Quarter notes - including rests | |
| 12.5 4/4 - 1 bar: 16th, 8th & Quarter notes - including rests | |
| 12.6 3/4 - 1 bar: 16th, 8th & Quarter notes - including rests | |
| 12.7 2/4 - 1 bar: 16th, 8th & Quarter notes - including rests | |
| 12.8 2/4, 3/4 & 4/4 - 1 bar: 16th, 8th & Quarter notes - including rests | |
13: All Note values from the Previous Lessons, Including Rests |
|
| 13.1 4/4 - 1 bar: 16th, 8th, Quarter, Half & Whole notes - including rests | |
| 13.2 3/4 - 1 bar: 16th, 8th, Quarter & Half notes - including rests | |
| 13.3 2/4 - 1 bar: 16th, 8th, Quarter & Half notes - including rests | |
| 13.4 2/4, 3/4 & 4/4 - 1 bar: 16th, 8th, Quarter & Half notes - including rests | |
14: 4/4: Triplets |
|
| 14.1 4/4 - 1 bar: Quarter notes, 8th triplets | |
| 14.2 4/4 - 1 bar: Quarter notes, 8th triplets - including rests | |
| 14.3 4/4 - 1 bar: Quarter & Half notes, 8th triplets - including rests | |
| 14.4 4/4 - 1 bar: Quarter notes, 8th triplets - including rests | |
| 14.5 4/4 - 1 bar: 8th & Quarter triplets | |
| 14.6 4/4 - 1 bar: 8th & Quarter triplets - including rests | |
| 14.7 4/4 - 1 bar: Quarter notes, 8th & Quarter triplets | |
| 14.8 4/4 - 1 bar: Quarter notes, 8th & Quarter triplets - including rests | |
| 14.9 4/4 - 1 bar: Half triplets | |
| 14.10 4/4 - 1 bar: Half triplets - including rests | |
| 14.11 4/4 - 1 bar: Quarter notes, 16th triplets | |
| 14.12 4/4 - 1 bar: Quarter notes, 16th triplets - including rests | |
| 14.13 4/4 - 1 bar: 16th triplets - including rests | |
| 14.14 4/4 - 1 bar: 16th & 8th triplets | |
| 14.15 4/4 - 1 bar: 16th & 8th triplets - including rests | |
| 14.16 4/4 - 1 bar: 16th, 8th, Quarter & Half triplets | |
| 14.17 4/4 - 1 bar: 16th, 8th, Quarter & Half triplets - including rests | |
15: Triplets, Now in 3/4 |
|
| 15.1 3/4 - 1 bar: Quarter notes, 8th triplets | |
| 15.2 3/4 - 1 bar: Quarter notes, 8th triplets - including rests | |
| 15.3 3/4 - 1 bar: Quarter & Half notes, 8th triplets - including rests | |
| 15.4 3/4 - 1 bar: Quarter notes, 8th triplets - including rests | |
| 15.5 3/4 - 1 bar: 8th & Quarter triplets | |
| 15.6 3/4 - 1 bar: 8th & Quarter triplets - including rests | |
| 15.7 3/4 - 1 bar: Quarter notes, 8th & Quarter triplets | |
| 15.8 3/4 - 1 bar: Quarter notes, 8th & Quarter triplets - including rests | |
| 15.9 3/4 - 1 bar: Quarter notes, 16th triplets | |
| 15.10 3/4 - 1 bar: Quarter notes, 16th triplets - including rests | |
| 15.11 3/4 - 1 bar: 16th triplets - including rests | |
| 15.12 3/4 - 1 bar: 16th & 8th triplets | |
| 15.13 3/4 - 1 bar: 16th & 8th triplets - including rests | |
| 15.14 3/4 - 1 bar: 16th, 8th & Quarter triplets | |
| 15.15 3/4 - 1 bar: 16th, 8th & Quarter triplets - including rests | |
16: Introducing a New Time Signature: 5/4 |
|
| 16.1 5/4 - 1 bar: 8th & Quarter notes - including rests | |
| 16.2 5/4 - 1 bar: 8th & Quarter notes - including rests | |
| 16.3 5/4 - 1 bar: 8th, Quarter & Half notes - including rests | |
| 16.4 5/4 - 1 bar: 16th, 8th & Quarter notes - including rests | |
| 16.5 5/4 - 1 bar: 16th, 8th & Quarter notes - including rests | |
| 16.6 5/4 - 1 bar: 16th, 8th, Quarter, Half & Whole notes - including rests | |
| 16.7 5/4 - 1 bar: 16th, 8th, Quarter, Half & Whole notes, 16th, 8th & Quarter triplets | |
| 16.8 5/4 - 1 bar: 16th, 8th, Quarter, Half & Whole notes, 16th, 8th & Quarter triplets - including rests | |
17: Introducing New Time Signatures: 3/8, 4/8 & 6/8 |
|
| 17.1 3/8, 4/8 & 6/8 - 1 bar: 16th & 8th notes | |
| 17.2 3/8, 4/8 & 6/8 - 1 bar: 16th & 8th notes - including rests | |
| 17.3 3/8, 4/8 & 6/8 - 1 bar: 16th, 8th & Quarter notes | |
| 17.4 3/8, 4/8 & 6/8 - 1 bar: 16th, 8th & Quarter notes - including rests | |
18: 6/8 with Dotted Subdivision |
|
| 18.1 6/8 - 1 bar: 8th notes, Quarter dotted notes | |
| 18.2 6/8 - 1 bar: 8th notes, Quarter dotted notes - including rests | |
| 18.3 6/8 - 1 bar: 8th & Quarter notes, Quarter dotted notes | |
| 18.4 6/8 - 1 bar: 8th & Quarter notes, Quarter dotted notes - including rests | |
| 18.5 6/8 - 1 bar: 16th, 8th & Quarter notes, Quarter dotted notes - including rests | |
19: Introducing the 9/8 Time Signature |
|
| 19.1 9/8 - 1 bar: 16th & 8th notes | |
| 19.2 9/8 - 1 bar: 16th & 8th notes - including rests | |
| 19.3 9/8 - 1 bar: 16th, 8th & Quarter notes | |
| 19.4 9/8 - 1 bar: 16th, 8th & Quarter notes - including rests | |
| 19.5 9/8 - 1 bar: 8th notes, Quarter dotted notes | |
| 19.6 9/8 - 1 bar: 8th notes, Quarter dotted notes - including rests | |
| 19.7 9/8 - 1 bar: 8th & Quarter notes, Quarter dotted notes | |
| 19.8 9/8 - 1 bar: 8th & Quarter notes, Quarter dotted notes - including rests | |
| 19.9 9/8 - 1 bar: 16th, 8th & Quarter notes, Quarter dotted notes - including rests | |
20: Introducing the 12/8 Time Signature |
|
| 20.1 12/8 - 1 bar: 16th & 8th notes | |
| 20.2 12/8 - 1 bar: 16th & 8th notes - including rests | |
| 20.3 12/8 - 1 bar: 16th, 8th & Quarter notes | |
| 20.4 12/8 - 1 bar: 16th, 8th & Quarter notes - including rests | |
| 20.5 12/8 - 1 bar: 8th notes, Quarter dotted notes | |
| 20.6 12/8 - 1 bar: 8th notes, Quarter dotted notes - including rests | |
| 20.7 12/8 - 1 bar: 8th & Quarter notes, Quarter dotted notes | |
| 20.8 12/8 - 1 bar: 8th & Quarter notes, Quarter dotted notes - including rests | |
| 20.9 12/8 - 1 bar: 16th, 8th & Quarter notes, Quarter dotted notes - including rests | |
21: Introducing New Time Signatures: 5/8 & 7/8 |
|
| 21.1 5/8 & 7/8 - 1 bar: 16th & 8th notes | |
| 21.2 5/8 & 7/8 - 1 bar: 16th & 8th notes - including rests | |
| 21.3 5/8 & 7/8 - 1 bar: 16th, 8th & Quarter notes | |
| 21.4 5/8 & 7/8 - 1 bar: 16th, 8th & Quarter notes - including rests | |
22: Introducing New Time Signatures: 2/2, 3/2 & 4/2 |
|
| 22.1 2/2, 3/2 & 4/2 - 1 bar: Half & Whole notes | |
| 22.2 2/2, 3/2 & 4/2 - 1 bar: Half & Whole notes - including rests | |
| 22.3 2/2, 3/2 & 4/2 - 1 bar: Quarter, Half & Whole notes | |
| 22.4 2/2, 3/2 & 4/2 - 1 bar: Quarter, Half & Whole notes - including rests | |
| 22.5 2/2, 3/2 & 4/2 - 1 bar: 8th, Quarter & Half notes - including rests | |
| 22.6 2/2, 3/2 & 4/2 - 1 bar: 8th, Quarter & Half notes - including rests | |
23: 4/4: Mixed Note Groupings |
|
| 23.1 4/4 - 1 bar: 8th notes, 8th triplets | |
| 23.2 4/4 - 1 bar: 8th notes, 8th triplets - including rests | |
| 23.3 4/4 - 1 bar: Quarter notes, Quarter triplets | |
| 23.4 4/4 - 1 bar: Quarter notes, Quarter triplets - including rests | |
| 23.5 4/4 - 1 bar: 8th & Quarter notes, 8th & Quarter triplets | |
| 23.6 4/4 - 1 bar: 8th & Quarter notes, 8th & Quarter triplets - including rests | |
| 23.7 4/4 - 1 bar: 16th notes, 16th triplets | |
| 23.8 4/4 - 1 bar: 16th notes, 16th triplets - including rests | |
| 23.9 4/4 - 1 bar: 16th & 8th notes, 16th & 8th triplets | |
| 23.10 4/4 - 1 bar: 16th & 8th notes, 16th & 8th triplets - including rests | |
| 23.11 4/4 - 1 bar: 16th, 8th & Quarter notes, 16th, 8th & Quarter triplets | |
| 23.12 4/4 - 1 bar: 16th, 8th & Quarter notes, 16th, 8th & Quarter triplets - including rests | |
24: 3/4: Mixed Note Groupings |
|
| 24.1 3/4 - 1 bar: 8th notes, 8th triplets | |
| 24.2 3/4 - 1 bar: 8th notes, 8th triplets - including rests | |
| 24.3 3/4 - 1 bar: Quarter notes, Quarter triplets | |
| 24.4 3/4 - 1 bar: Quarter notes, Quarter triplets - including rests | |
| 24.5 3/4 - 1 bar: 8th & Quarter notes, 8th & Quarter triplets | |
| 24.6 3/4 - 1 bar: 8th & Quarter notes, 8th & Quarter triplets - including rests | |
| 24.7 3/4 - 1 bar: 16th notes, 16th triplets | |
| 24.8 3/4 - 1 bar: 16th notes, 16th triplets - including rests | |
| 24.9 3/4 - 1 bar: 16th & 8th notes, 16th & 8th triplets | |
| 24.10 3/4 - 1 bar: 16th & 8th notes, 16th & 8th triplets - including rests | |
| 24.11 3/4 - 1 bar: 16th, 8th & Quarter notes, 16th, 8th & Quarter triplets | |
| 24.12 3/4 - 1 bar: 16th, 8th & Quarter notes, 16th, 8th & Quarter triplets - including rests | |
25: 4/4: Introducing 32nd Notes |
|
| 25.1 4/4 - 1 bar: 8th & Quarter notes - including rests | |
| 25.2 4/4 - 1 bar: 16th & 8th notes - including rests | |
| 25.3 4/4 - 1 bar: 32nd & 16th notes | |
| 25.4 4/4 - 1 bar: 32nd & 16th notes - including rests | |
| 25.5 4/4 - 1 bar: 32nd & 16th notes - including rests | |
| 25.6 4/4 - 1 bar: 32nd notes - including rests | |
| 25.7 4/4 - 1 bar: 32nd, 16th, 8th & Quarter notes | |
| 25.8 4/4 - 1 bar: 32nd, 16th, 8th & Quarter notes - including rests | |
26: 3/4: 32nd Notes |
|
| 26.1 3/4 - 1 bar: 8th & Quarter notes - including rests | |
| 26.2 3/4 - 1 bar: 16th & 8th notes - including rests | |
| 26.3 3/4 - 1 bar: 32nd & 16th notes | |
| 26.4 3/4 - 1 bar: 32nd & 16th notes - including rests | |
| 26.5 3/4 - 1 bar: 32nd & 16th notes - including rests | |
| 26.6 3/4 - 1 bar: 32nd notes - including rests | |
| 26.7 3/4 - 1 bar: 32nd, 16th, 8th & Quarter notes | |
| 26.8 3/4 - 1 bar: 32nd, 16th, 8th & Quarter notes - including rests | |
27: Final roundup |
|
| 27.1 Simple meters | |
| 27.2 Simple meters with rests | |
| 27.3 Compound meters | |
| 27.4 Compound meters with rests | |
| 27.5 Asymmetrical meters I | |
| 27.6 Asymmetrical meters II | |
General Workshops - Rhythm Error Detection |
|
1: 4/4 - 2 bars: Whole, Half, Quarter & Eighth Notes |
|
| 1.1 4/4 - 2 bars: Quarter notes - including rests | |
| 1.2 4/4 - 2 bars: 8th & Quarter notes | |
| 1.3 4/4 - 2 bars: 8th notes - including rests | |
| 1.4 4/4 - 2 bars: 8th & Quarter notes - including rests | |
| 1.5 4/4 - 2 bars: Quarter & Half notes - including rests | |
| 1.6 4/4 - 2 bars: Half & Whole notes - including rests | |
| 1.7 4/4 - 2 bars: Quarter, Half & Whole notes - including rests | |
| 1.8 4/4 - 2 bars: 8th, Quarter, Half & Whole notes - including rests | |
2: 3/4 - 2 bars: Half, Quarter & Eighth Notes |
|
| 2.1 3/4 - 2 bars: Quarter notes - including rests | |
| 2.2 3/4 - 2 bars: 8th & Quarter notes | |
| 2.3 3/4 - 2 bars: 8th notes - including rests | |
| 2.4 3/4 - 2 bars: 8th & Quarter notes - including rests | |
| 2.5 3/4 - 2 bars: Quarter & Half notes - including rests | |
| 2.6 3/4 - 2 bars: 8th, Quarter & Half notes - including rests | |
3: 2/4 - 2 bars: Half, Quarter & Eighth Notes |
|
| 3.1 2/4 - 2 bars: Quarter notes - including rests | |
| 3.2 2/4 - 2 bars: 8th & Quarter notes | |
| 3.3 2/4 - 2 bars: 8th notes - including rests | |
| 3.4 2/4 - 2 bars: 8th & Quarter notes - including rests | |
| 3.5 2/4 - 2 bars: Quarter & Half notes - including rests | |
| 3.6 2/4 - 2 bars: 8th, Quarter & Half notes - including rests | |
4: 4/4 - 4 bars: Whole, half, Quarter & Eighth Notes |
|
| 4.1 4/4 - 4 bars: Quarter notes - including rests | |
| 4.2 4/4 - 4 bars: 8th & Quarter notes | |
| 4.3 4/4 - 4 bars: 8th notes - including rests | |
| 4.4 4/4 - 4 bars: 8th & Quarter notes - including rests | |
| 4.5 4/4 - 4 bars: Quarter & Half notes - including rests | |
| 4.6 4/4 - 4 bars: Half & Whole notes - including rests | |
| 4.7 4/4 - 4 bars: Quarter, Half & Whole notes - including rests | |
| 4.8 4/4 - 4 bars: 8th, Quarter, Half & Whole notes - including rests | |
5: 3/4 - 4 bars: Half, Quarter & Eighth Notes |
|
| 5.1 3/4 - 4 bars: Quarter notes - including rests | |
| 5.2 3/4 - 4 bars: 8th & Quarter notes | |
| 5.3 3/4 - 4 bars: 8th notes - including rests | |
| 5.4 3/4 - 4 bars: 8th & Quarter notes - including rests | |
| 5.5 3/4 - 4 bars: Quarter & Half notes - including rests | |
| 5.6 3/4 - 4 bars: 8th, Quarter & Half notes - including rests | |
6: 2/4 - 4 bars: Half, Quarter & Eighth Notes |
|
| 6.1 2/4 - 4 bars: Quarter notes - including rests | |
| 6.2 2/4 - 4 bars: 8th & Quarter notes | |
| 6.3 2/4 - 4 bars: 8th notes - including rests | |
| 6.4 2/4 - 4 bars: 8th & Quarter notes - including rests | |
| 6.5 2/4 - 4 bars: Quarter & Half notes - including rests | |
| 6.6 2/4 - 4 bars: 8th, Quarter & Half notes - including rests | |
7: 4/4 - 8 bars: Whole, Half, Quarter & Eighth Notes |
|
| 7.1 4/4 - 8 bars: Quarter notes - including rests | |
| 7.2 4/4 - 8 bars: 8th & Quarter notes | |
| 7.3 4/4 - 8 bars: 8th notes - including rests | |
| 7.4 4/4 - 8 bars: 8th & Quarter notes - including rests | |
| 7.5 4/4 - 8 bars: Quarter & Half notes - including rests | |
| 7.6 4/4 - 8 bars: Half & Whole notes - including rests | |
| 7.7 4/4 - 8 bars: Quarter, Half & Whole notes - including rests | |
| 7.8 4/4 - 8 bars: 8th, Quarter, Half & Whole notes - including rests | |
8: 4/4: Introducing Sixteenth Note Groupings |
|
| 8.1 4/4 - 2 bars: 16th & Quarter notes | |
| 8.2 4/4 - 2 bars: 16th, 8th & Quarter notes - including rests | |
| 8.3 4/4 - 2 bars: 16th, 8th & Quarter notes - including rests | |
9: 3/4: Sixteenth Note Groupings |
|
| 9.1 3/4 - 2 bars: 16th & Quarter notes | |
| 9.2 3/4 - 2 bars: 16th, 8th & Quarter notes - including rests | |
| 9.3 3/4 - 2 bars: 16th, 8th & Quarter notes - including rests | |
10: 2/4: Sixteenth Note Groupings |
|
| 10.1 2/4 - 2 bars: 16th & Quarter notes | |
| 10.2 2/4 - 2 bars: 16th, 8th & Quarter notes - including rests | |
| 10.3 2/4 - 2 bars: 16th, 8th & Quarter notes - including rests | |
11: Advanced Sixteenth Note Groupings |
|
| 11.1 4/4 - 2 bars: 16th, 8th & Quarter notes | |
| 11.2 3/4 - 2 bars: 16th, 8th & Quarter notes | |
| 11.3 2/4 - 2 bars: 16th, 8th & Quarter notes | |
| 11.4 2/4, 3/4 & 4/4 - 2 bars: 16th, 8th & Quarter notes | |
| 11.5 4/4 - 2 bars: 16th, 8th & Quarter notes | |
| 11.6 3/4 - 2 bars: 16th, 8th & Quarter notes | |
| 11.7 2/4 - 2 bars: 16th, 8th & Quarter notes | |
| 11.8 2/4, 3/4 & 4/4 - 2 bars: 16th, 8th & Quarter notes | |
12: Advanced Sixteenth Note Groupings with Rests |
|
| 12.1 4/4 - 2 bars: 16th, 8th & Quarter notes - including rests | |
| 12.2 3/4 - 2 bars: 16th, 8th & Quarter notes - including rests | |
| 12.3 2/4 - 2 bars: 16th, 8th & Quarter notes - including rests | |
| 12.4 2/4, 3/4 & 4/4 - 2 bars: 16th, 8th & Quarter notes - including rests | |
| 12.5 4/4 - 2 bars: 16th & Quarter notes - including rests | |
| 12.6 3/4 - 2 bars: 16th & Quarter notes - including rests | |
| 12.7 2/4 - 2 bars: 16th & Quarter notes - including rests | |
| 12.8 2/4, 3/4 & 4/4 - 2 bars: 16th & Quarter notes - including rests | |
13: Advanced 16th and 8th Combinations with Rests |
|
| 13.1 4/4 - 2 bars: 16th, 8th & Quarter notes - including rests | |
| 13.2 3/4 - 2 bars: 16th, 8th & Quarter notes - including rests | |
| 13.3 2/4 - 2 bars: 16th, 8th & Quarter notes - including rests | |
| 13.4 2/4, 3/4 & 4/4 - 2 bars: 16th, 8th & Quarter notes - including rests | |
| 13.5 4/4 - 2 bars: 16th, 8th & Quarter notes - including rests | |
| 13.6 3/4 - 2 bars: 16th, 8th & Quarter notes - including rests | |
| 13.7 2/4 - 2 bars: 16th, 8th & Quarter notes - including rests | |
| 13.8 2/4, 3/4 & 4/4 - 2 bars: 16th, 8th & Quarter notes - including rests | |
14: All Note values from the Previous Lessons, Including Rests |
|
| 14.1 4/4 - 2 bars: 16th, 8th, Quarter, Half & Whole notes - including rests | |
| 14.2 3/4 - 2 bars: 16th, 8th, Quarter & Half notes - including rests | |
| 14.3 2/4 - 2 bars: 16th, 8th, Quarter & Half notes - including rests | |
| 14.4 2/4, 3/4 & 4/4 - 2 bars: 16th, 8th, Quarter & Half notes - including rests | |
15: 4/4: Triplets |
|
| 15.1 4/4 - 2 bars: Quarter notes, 8th triplets | |
| 15.2 4/4 - 2 bars: Quarter notes, 8th triplets - including rests | |
| 15.3 4/4 - 2 bars: Quarter & Half notes, 8th triplets - including rests | |
| 15.4 4/4 - 2 bars: Quarter notes, 8th triplets - including rests | |
| 15.5 4/4 - 2 bars: 8th & Quarter triplets | |
| 15.6 4/4 - 2 bars: 8th & Quarter triplets - including rests | |
| 15.7 4/4 - 2 bars: Quarter notes, 8th & Quarter triplets | |
| 15.8 4/4 - 2 bars: Quarter notes, 8th & Quarter triplets - including rests | |
| 15.9 4/4 - 2 bars: Half triplets | |
| 15.10 4/4 - 2 bars: Half triplets - including rests | |
| 15.11 4/4 - 2 bars: Quarter notes, 16th triplets | |
| 15.12 4/4 - 2 bars: Quarter notes, 16th triplets - including rests | |
| 15.13 4/4 - 2 bars: 16th triplets - including rests | |
| 15.14 4/4 - 2 bars: 16th & 8th triplets | |
| 15.15 4/4 - 2 bars: 16th & 8th triplets - including rests | |
| 15.16 4/4 - 2 bars: 16th, 8th, Quarter & Half triplets | |
| 15.17 4/4 - 2 bars: 16th, 8th, Quarter & Half triplets - including rests | |
16: Triplets, Now in 3/4 |
|
| 16.1 3/4 - 2 bars: Quarter notes, 8th triplets | |
| 16.2 3/4 - 2 bars: Quarter notes, 8th triplets - including rests | |
| 16.3 3/4 - 2 bars: Quarter & Half notes, 8th triplets - including rests | |
| 16.4 3/4 - 2 bars: Quarter notes, 8th triplets - including rests | |
| 16.5 3/4 - 2 bars: 8th & Quarter triplets | |
| 16.6 3/4 - 2 bars: 8th & Quarter triplets - including rests | |
| 16.7 3/4 - 2 bars: Quarter notes, 8th & Quarter triplets | |
| 16.8 3/4 - 2 bars: Quarter notes, 8th & Quarter triplets - including rests | |
| 16.9 3/4 - 2 bars: Quarter notes, 16th triplets | |
| 16.10 3/4 - 2 bars: Quarter notes, 16th triplets - including rests | |
| 16.11 3/4 - 2 bars: 16th triplets - including rests | |
| 16.12 3/4 - 2 bars: 16th & 8th triplets | |
| 16.13 3/4 - 2 bars: 16th & 8th triplets - including rests | |
| 16.14 3/4 - 2 bars: 16th, 8th & Quarter triplets | |
| 16.15 3/4 - 2 bars: 16th, 8th & Quarter triplets - including rests | |
17: Introducing a New Time Signature: 5/4 |
|
| 17.1 5/4 - 2 bars: 8th & Quarter notes - including rests | |
| 17.2 5/4 - 2 bars: 8th & Quarter notes - including rests | |
| 17.3 5/4 - 2 bars: 8th, Quarter & Half notes - including rests | |
| 17.4 5/4 - 2 bars: 16th, 8th & Quarter notes - including rests | |
| 17.5 5/4 - 2 bars: 16th, 8th & Quarter notes - including rests | |
| 17.6 5/4 - 2 bars: 16th, 8th, Quarter, Half & Whole notes - including rests | |
| 17.7 5/4 - 2 bars: 16th, 8th, Quarter, Half & Whole notes, 16th, 8th & Quarter triplets | |
| 17.8 5/4 - 2 bars: 16th, 8th, Quarter, Half & Whole notes, 16th, 8th & Quarter triplets - including rests | |
18: Introducing New Time Signatures: 3/8, 4/8 & 6/8 |
|
| 18.1 3/8, 4/8 & 6/8 - 2 bars: 16th & 8th notes | |
| 18.2 3/8, 4/8 & 6/8 - 2 bars: 16th & 8th notes - including rests | |
| 18.3 3/8, 4/8 & 6/8 - 2 bars: 16th, 8th & Quarter notes | |
| 18.4 3/8, 4/8 & 6/8 - 2 bars: 16th, 8th & Quarter notes - including rests | |
19: 6/8 with Dotted Subdivision |
|
| 19.1 6/8 - 2 bars: 8th notes, Quarter dotted notes | |
| 19.2 6/8 - 2 bars: 8th notes, Quarter dotted notes - including rests | |
| 19.3 6/8 - 2 bars: 8th & Quarter notes, Quarter dotted notes | |
| 19.4 6/8 - 2 bars: 8th & Quarter notes, Quarter dotted notes - including rests | |
| 19.5 6/8 - 2 bars: 16th, 8th & Quarter notes, Quarter dotted notes - including rests | |
20: Introducing the 9/8 Time Signature |
|
| 20.1 9/8 - 2 bars: 16th & 8th notes | |
| 20.2 9/8 - 2 bars: 16th & 8th notes - including rests | |
| 20.3 9/8 - 2 bars: 16th, 8th & Quarter notes | |
| 20.4 9/8 - 2 bars: 16th, 8th & Quarter notes - including rests | |
| 20.5 9/8 - 2 bars: 8th notes, Quarter dotted notes | |
| 20.6 9/8 - 2 bars: 8th notes, Quarter dotted notes - including rests | |
| 20.7 9/8 - 2 bars: 8th & Quarter notes, Quarter dotted notes | |
| 20.8 9/8 - 2 bars: 8th & Quarter notes, Quarter dotted notes - including rests | |
| 20.9 9/8 - 2 bars: 16th, 8th & Quarter notes, Quarter dotted notes - including rests | |
21: Introducing the 12/8 Time Signature |
|
| 21.1 12/8 - 2 bars: 16th & 8th notes | |
| 21.2 12/8 - 2 bars: 16th & 8th notes - including rests | |
| 21.3 12/8 - 2 bars: 16th, 8th & Quarter notes | |
| 21.4 12/8 - 2 bars: 16th, 8th & Quarter notes - including rests | |
| 21.5 12/8 - 2 bars: 8th notes, Quarter dotted notes | |
| 21.6 12/8 - 2 bars: 8th notes, Quarter dotted notes - including rests | |
| 21.7 12/8 - 2 bars: 8th & Quarter notes, Quarter dotted notes | |
| 21.8 12/8 - 2 bars: 8th & Quarter notes, Quarter dotted notes - including rests | |
| 21.9 12/8 - 2 bars: 16th, 8th & Quarter notes, Quarter dotted notes - including rests | |
22: Introducing New Time Signatures: 5/8 & 7/8 |
|
| 22.1 5/8 & 7/8 - 2 bars: 16th & 8th notes | |
| 22.2 5/8 & 7/8 - 2 bars: 16th & 8th notes - including rests | |
| 22.3 5/8 & 7/8 - 2 bars: 16th, 8th & Quarter notes | |
| 22.4 5/8 & 7/8 - 2 bars: 16th, 8th & Quarter notes - including rests | |
23: Introducing New Time Signatures: 2/2, 3/2 & 4/2 |
|
| 23.1 2/2, 3/2 & 4/2 - 2 bars: Half & Whole notes | |
| 23.2 2/2, 3/2 & 4/2 - 2 bars: Half & Whole notes - including rests | |
| 23.3 2/2, 3/2 & 4/2 - 2 bars: Quarter, Half & Whole notes | |
| 23.4 2/2, 3/2 & 4/2 - 2 bars: Quarter, Half & Whole notes - including rests | |
| 23.5 2/2, 3/2 & 4/2 - 2 bars: 8th, Quarter & Half notes - including rests | |
| 23.6 2/2, 3/2 & 4/2 - 2 bars: 8th, Quarter & Half notes - including rests | |
24: 4/4: Mixed Note Groupings |
|
| 24.1 4/4 - 2 bars: 8th notes, 8th triplets | |
| 24.2 4/4 - 2 bars: 8th notes, 8th triplets - including rests | |
| 24.3 4/4 - 2 bars: Quarter notes, Quarter triplets | |
| 24.4 4/4 - 2 bars: Quarter notes, Quarter triplets - including rests | |
| 24.5 4/4 - 2 bars: 8th & Quarter notes, 8th & Quarter triplets | |
| 24.6 4/4 - 2 bars: 8th & Quarter notes, 8th & Quarter triplets - including rests | |
| 24.7 4/4 - 2 bars: 16th notes, 16th triplets | |
| 24.8 4/4 - 2 bars: 16th notes, 16th triplets - including rests | |
| 24.9 4/4 - 2 bars: 16th & 8th notes, 16th & 8th triplets | |
| 24.10 4/4 - 2 bars: 16th & 8th notes, 16th & 8th triplets - including rests | |
| 24.11 4/4 - 2 bars: 16th, 8th & Quarter notes, 16th, 8th & Quarter triplets | |
| 24.12 4/4 - 2 bars: 16th, 8th & Quarter notes, 16th, 8th & Quarter triplets - including rests | |
25: 3/4: Mixed Note Groupings |
|
| 25.1 3/4 - 2 bars: 8th notes, 8th triplets | |
| 25.2 3/4 - 2 bars: 8th notes, 8th triplets - including rests | |
| 25.3 3/4 - 2 bars: Quarter notes, Quarter triplets | |
| 25.4 3/4 - 2 bars: Quarter notes, Quarter triplets - including rests | |
| 25.5 3/4 - 2 bars: 8th & Quarter notes, 8th & Quarter triplets | |
| 25.6 3/4 - 2 bars: 8th & Quarter notes, 8th & Quarter triplets - including rests | |
| 25.7 3/4 - 2 bars: 16th notes, 16th triplets | |
| 25.8 3/4 - 2 bars: 16th notes, 16th triplets - including rests | |
| 25.9 3/4 - 2 bars: 16th & 8th notes, 16th & 8th triplets | |
| 25.10 3/4 - 2 bars: 16th & 8th notes, 16th & 8th triplets - including rests | |
| 25.11 3/4 - 2 bars: 16th, 8th & Quarter notes, 16th, 8th & Quarter triplets | |
| 25.12 3/4 - 2 bars: 16th, 8th & Quarter notes, 16th, 8th & Quarter triplets - including rests | |
26: 4/4: Introducing 32nd Notes |
|
| 26.1 4/4 - 2 bars: 8th & Quarter notes - including rests | |
| 26.2 4/4 - 2 bars: 16th & 8th notes - including rests | |
| 26.3 4/4 - 2 bars: 32nd & 16th notes | |
| 26.4 4/4 - 2 bars: 32nd & 16th notes - including rests | |
| 26.5 4/4 - 2 bars: 32nd & 16th notes - including rests | |
| 26.6 4/4 - 2 bars: 32nd notes - including rests | |
| 26.7 4/4 - 2 bars: 32nd, 16th, 8th & Quarter notes | |
| 26.8 4/4 - 2 bars: 32nd, 16th, 8th & Quarter notes - including rests | |
27: 3/4: 32nd Notes |
|
| 27.1 3/4 - 2 bars: 8th & Quarter notes - including rests | |
| 27.2 3/4 - 2 bars: 16th & 8th notes - including rests | |
| 27.3 3/4 - 2 bars: 32nd & 16th notes | |
| 27.4 3/4 - 2 bars: 32nd & 16th notes - including rests | |
| 27.5 3/4 - 2 bars: 32nd & 16th notes - including rests | |
| 27.6 3/4 - 2 bars: 32nd notes - including rests | |
| 27.7 3/4 - 2 bars: 32nd, 16th, 8th & Quarter notes | |
| 27.8 3/4 - 2 bars: 32nd, 16th, 8th & Quarter notes - including rests | |
28: All the Time Signatures from the Previous Lessons |
|
| 28.1 Mixed Time Signatures with 32nd, 16th, 8th & Quarter Notes | |
| 28.2 Mixed Time Signatures with 32nd, 16th, 8th & Quarter Notes + Rests | |
General Workshops - Rhythm Sight-Reading |
|
1: 4/4 - 4 bars: Whole, Half, Quarter & Eighth Notes |
|
| 1.1 4/4 - 4 bars: Quarter notes - including rests | |
| 1.2 4/4 - 4 bars: 8th & Quarter notes | |
| 1.3 4/4 - 4 bars: 8th notes - including rests | |
| 1.4 4/4 - 4 bars: 8th & Quarter notes - including rests | |
| 1.5 4/4 - 4 bars: Quarter & Half notes - including rests | |
| 1.6 4/4 - 4 bars: Half & Whole notes - including rests | |
| 1.7 4/4 - 4 bars: Quarter, Half & Whole notes - including rests | |
| 1.8 4/4 - 4 bars: 8th, Quarter, Half & Whole notes - including rests | |
2: 3/4 - 4 bars: Half, Quarter & Eighth Notes |
|
| 2.1 3/4 - 4 bars: Quarter notes - including rests | |
| 2.2 3/4 - 4 bars: 8th & Quarter notes | |
| 2.3 3/4 - 4 bars: 8th notes - including rests | |
| 2.4 3/4 - 4 bars: 8th & Quarter notes - including rests | |
| 2.5 3/4 - 4 bars: Quarter & Half notes - including rests | |
| 2.6 3/4 - 4 bars: 8th, Quarter & Half notes - including rests | |
3: 2/4 - 4 bars: Half, Quarter & Eighth Notes |
|
| 3.1 2/4 - 4 bars: Quarter notes - including rests | |
| 3.2 2/4 - 4 bars: 8th & Quarter notes | |
| 3.3 2/4 - 4 bars: 8th notes - including rests | |
| 3.4 2/4 - 4 bars: 8th & Quarter notes - including rests | |
| 3.5 2/4 - 4 bars: Quarter & Half notes - including rests | |
| 3.6 2/4 - 4 bars: 8th, Quarter & Half notes - including rests | |
4: 4/4 - 8 bars: Whole, half, Quarter & Eighth Notes |
|
| 4.1 4/4 - 8 bars: Quarter notes - including rests | |
| 4.2 4/4 - 8 bars: 8th & Quarter notes | |
| 4.3 4/4 - 8 bars: 8th notes - including rests | |
| 4.4 4/4 - 8 bars: 8th & Quarter notes - including rests | |
| 4.5 4/4 - 8 bars: Quarter & Half notes - including rests | |
| 4.6 4/4 - 8 bars: Half & Whole notes - including rests | |
| 4.7 4/4 - 8 bars: Quarter, Half & Whole notes - including rests | |
| 4.8 4/4 - 8 bars: 8th, Quarter, Half & Whole notes - including rests | |
5: 3/4 - 8 bars: Half, Quarter & Eighth Notes |
|
| 5.1 3/4 - 8 bars: Quarter notes - including rests | |
| 5.2 3/4 - 8 bars: 8th & Quarter notes | |
| 5.3 3/4 - 8 bars: 8th notes - including rests | |
| 5.4 3/4 - 8 bars: 8th & Quarter notes - including rests | |
| 5.5 3/4 - 8 bars: Quarter & Half notes - including rests | |
| 5.6 3/4 - 8 bars: 8th, Quarter & Half notes - including rests | |
6: 2/4 - 8 bars: Half, Quarter & Eighth Notes |
|
| 6.1 2/4 - 8 bars: Quarter notes - including rests | |
| 6.2 2/4 - 8 bars: 8th & Quarter notes | |
| 6.3 2/4 - 8 bars: 8th notes - including rests | |
| 6.4 2/4 - 8 bars: 8th & Quarter notes - including rests | |
| 6.5 2/4 - 8 bars: Quarter & Half notes - including rests | |
| 6.6 2/4 - 8 bars: 8th, Quarter & Half notes - including rests | |
7: 4/4: Introducing Sixteenth Note Groupings |
|
| 7.1 4/4 - 4 bars: 16th & Quarter notes | |
| 7.2 4/4 - 4 bars: 16th, 8th & Quarter notes - including rests | |
| 7.3 4/4 - 4 bars: 16th, 8th & Quarter notes - including rests | |
8: 3/4: Sixteenth Note Groupings |
|
| 8.1 3/4 - 4 bars: 16th & Quarter notes | |
| 8.2 3/4 - 4 bars: 16th, 8th & Quarter notes - including rests | |
| 8.3 3/4 - 4 bars: 16th, 8th & Quarter notes - including rests | |
9: 2/4: Sixteenth Note Groupings |
|
| 9.1 2/4 - 4 bars: 16th & Quarter notes | |
| 9.2 2/4 - 4 bars: 16th, 8th & Quarter notes - including rests | |
| 9.3 2/4 - 4 bars: 16th, 8th & Quarter notes - including rests | |
10: Advanced Sixteenth Note Groupings |
|
| 10.1 4/4 - 4 bars: 16th, 8th & Quarter notes | |
| 10.2 3/4 - 4 bars: 16th, 8th & Quarter notes | |
| 10.3 2/4 - 4 bars: 16th, 8th & Quarter notes | |
| 10.4 2/4, 3/4 & 4/4 - 4 bars: 16th, 8th & Quarter notes | |
| 10.5 4/4 - 4 bars: 16th, 8th & Quarter notes | |
| 10.6 3/4 - 4 bars: 16th, 8th & Quarter notes | |
| 10.7 2/4 - 4 bars: 16th, 8th & Quarter notes | |
| 10.8 2/4, 3/4 & 4/4 - 4 bars: 16th, 8th & Quarter notes | |
11: Advanced Sixteenth Note Groupings with Rests |
|
| 11.1 4/4 - 4 bars: 16th, 8th & Quarter notes - including rests | |
| 11.2 3/4 - 4 bars: 16th, 8th & Quarter notes - including rests | |
| 11.3 2/4 - 4 bars: 16th, 8th & Quarter notes - including rests | |
| 11.4 2/4, 3/4 & 4/4 - 4 bars: 16th, 8th & Quarter notes - including rests | |
| 11.5 4/4 - 4 bars: 16th & Quarter notes - including rests | |
| 11.6 3/4 - 4 bars: 16th & Quarter notes - including rests | |
| 11.7 2/4 - 4 bars: 16th & Quarter notes - including rests | |
| 11.8 2/4, 3/4 & 4/4 - 4 bars: 16th & Quarter notes - including rests | |
12: Advanced 16th and 8th Combinations with Rests |
|
| 12.1 4/4 - 4 bars: 16th, 8th & Quarter notes - including rests | |
| 12.2 3/4 - 4 bars: 16th, 8th & Quarter notes - including rests | |
| 12.3 2/4 - 4 bars: 16th, 8th & Quarter notes - including rests | |
| 12.4 2/4, 3/4 & 4/4 - 4 bars: 16th, 8th & Quarter notes - including rests | |
| 12.5 4/4 - 4 bars: 16th, 8th & Quarter notes - including rests | |
| 12.6 3/4 - 4 bars: 16th, 8th & Quarter notes - including rests | |
| 12.7 2/4 - 4 bars: 16th, 8th & Quarter notes - including rests | |
| 12.8 2/4, 3/4 & 4/4 - 4 bars: 16th, 8th & Quarter notes - including rests | |
13: All Note values from the Previous Lessons, Including Rests |
|
| 13.1 4/4 - 4 bars: 16th, 8th, Quarter, Half & Whole notes - including rests | |
| 13.2 3/4 - 4 bars: 16th, 8th, Quarter & Half notes - including rests | |
| 13.3 2/4 - 4 bars: 16th, 8th, Quarter & Half notes - including rests | |
| 13.4 2/4, 3/4 & 4/4 - 4 bars: 16th, 8th, Quarter & Half notes - including rests | |
14: 4/4: Triplets |
|
| 14.1 4/4 - 4 bars: Quarter notes, 8th triplets | |
| 14.2 4/4 - 4 bars: Quarter notes, 8th triplets - including rests | |
| 14.3 4/4 - 4 bars: Quarter & Half notes, 8th triplets - including rests | |
| 14.4 4/4 - 4 bars: Quarter notes, 8th triplets - including rests | |
| 14.5 4/4 - 4 bars: 8th & Quarter triplets | |
| 14.6 4/4 - 4 bars: 8th & Quarter triplets - including rests | |
| 14.7 4/4 - 4 bars: Quarter notes, 8th & Quarter triplets | |
| 14.8 4/4 - 4 bars: Quarter notes, 8th & Quarter triplets - including rests | |
| 14.9 4/4 - 4 bars: Half triplets | |
| 14.10 4/4 - 4 bars: Half triplets - including rests | |
| 14.11 4/4 - 4 bars: Quarter notes, 16th triplets | |
| 14.12 4/4 - 4 bars: Quarter notes, 16th triplets - including rests | |
| 14.13 4/4 - 4 bars: 16th triplets - including rests | |
| 14.14 4/4 - 4 bars: 16th & 8th triplets | |
| 14.15 4/4 - 4 bars: 16th & 8th triplets - including rests | |
| 14.16 4/4 - 4 bars: 16th, 8th, Quarter & Half triplets | |
| 14.17 4/4 - 4 bars: 16th, 8th, Quarter & Half triplets - including rests | |
15: Triplets, Now in 3/4 |
|
| 15.1 3/4 - 4 bars: Quarter notes, 8th triplets | |
| 15.2 3/4 - 4 bars: Quarter notes, 8th triplets - including rests | |
| 15.3 3/4 - 4 bars: Quarter & Half notes, 8th triplets - including rests | |
| 15.4 3/4 - 4 bars: Quarter notes, 8th triplets - including rests | |
| 15.5 3/4 - 4 bars: 8th & Quarter triplets | |
| 15.6 3/4 - 4 bars: 8th & Quarter triplets - including rests | |
| 15.7 3/4 - 4 bars: Quarter notes, 8th & Quarter triplets | |
| 15.8 3/4 - 4 bars: Quarter notes, 8th & Quarter triplets - including rests | |
| 15.9 3/4 - 4 bars: Quarter notes, 16th triplets | |
| 15.10 3/4 - 4 bars: Quarter notes, 16th triplets - including rests | |
| 15.11 3/4 - 4 bars: 16th triplets - including rests | |
| 15.12 3/4 - 4 bars: 16th & 8th triplets | |
| 15.13 3/4 - 4 bars: 16th & 8th triplets - including rests | |
| 15.14 3/4 - 4 bars: 16th, 8th & Quarter triplets | |
| 15.15 3/4 - 4 bars: 16th, 8th & Quarter triplets - including rests | |
16: Introducing a New Time Signature: 5/4 |
|
| 16.1 5/4 - 4 bars: 8th & Quarter notes - including rests | |
| 16.2 5/4 - 4 bars: 8th & Quarter notes - including rests | |
| 16.3 5/4 - 4 bars: 8th, Quarter & Half notes - including rests | |
| 16.4 5/4 - 4 bars: 16th, 8th & Quarter notes - including rests | |
| 16.5 5/4 - 4 bars: 16th, 8th & Quarter notes - including rests | |
| 16.6 5/4 - 4 bars: 16th, 8th, Quarter, Half & Whole notes - including rests | |
| 16.7 5/4 - 4 bars: 16th, 8th, Quarter, Half & Whole notes, 16th, 8th & Quarter triplets | |
| 16.8 5/4 - 4 bars: 16th, 8th, Quarter, Half & Whole notes, 16th, 8th & Quarter triplets - including rests | |
17: Introducing New Time Signatures: 3/8, 4/8 & 6/8 |
|
| 17.1 3/8, 4/8 & 6/8 - 4 bars: 16th & 8th notes | |
| 17.2 3/8, 4/8 & 6/8 - 4 bars: 16th & 8th notes - including rests | |
| 17.3 3/8, 4/8 & 6/8 - 4 bars: 16th, 8th & Quarter notes | |
| 17.4 3/8, 4/8 & 6/8 - 4 bars: 16th, 8th & Quarter notes - including rests | |
18: 6/8 with Dotted Subdivision |
|
| 18.1 6/8 - 4 bars: 8th notes, Quarter dotted notes | |
| 18.2 6/8 - 4 bars: 8th notes, Quarter dotted notes - including rests | |
| 18.3 6/8 - 4 bars: 8th & Quarter notes, Quarter dotted notes | |
| 18.4 6/8 - 4 bars: 8th & Quarter notes, Quarter dotted notes - including rests | |
| 18.5 6/8 - 4 bars: 16th, 8th & Quarter notes, Quarter dotted notes - including rests | |
19: Introducing the 9/8 Time Signature |
|
| 19.1 9/8 - 4 bars: 16th & 8th notes | |
| 19.2 9/8 - 4 bars: 16th & 8th notes - including rests | |
| 19.3 9/8 - 4 bars: 16th, 8th & Quarter notes | |
| 19.4 9/8 - 4 bars: 16th, 8th & Quarter notes - including rests | |
| 19.5 9/8 - 4 bars: 8th notes, Quarter dotted notes | |
| 19.6 9/8 - 4 bars: 8th notes, Quarter dotted notes - including rests | |
| 19.7 9/8 - 4 bars: 8th & Quarter notes, Quarter dotted notes | |
| 19.8 9/8 - 4 bars: 8th & Quarter notes, Quarter dotted notes - including rests | |
| 19.9 9/8 - 4 bars: 16th, 8th & Quarter notes, Quarter dotted notes - including rests | |
20: Introducing the 12/8 Time Signature |
|
| 20.1 12/8 - 4 bars: 16th & 8th notes | |
| 20.2 12/8 - 4 bars: 16th & 8th notes - including rests | |
| 20.3 12/8 - 4 bars: 16th, 8th & Quarter notes | |
| 20.4 12/8 - 4 bars: 16th, 8th & Quarter notes - including rests | |
| 20.5 12/8 - 4 bars: 8th notes, Quarter dotted notes | |
| 20.6 12/8 - 4 bars: 8th notes, Quarter dotted notes - including rests | |
| 20.7 12/8 - 4 bars: 8th & Quarter notes, Quarter dotted notes | |
| 20.8 12/8 - 4 bars: 8th & Quarter notes, Quarter dotted notes - including rests | |
| 20.9 12/8 - 4 bars: 16th, 8th & Quarter notes, Quarter dotted notes - including rests | |
21: Introducing New Time Signatures: 5/8 & 7/8 |
|
| 21.1 5/8 & 7/8 - 4 bars: 16th & 8th notes | |
| 21.2 5/8 & 7/8 - 4 bars: 16th & 8th notes - including rests | |
| 21.3 5/8 & 7/8 - 4 bars: 16th, 8th & Quarter notes | |
| 21.4 5/8 & 7/8 - 4 bars: 16th, 8th & Quarter notes - including rests | |
22: Introducing New Time Signatures: 2/2, 3/2 & 4/2 |
|
| 22.1 2/2, 3/2 & 4/2 - 4 bars: Half & Whole notes | |
| 22.2 2/2, 3/2 & 4/2 - 4 bars: Half & Whole notes - including rests | |
| 22.3 2/2, 3/2 & 4/2 - 4 bars: Quarter, Half & Whole notes | |
| 22.4 2/2, 3/2 & 4/2 - 4 bars: Quarter, Half & Whole notes - including rests | |
| 22.5 2/2, 3/2 & 4/2 - 4 bars: 8th, Quarter & Half notes - including rests | |
| 22.6 2/2, 3/2 & 4/2 - 4 bars: 8th, Quarter & Half notes - including rests | |
23: 4/4: Mixed Note Groupings |
|
| 23.1 4/4 - 4 bars: 8th notes, 8th triplets | |
| 23.2 4/4 - 4 bars: 8th notes, 8th triplets - including rests | |
| 23.3 4/4 - 4 bars: Quarter notes, Quarter triplets | |
| 23.4 4/4 - 4 bars: Quarter notes, Quarter triplets - including rests | |
| 23.5 4/4 - 4 bars: 8th & Quarter notes, 8th & Quarter triplets | |
| 23.6 4/4 - 4 bars: 8th & Quarter notes, 8th & Quarter triplets - including rests | |
| 23.7 4/4 - 4 bars: 16th notes, 16th triplets | |
| 23.8 4/4 - 4 bars: 16th notes, 16th triplets - including rests | |
| 23.9 4/4 - 4 bars: 16th & 8th notes, 16th & 8th triplets | |
| 23.10 4/4 - 4 bars: 16th & 8th notes, 16th & 8th triplets - including rests | |
| 23.11 4/4 - 4 bars: 16th, 8th & Quarter notes, 16th, 8th & Quarter triplets | |
| 23.12 4/4 - 4 bars: 16th, 8th & Quarter notes, 16th, 8th & Quarter triplets - including rests | |
24: 3/4: Mixed Note Groupings |
|
| 24.1 3/4 - 4 bars: 8th notes, 8th triplets | |
| 24.2 3/4 - 4 bars: 8th notes, 8th triplets - including rests | |
| 24.3 3/4 - 4 bars: Quarter notes, Quarter triplets | |
| 24.4 3/4 - 4 bars: Quarter notes, Quarter triplets - including rests | |
| 24.5 3/4 - 4 bars: 8th & Quarter notes, 8th & Quarter triplets | |
| 24.6 3/4 - 4 bars: 8th & Quarter notes, 8th & Quarter triplets - including rests | |
| 24.7 3/4 - 4 bars: 16th notes, 16th triplets | |
| 24.8 3/4 - 4 bars: 16th notes, 16th triplets - including rests | |
| 24.9 3/4 - 4 bars: 16th & 8th notes, 16th & 8th triplets | |
| 24.10 3/4 - 4 bars: 16th & 8th notes, 16th & 8th triplets - including rests | |
| 24.11 3/4 - 4 bars: 16th, 8th & Quarter notes, 16th, 8th & Quarter triplets | |
| 24.12 3/4 - 4 bars: 16th, 8th & Quarter notes, 16th, 8th & Quarter triplets - including rests | |
25: 4/4: Introducing 32nd Notes |
|
| 25.1 4/4 - 4 bars: 8th & Quarter notes - including rests | |
| 25.2 4/4 - 4 bars: 16th & 8th notes - including rests | |
| 25.3 4/4 - 4 bars: 32nd & 16th notes | |
| 25.4 4/4 - 4 bars: 32nd & 16th notes - including rests | |
| 25.5 4/4 - 4 bars: 32nd & 16th notes - including rests | |
| 25.6 4/4 - 4 bars: 32nd notes - including rests | |
| 25.7 4/4 - 4 bars: 32nd, 16th, 8th & Quarter notes | |
| 25.8 4/4 - 4 bars: 32nd, 16th, 8th & Quarter notes - including rests | |
26: 3/4: 32nd Notes |
|
| 26.1 3/4 - 4 bars: 8th & Quarter notes - including rests | |
| 26.2 3/4 - 4 bars: 16th & 8th notes - including rests | |
| 26.3 3/4 - 4 bars: 32nd & 16th notes | |
| 26.4 3/4 - 4 bars: 32nd & 16th notes - including rests | |
| 26.5 3/4 - 4 bars: 32nd & 16th notes - including rests | |
| 26.6 3/4 - 4 bars: 32nd notes - including rests | |
| 26.7 3/4 - 4 bars: 32nd, 16th, 8th & Quarter notes | |
| 26.8 3/4 - 4 bars: 32nd, 16th, 8th & Quarter notes - including rests | |
27: Final roundup |
|
| 27.1 Simple meters | |
| 27.2 Simple meters with rests | |
| 27.3 Compound meters | |
| 27.4 Compound meters with rests | |
| 27.5 Asymmetrical meters I | |
| 27.6 Asymmetrical meters II | |
General Workshops - Rhythmic Dictation |
|
1: 4/4 - 1 bar: Whole, Half, Quarter & Eighth Notes |
|
| 1.1 4/4 - 1 bar: Quarter notes - including rests | |
| 1.2 4/4 - 1 bar: 8th & Quarter notes | |
| 1.3 4/4 - 1 bar: 8th notes - including rests | |
| 1.4 4/4 - 1 bar: 8th & Quarter notes - including rests | |
| 1.5 4/4 - 1 bar: Quarter & Half notes - including rests | |
| 1.6 4/4 - 1 bar: Half & Whole notes - including rests | |
| 1.7 4/4 - 1 bar: Quarter, Half & Whole notes - including rests | |
| 1.8 4/4 - 1 bar: 8th, Quarter, Half & Whole notes - including rests | |
2: 3/4 - 1 bar: Half, Quarter & Eighth Notes |
|
| 2.1 3/4 - 1 bar: Quarter notes - including rests | |
| 2.2 3/4 - 1 bar: 8th & Quarter notes | |
| 2.3 3/4 - 1 bar: 8th notes - including rests | |
| 2.4 3/4 - 1 bar: 8th & Quarter notes - including rests | |
| 2.5 3/4 - 1 bar: Quarter & Half notes - including rests | |
| 2.6 3/4 - 1 bar: 8th, Quarter & Half notes - including rests | |
3: 2/4 - 1 bar: Half, Quarter & Eighth Notes |
|
| 3.1 2/4 - 1 bar: Quarter notes - including rests | |
| 3.2 2/4 - 1 bar: 8th & Quarter notes | |
| 3.3 2/4 - 1 bar: 8th notes - including rests | |
| 3.4 2/4 - 1 bar: 8th & Quarter notes - including rests | |
| 3.5 2/4 - 1 bar: Quarter & Half notes - including rests | |
| 3.6 2/4 - 1 bar: 8th, Quarter & Half notes - including rests | |
4: 4/4 - 2 bars: Whole, half, Quarter & Eighth Notes |
|
| 4.1 4/4 - 2 bars: Quarter notes - including rests | |
| 4.2 4/4 - 2 bars: 8th & Quarter notes | |
| 4.3 4/4 - 2 bars: 8th notes - including rests | |
| 4.4 4/4 - 2 bars: 8th & Quarter notes - including rests | |
| 4.5 4/4 - 2 bars: Quarter & Half notes - including rests | |
| 4.6 4/4 - 2 bars: Half & Whole notes - including rests | |
| 4.7 4/4 - 2 bars: Quarter, Half & Whole notes - including rests | |
| 4.8 4/4 - 2 bars: 8th, Quarter, Half & Whole notes - including rests | |
5: 3/4 - 2 bars: Half, Quarter & Eighth Notes |
|
| 5.1 3/4 - 2 bars: Quarter notes - including rests | |
| 5.2 3/4 - 2 bars: 8th & Quarter notes | |
| 5.3 3/4 - 2 bars: 8th notes - including rests | |
| 5.4 3/4 - 2 bars: 8th & Quarter notes - including rests | |
| 5.5 3/4 - 2 bars: Quarter & Half notes - including rests | |
| 5.6 3/4 - 2 bars: 8th, Quarter & Half notes - including rests | |
6: 2/4 - 2 bars: Half, Quarter & Eighth Notes |
|
| 6.1 2/4 - 2 bars: Quarter notes - including rests | |
| 6.2 2/4 - 2 bars: 8th & Quarter notes | |
| 6.3 2/4 - 2 bars: 8th notes - including rests | |
| 6.4 2/4 - 2 bars: 8th & Quarter notes - including rests | |
| 6.5 2/4 - 2 bars: Quarter & Half notes - including rests | |
| 6.6 2/4 - 2 bars: 8th, Quarter & Half notes - including rests | |
7: 4/4: Introducing Sixteenth Note Groupings |
|
| 7.1 4/4 - 1 bar: 16th & Quarter notes | |
| 7.2 4/4 - 1 bar: 16th, 8th & Quarter notes - including rests | |
| 7.3 4/4 - 1 bar: 16th, 8th & Quarter notes - including rests | |
8: 3/4: Sixteenth Note Groupings |
|
| 8.1 3/4 - 1 bar: 16th & Quarter notes | |
| 8.2 3/4 - 1 bar: 16th, 8th & Quarter notes - including rests | |
| 8.3 3/4 - 1 bar: 16th, 8th & Quarter notes - including rests | |
9: 2/4: Sixteenth Note Groupings |
|
| 9.1 2/4 - 1 bar: 16th & Quarter notes | |
| 9.2 2/4 - 1 bar: 16th, 8th & Quarter notes - including rests | |
| 9.3 2/4 - 1 bar: 16th, 8th & Quarter notes - including rests | |
10: Advanced Sixteenth Note Groupings |
|
| 10.1 4/4 - 1 bar: 16th, 8th & Quarter notes | |
| 10.2 3/4 - 1 bar: 16th, 8th & Quarter notes | |
| 10.3 2/4 - 1 bar: 16th, 8th & Quarter notes | |
| 10.4 2/4, 3/4 & 4/4 - 1 bar: 16th, 8th & Quarter notes | |
| 10.5 4/4 - 1 bar: 16th, 8th & Quarter notes | |
| 10.6 3/4 - 1 bar: 16th, 8th & Quarter notes | |
| 10.7 2/4 - 1 bar: 16th, 8th & Quarter notes | |
| 10.8 2/4, 3/4 & 4/4 - 1 bar: 16th, 8th & Quarter notes | |
11: Advanced Sixteenth Note Groupings with Rests |
|
| 11.1 4/4 - 1 bar: 16th, 8th & Quarter notes - including rests | |
| 11.2 3/4 - 1 bar: 16th, 8th & Quarter notes - including rests | |
| 11.3 2/4 - 1 bar: 16th, 8th & Quarter notes - including rests | |
| 11.4 2/4, 3/4 & 4/4 - 1 bar: 16th, 8th & Quarter notes - including rests | |
| 11.5 4/4 - 1 bar: 16th & Quarter notes - including rests | |
| 11.6 3/4 - 1 bar: 16th & Quarter notes - including rests | |
| 11.7 2/4 - 1 bar: 16th & Quarter notes - including rests | |
| 11.8 2/4, 3/4 & 4/4 - 1 bar: 16th & Quarter notes - including rests | |
12: Advanced 16th and 8th Combinations with Rests |
|
| 12.1 4/4 - 1 bar: 16th, 8th & Quarter notes - including rests | |
| 12.2 3/4 - 1 bar: 16th, 8th & Quarter notes - including rests | |
| 12.3 2/4 - 1 bar: 16th, 8th & Quarter notes - including rests | |
| 12.4 2/4, 3/4 & 4/4 - 1 bar: 16th, 8th & Quarter notes - including rests | |
| 12.5 4/4 - 1 bar: 16th, 8th & Quarter notes - including rests | |
| 12.6 3/4 - 1 bar: 16th, 8th & Quarter notes - including rests | |
| 12.7 2/4 - 1 bar: 16th, 8th & Quarter notes - including rests | |
| 12.8 2/4, 3/4 & 4/4 - 1 bar: 16th, 8th & Quarter notes - including rests | |
13: All Note values from the Previous Lessons, Including Rests |
|
| 13.1 4/4 - 1 bar: 16th, 8th, Quarter, Half & Whole notes - including rests | |
| 13.2 3/4 - 1 bar: 16th, 8th, Quarter & Half notes - including rests | |
| 13.3 2/4 - 1 bar: 16th, 8th, Quarter & Half notes - including rests | |
| 13.4 2/4, 3/4 & 4/4 - 1 bar: 16th, 8th, Quarter & Half notes - including rests | |
14: 4/4: Triplets |
|
| 14.1 4/4 - 1 bar: Quarter notes, 8th triplets | |
| 14.2 4/4 - 1 bar: Quarter notes, 8th triplets - including rests | |
| 14.3 4/4 - 1 bar: Quarter & Half notes, 8th triplets - including rests | |
| 14.4 4/4 - 1 bar: Quarter notes, 8th triplets - including rests | |
| 14.5 4/4 - 1 bar: 8th & Quarter triplets | |
| 14.6 4/4 - 1 bar: 8th & Quarter triplets - including rests | |
| 14.7 4/4 - 1 bar: Quarter notes, 8th & Quarter triplets | |
| 14.8 4/4 - 1 bar: Quarter notes, 8th & Quarter triplets - including rests | |
| 14.9 4/4 - 1 bar: Half triplets | |
| 14.10 4/4 - 1 bar: Half triplets - including rests | |
| 14.11 4/4 - 1 bar: Quarter notes, 16th triplets | |
| 14.12 4/4 - 1 bar: Quarter notes, 16th triplets - including rests | |
| 14.13 4/4 - 1 bar: 16th triplets - including rests | |
| 14.14 4/4 - 1 bar: 16th & 8th triplets | |
| 14.15 4/4 - 1 bar: 16th & 8th triplets - including rests | |
| 14.16 4/4 - 1 bar: 16th, 8th, Quarter & Half triplets | |
| 14.17 4/4 - 1 bar: 16th, 8th, Quarter & Half triplets - including rests | |
15: Triplets, Now in 3/4 |
|
| 15.1 3/4 - 1 bar: Quarter notes, 8th triplets | |
| 15.2 3/4 - 1 bar: Quarter notes, 8th triplets - including rests | |
| 15.3 3/4 - 1 bar: Quarter & Half notes, 8th triplets - including rests | |
| 15.4 3/4 - 1 bar: Quarter notes, 8th triplets - including rests | |
| 15.5 3/4 - 1 bar: 8th & Quarter triplets | |
| 15.6 3/4 - 1 bar: 8th & Quarter triplets - including rests | |
| 15.7 3/4 - 1 bar: Quarter notes, 8th & Quarter triplets | |
| 15.8 3/4 - 1 bar: Quarter notes, 8th & Quarter triplets - including rests | |
| 15.9 3/4 - 1 bar: Quarter notes, 16th triplets | |
| 15.10 3/4 - 1 bar: Quarter notes, 16th triplets - including rests | |
| 15.11 3/4 - 1 bar: 16th triplets - including rests | |
| 15.12 3/4 - 1 bar: 16th & 8th triplets | |
| 15.13 3/4 - 1 bar: 16th & 8th triplets - including rests | |
| 15.14 3/4 - 1 bar: 16th, 8th & Quarter triplets | |
| 15.15 3/4 - 1 bar: 16th, 8th & Quarter triplets - including rests | |
16: Introducing a New Time Signature: 5/4 |
|
| 16.1 5/4 - 1 bar: 8th & Quarter notes - including rests | |
| 16.2 5/4 - 1 bar: 8th & Quarter notes - including rests | |
| 16.3 5/4 - 1 bar: 8th, Quarter & Half notes - including rests | |
| 16.4 5/4 - 1 bar: 16th, 8th & Quarter notes - including rests | |
| 16.5 5/4 - 1 bar: 16th, 8th & Quarter notes - including rests | |
| 16.6 5/4 - 1 bar: 16th, 8th, Quarter, Half & Whole notes - including rests | |
| 16.7 5/4 - 1 bar: 16th, 8th, Quarter, Half & Whole notes, 16th, 8th & Quarter triplets | |
| 16.8 5/4 - 1 bar: 16th, 8th, Quarter, Half & Whole notes, 16th, 8th & Quarter triplets - including rests | |
17: Introducing New Time Signatures: 3/8, 4/8 & 6/8 |
|
| 17.1 3/8, 4/8 & 6/8 - 1 bar: 16th & 8th notes | |
| 17.2 3/8, 4/8 & 6/8 - 1 bar: 16th & 8th notes - including rests | |
| 17.3 3/8, 4/8 & 6/8 - 1 bar: 16th, 8th & Quarter notes | |
| 17.4 3/8, 4/8 & 6/8 - 1 bar: 16th, 8th & Quarter notes - including rests | |
18: 6/8 with Dotted Subdivision |
|
| 18.1 6/8 - 1 bar: 8th notes, Quarter dotted notes | |
| 18.2 6/8 - 1 bar: 8th notes, Quarter dotted notes - including rests | |
| 18.3 6/8 - 1 bar: 8th & Quarter notes, Quarter dotted notes | |
| 18.4 6/8 - 1 bar: 8th & Quarter notes, Quarter dotted notes - including rests | |
| 18.5 6/8 - 1 bar: 16th, 8th & Quarter notes, Quarter dotted notes - including rests | |
19: Introducing the 9/8 Time Signature |
|
| 19.1 9/8 - 1 bar: 16th & 8th notes | |
| 19.2 9/8 - 1 bar: 16th & 8th notes - including rests | |
| 19.3 9/8 - 1 bar: 16th, 8th & Quarter notes | |
| 19.4 9/8 - 1 bar: 16th, 8th & Quarter notes - including rests | |
| 19.5 9/8 - 1 bar: 8th notes, Quarter dotted notes | |
| 19.6 9/8 - 1 bar: 8th notes, Quarter dotted notes - including rests | |
| 19.7 9/8 - 1 bar: 8th & Quarter notes, Quarter dotted notes | |
| 19.8 9/8 - 1 bar: 8th & Quarter notes, Quarter dotted notes - including rests | |
| 19.9 9/8 - 1 bar: 16th, 8th & Quarter notes, Quarter dotted notes - including rests | |
20: Introducing the 12/8 Time Signature |
|
| 20.1 12/8 - 1 bar: 16th & 8th notes | |
| 20.2 12/8 - 1 bar: 16th & 8th notes - including rests | |
| 20.3 12/8 - 1 bar: 16th, 8th & Quarter notes | |
| 20.4 12/8 - 1 bar: 16th, 8th & Quarter notes - including rests | |
| 20.5 12/8 - 1 bar: 8th notes, Quarter dotted notes | |
| 20.6 12/8 - 1 bar: 8th notes, Quarter dotted notes - including rests | |
| 20.7 12/8 - 1 bar: 8th & Quarter notes, Quarter dotted notes | |
| 20.8 12/8 - 1 bar: 8th & Quarter notes, Quarter dotted notes - including rests | |
| 20.9 12/8 - 1 bar: 16th, 8th & Quarter notes, Quarter dotted notes - including rests | |
21: Introducing New Time Signatures: 5/8 & 7/8 |
|
| 21.1 5/8 & 7/8 - 1 bar: 16th & 8th notes | |
| 21.2 5/8 & 7/8 - 1 bar: 16th & 8th notes - including rests | |
| 21.3 5/8 & 7/8 - 1 bar: 16th, 8th & Quarter notes | |
| 21.4 5/8 & 7/8 - 1 bar: 16th, 8th & Quarter notes - including rests | |
22: Introducing New Time Signatures: 2/2, 3/2 & 4/2 |
|
| 22.1 2/2, 3/2 & 4/2 - 1 bar: Half & Whole notes | |
| 22.2 2/2, 3/2 & 4/2 - 1 bar: Half & Whole notes - including rests | |
| 22.3 2/2, 3/2 & 4/2 - 1 bar: Quarter, Half & Whole notes | |
| 22.4 2/2, 3/2 & 4/2 - 1 bar: Quarter, Half & Whole notes - including rests | |
| 22.5 2/2, 3/2 & 4/2 - 1 bar: 8th, Quarter & Half notes - including rests | |
| 22.6 2/2, 3/2 & 4/2 - 1 bar: 8th, Quarter & Half notes - including rests | |
23: 4/4: Mixed Note Groupings |
|
| 23.1 4/4 - 1 bar: 8th notes, 8th triplets | |
| 23.2 4/4 - 1 bar: 8th notes, 8th triplets - including rests | |
| 23.3 4/4 - 1 bar: Quarter notes, Quarter triplets | |
| 23.4 4/4 - 1 bar: Quarter notes, Quarter triplets - including rests | |
| 23.5 4/4 - 1 bar: 8th & Quarter notes, 8th & Quarter triplets | |
| 23.6 4/4 - 1 bar: 8th & Quarter notes, 8th & Quarter triplets - including rests | |
| 23.7 4/4 - 1 bar: 16th notes, 16th triplets | |
| 23.8 4/4 - 1 bar: 16th notes, 16th triplets - including rests | |
| 23.9 4/4 - 1 bar: 16th & 8th notes, 16th & 8th triplets | |
| 23.10 4/4 - 1 bar: 16th & 8th notes, 16th & 8th triplets - including rests | |
| 23.11 4/4 - 1 bar: 16th, 8th & Quarter notes, 16th, 8th & Quarter triplets | |
| 23.12 4/4 - 1 bar: 16th, 8th & Quarter notes, 16th, 8th & Quarter triplets - including rests | |
24: 3/4: Mixed Note Groupings |
|
| 24.1 3/4 - 1 bar: 8th notes, 8th triplets | |
| 24.2 3/4 - 1 bar: 8th notes, 8th triplets - including rests | |
| 24.3 3/4 - 1 bar: Quarter notes, Quarter triplets | |
| 24.4 3/4 - 1 bar: Quarter notes, Quarter triplets - including rests | |
| 24.5 3/4 - 1 bar: 8th & Quarter notes, 8th & Quarter triplets | |
| 24.6 3/4 - 1 bar: 8th & Quarter notes, 8th & Quarter triplets - including rests | |
| 24.7 3/4 - 1 bar: 16th notes, 16th triplets | |
| 24.8 3/4 - 1 bar: 16th notes, 16th triplets - including rests | |
| 24.9 3/4 - 1 bar: 16th & 8th notes, 16th & 8th triplets | |
| 24.10 3/4 - 1 bar: 16th & 8th notes, 16th & 8th triplets - including rests | |
| 24.11 3/4 - 1 bar: 16th, 8th & Quarter notes, 16th, 8th & Quarter triplets | |
| 24.12 3/4 - 1 bar: 16th, 8th & Quarter notes, 16th, 8th & Quarter triplets - including rests | |
25: 4/4: Introducing 32nd Notes |
|
| 25.1 4/4 - 1 bar: 8th & Quarter notes - including rests | |
| 25.2 4/4 - 1 bar: 16th & 8th notes - including rests | |
| 25.3 4/4 - 1 bar: 32nd & 16th notes | |
| 25.4 4/4 - 1 bar: 32nd & 16th notes - including rests | |
| 25.5 4/4 - 1 bar: 32nd & 16th notes - including rests | |
| 25.6 4/4 - 1 bar: 32nd notes - including rests | |
| 25.7 4/4 - 1 bar: 32nd, 16th, 8th & Quarter notes | |
| 25.8 4/4 - 1 bar: 32nd, 16th, 8th & Quarter notes - including rests | |
26: 3/4: 32nd Notes |
|
| 26.1 3/4 - 1 bar: 8th & Quarter notes - including rests | |
| 26.2 3/4 - 1 bar: 16th & 8th notes - including rests | |
| 26.3 3/4 - 1 bar: 32nd & 16th notes | |
| 26.4 3/4 - 1 bar: 32nd & 16th notes - including rests | |
| 26.5 3/4 - 1 bar: 32nd & 16th notes - including rests | |
| 26.6 3/4 - 1 bar: 32nd notes - including rests | |
| 26.7 3/4 - 1 bar: 32nd, 16th, 8th & Quarter notes | |
| 26.8 3/4 - 1 bar: 32nd, 16th, 8th & Quarter notes - including rests | |
27: All the Time Signatures from the Previous Lessons |
|
| 27.1 Mixed Time Signatures with 32nd, 16th, 8th & Quarter Notes | |
| 27.2 Mixed Time Signatures with 32nd, 16th, 8th & Quarter Notes + Rests | |
General Workshops - Scale Identification |
|
1: Module 1 |
|
| 1.1 Major, Lydian and Mixolydian (begin with 1-1) | |
| 1.2 Scales with minor sound (begin with 1-½) | |
| 1.3 Phrygian and Locrian (begin with ½-1) | |
| 1.4 All modes and harmonic and melodic minor | |
| 1.5 Whole tone and variants of Lydian and Mixolydian | |
| 1.6 Melodic minor, Locrian (#2) and Dim (1-½) | |
| 1.7 Phrygian (#6), Altered and Dim (½-1) | |
| 1.8 Derivatives of melodic minor, Whole tone and Dim | |
| 1.9 All scales and modes from lessons 1-8 | |
| 1.10 Derivatives of harmonic minor | |
| 1.11 The two pentatonic scales | |
| 1.12 All modes - descending | |
| 1.13 Derivatives of harmonic minor - descending | |
Jazz Workshops - Chord Identification |
|
1: Module 1 |
|
| 1.1 Four note chords #1: major | |
| 1.2 Four note chords #2: minor | |
| 1.3 Four note chords #3: dim7, mi7(b5) | |
| 1.4 Four note chords #4 | |
| 1.5 Four note chords #5: maj7 dissonant | |
| 1.6 Four note chords #6: major7 dissonant | |
| 1.7 Four note chords #7: minor dissonant | |
| 1.8 Four note chords #8: the six most dissonant | |
| 1.9 Four note chords #9: all | |
| 1.10 Tonic major: Five and six note chords | |
| 1.11 Tonic major: 4 to 7 note chords, Lydian scale | |
| 1.12 Tonic major, mixed | |
| 1.13 Tonic minor: 5 and 6 note chords | |
| 1.14 Tonic minor: Dorian and melodic scales | |
| 1.15 mi7(b5) chords | |
| 1.16 Minor chords, mixed | |
| 1.17 Dominants, Mixolydian scale | |
| 1.18 Dominants, Mixolydian #11 mode | |
| 1.19 Dominants, altered scale | |
| 1.20 Dominants, diminished scale | |
| 1.21 Dominants, mixed | |
| 1.22 All chords, mixed | |
Jazz Workshops - Chord Progressions |
|
1: Module 1 |
|
| 1.1 Diatonic progressions, major | |
| 1.2 Diatonic progressions, major | |
| 1.3 Diatonic progressions, major | |
| 1.4 Diatonic progressions, minor | |
| 1.5 Diatonic progressions, minor, with Dominant 7 | |
| 1.6 Diatonic progressions, major, with Dominant V7/IV | |
| 1.7 Diatonic major, with Dominant V7/V | |
| 1.8 Diatonic major, with Dominant V7/II | |
| 1.9 Diatonic major, with Dominant V7/VI | |
| 1.10 Diatonic major, with Dominant V7/III | |
| 1.11 Major with all 5 secondary dominants | |
| 1.12 Major with tritone substituted dominants #1 | |
| 1.13 Major with tritone substituted dominants #2 | |
| 1.14 Major with tritone substituted dominants #3 | |
| 1.15 Major with a modal interchange chord | |
| 1.16 Major with at least 2 modal interchange chords | |
| 1.17 Major, various number of modal interchange chords | |
| 1.18 All themes mixed! | |
Jazz Workshops - Melodic Dictation |
|
1: Blues Scales and Songs |
|
| 1.1 Blues “licks:” 3 to 4 tones in the Key of C (1 bar) | |
| 1.2 Blues “licks:” 3 to 4 tones in the Key of F (1 bar) | |
| 1.3 Blues “licks:” 3 to 4 tones in Key of G (1 bar) | |
| 1.4 Blues “licks:” 5 to 6 tones in the Key of C (2 bars) | |
| 1.5 Melodies on the Blues Scale-7 to 8 tones in the Keys of C, F, and G, (2 bars) | |
| 1.6 Melodic Dictation: "St. Louis Blues" | |
| 1.7 Melodic Dictation: "Beale Street Blues" | |
| 1.8 Exam: Blues "Licks" and "St. Louis Blues" | |
2: 1920's American Swing Hits |
|
| 2.1 Review of Melodic Patterns: Keys of Bb, Eb, A and D (5 to 6 tones) | |
| 2.2 Melodic Dictation: "By the Light of the Silvery Moon" | |
| 2.3 Melodic Dictation: "Swanee" | |
| 2.4 Melodic Dictation: "Rock-a-bye Your Baby" | |
| 2.5 Melodic Dictation: "T'ain't Nobody's Business If I Do" | |
| 2.6 Exam: American Swing Hits of the 1920's | |
3: Ballads and Blues in Minor |
|
| 3.1 Natural Minor Patterns: 3 to 4 tones | |
| 3.2 Natural Minor Patterns: 5 to 6 tones | |
| 3.3 Melodic Dictation: "St. James Infirmary Blues" | |
| 3.4 Melodic Dictation: "Flee as a Bird" | |
| 3.5 Melodic Dictation: "King Chanticleer" | |
| 3.6 Melodic Dictation: "Some of these Days" | |
| 3.7 Exam: Ballads and Blues in Minor Keys | |
4: Novelty Songs & Rhythms |
|
| 4.1 Blues Scale: 5 to 6 tones in 3/4 meter with swing 8ths | |
| 4.2 Blues Scale: 5 to 6 tones in 3/4 meter with octave leaps | |
| 4.3 Melodic Dictation: "Missouri Waltz" | |
| 4.4 Melodic Dictation: "Sheik of Araby" | |
| 4.5 Melodic Dictation: "Ja Da" | |
| 4.6 Melodic Dictation: "Ain't We Got Fun" | |
| 4.7 Exam: Novelty Songs and Rhythms | |
5: Irish Ballads & Folk Music |
|
| 5.1 Major Scales: Two-Measure Melodies with 7th leaps | |
| 5.2 Melodic Dictation: "Too Ra Loo Ra Loo Ral" | |
| 5.3 Melodic Dictation: "When Irish Eyes are Smiling" | |
| 5.4 Melodic Dictation: "Careless Love" | |
| 5.5 Melodic Dictation: "The Bells of St. Mary's" | |
| 5.6 Exam: Irish Ballads and Folk Music | |
6: Fun with Irving Berlin |
|
| 6.1 Melodic Dictation: "Alexander's Ragtime Band" | |
| 6.2 Melodic Dictation: "When the Midnight Choo Choo Leaves for Alabam" | |
| 6.3 Melodic Dictation: "At the Devil's Ball" | |
| 6.4 Melodic Dictation: "Mandy" | |
| 6.5 Melodic Dictation: "I Never Knew" | |
| 6.6 Exam: Fun with Irving Berlin | |
7: Transcribe “After You've Gone” |
|
| 7.1 After You've Gone | |
Jazz Workshops - Melodic Sight-Singing |
|
1: Blues Scales and Blues Songs |
|
| 1.1 Blues “licks:” 3 to 4 tones in the Key of C (1 bar) | |
| 1.2 Blues “licks:” 3 to 4 tones in the Key of F (1 bar) | |
| 1.3 Blues “licks:” 3 to 4 tones in Key of G (1 bar) | |
| 1.4 Blues “licks:” 5 to 6 tones in the Key of C (2 bars) | |
| 1.5 Melodies on the Blues Scale-7 to 8 tones in the Keys of C, F, and G, (2 bars) | |
| 1.6 Listening Activity: "St. Louis Blues" by W.C. Handy | |
| 1.7 Sight-Singing: "St. Louis Blues" | |
| 1.8 Listening Activity: "Beale Street Blues" | |
| 1.9 Sight-Singing: "Beale Street Blues" | |
| 1.10 Exam: Blues "Licks" and "The Blues" | |
2: 1920's American Swing Hits |
|
| 2.1 Review of Melodic Patterns: Keys of Bb, Eb, A and D (5 to 6 tones) | |
| 2.2 Listening Activity: "By the Light of the Silvery Moon" | |
| 2.3 Sight-Singing: "By the Light of the Silvery Moon" | |
| 2.4 Listening Activity: "Swanee" by George Gershwin | |
| 2.5 Sight-Singing: "Swanee" | |
| 2.6 Listening Activity: "Rock-a-bye Your Baby (With a Dixie Melody)" | |
| 2.7 Sight-Singing: "Rock-a-bye Your Baby" | |
| 2.8 Listening Activity: "T'ain't Nobody's Business If I Do" | |
| 2.9 Sight-Singing: "Taint Nobody's Business..." | |
| 2.10 Exam: American Swing Hits of the 1920's | |
3: Ballads and Blues in Minor |
|
| 3.1 Natural Minor Patterns: 3 to 4 tones | |
| 3.2 Natural Minor Patterns: 5 to 6 tones | |
| 3.3 Listening Activity: "St. James Infirmary Blues" | |
| 3.4 Sight-Singing: "St. James Infirmary Blues" | |
| 3.5 Listening Activity: "Flee as a Bird" | |
| 3.6 Sight-Singing: "Flee as a Bird" | |
| 3.7 Listening Activity: "King Chanticleer" | |
| 3.8 Sight-Singing: "King Chanticleer" | |
| 3.9 Listening Activity: "Some of These Days" | |
| 3.10 Sight-Singing: "Some of these Days" | |
| 3.11 Exam: Ballads and Blues in Minor Keys | |
4: Novelty Songs & Rhythms |
|
| 4.1 Blues Scale: 5 to 6 tones in 3/4 meter with swing 8ths | |
| 4.2 Blues Scale: 5 to 6 tones in 3/4 meter with octave leaps | |
| 4.3 Listening Activity: "Missouri Waltz" | |
| 4.4 Sight-Singing: "Missouri Waltz" | |
| 4.5 Listening Activity: "The Sheik of Araby" | |
| 4.6 Sight-Singing: "Sheik of Araby" | |
| 4.7 Listening Activity: "Ja Da" | |
| 4.8 Sight-Singing: "Ja Da" | |
| 4.9 Listening Activity: "Ain't We Got Fun | |
| 4.10 Sight-Singing: "Ain't We Got Fun" | |
| 4.11 Exam: Novelty songs and Rhythms | |
5: Irish Ballads & Folk Music |
|
| 5.1 Major Scales: Two-measure melodies with 7th interval leaps | |
| 5.2 Listening Activity: "Too-ra-loo-ra-loo-ra" | |
| 5.3 Sight-Singing: "Too Ra Loo" | |
| 5.4 Listening Activity: "When Irish Eyes are Smiling" | |
| 5.5 Sight-Singing: "When Irish Eyes are Smiling" | |
| 5.6 Listening Activity: "Careless Love" | |
| 5.7 Sight-Singing: "Careless Love" | |
| 5.8 Listening Activity: "The Bells of St. Mary's" | |
| 5.9 Sight-Singing: "The Bells of St. Mary's" | |
| 5.10 Exam: Irish Ballads and Folk Music | |
6: Fun with Irving Berlin |
|
| 6.1 Listening Activity: "Alexander's Ragtime Band" | |
| 6.2 Sight-Singing: "Alexander's Ragtime Band" | |
| 6.3 Listening Activity: "Midnight Choo Choo" | |
| 6.4 Sight-Singing: "When the Midnight Choo Choo" | |
| 6.5 Listening Activity: "At the Devil's Ball" | |
| 6.6 Sight-Singing: "At the Devil's Ball" | |
| 6.7 Listening Activity: "Mandy" | |
| 6.8 Sight-Singing: "Mandy" | |
| 6.9 Listening Activity: "I Never Knew" | |
| 6.10 Sight-Singing: "I Never Knew" | |
| 6.11 Exam: Fun with Irving Berlin | |
7: Sight-Sing “After You've Gone” |
|
| 7.1 After You've Gone | |
Jazz Workshops - Melody Singback |
|
1: Blues Scales and Blues Songs |
|
| 1.1 Blues “licks:” 3 to 4 tones in the Key of C (1 bar) | |
| 1.2 Blues “licks:” 3 to 4 tones in the Key of F (1 bar) | |
| 1.3 Blues “licks:” 3 to 4 tones in Key of G (1 bar) | |
| 1.4 Blues “licks:” 5 to 6 tones in the Key of C (2 bars) | |
| 1.5 Melodies on the Blues Scale-7 to 8 tones in the Keys of C, F, and G, (2 bars) | |
| 1.6 Sing or play back: "St. Louis Blues" | |
| 1.7 Sing or play back: "Beale Street Blues" | |
| 1.8 Exam: Blues "Licks" and "The Blues" | |
2: 1920's American Swing Hits |
|
| 2.1 Review of Melodic Patterns: Keys of Bb, Eb, A and D (5 to 6 tones) | |
| 2.2 Sing or play back: "By the Light of the Silvery Moon" | |
| 2.3 Sing or play back: "Swanee" | |
| 2.4 Sing or play back: "Rock-a-bye Your Baby" | |
| 2.5 Sing or play back: "Taint Nobody's Business..." | |
| 2.6 Exam: American Swing Hits of the 1920's | |
3: Ballads and Blues in Minor |
|
| 3.1 Natural Minor Patterns: 3 to 4 tones | |
| 3.2 Natural Minor Patterns: 5 to 6 tones | |
| 3.3 Sing or play back: "St. James Infirmary Blues" | |
| 3.4 Sing or play back: "Flee as a Bird" | |
| 3.5 Sing or play back: "King Chanticleer" | |
| 3.6 Sing or play back: "Some of these Days" | |
| 3.7 Exam: Ballads and Blues in Minor Keys | |
4: Novelty Songs & Rhythms |
|
| 4.1 Blues Scale: 5 to 6 tones in 3/4 meter with swing 8ths | |
| 4.2 Blues Scale: 5 to 6 tones in 3/4 meter with octave leaps | |
| 4.3 Sing or play back: "Missouri Waltz" | |
| 4.4 Sing or play back: "Sheik of Araby" | |
| 4.5 Sing or play back: "Ja Da" | |
| 4.6 Sing or play back: "Ain't We Got Fun" | |
| 4.7 Exam: Novelty Songs and Rhythms | |
5: Irish Ballads & Folk Music |
|
| 5.1 Major Scales: Two-measure melodies with 7th interval leaps | |
| 5.2 Sing or play back: "Too Ra Loo" | |
| 5.3 Sing or play back: "When Irish Eyes are Smiling" | |
| 5.4 Sing or play back: "Careless Love" | |
| 5.5 Sing or play back: "The Bells of St. Mary's" | |
| 5.6 Exam: Irish Ballads and Folk Music | |
6: Fun with Irving Berlin |
|
| 6.1 Sing or play back: "Alexander's Ragtime Band" | |
| 6.2 Sing or play back: "When the Midnight Choo Choo" | |
| 6.3 Sing or play back: "At the Devil's Ball" | |
| 6.4 Sing or play back: "Mandy" | |
| 6.5 Sing or play back: "I Never Knew" | |
| 6.6 Exam: Fun with Irving Berlin | |
7: Play “After You've Gone” by ear |
|
| 7.1 After You've Gone | |
Jazz Workshops - Rhythm Clapback |
|
1: Module 1 |
|
| 1.1 4/4 swing, half-, quarter- and eighth notes | |
| 1.2 4/4 swing with rests | |
| 1.3 4/4 swing, quarter notes and eighths, faster tempo | |
| 1.4 3/4 swing, quarter notes, eighths and rests | |
| 1.5 3/4 and 4/4 swing - two bars! | |
| 1.6 4/4 swing with eighth note triplets | |
| 1.7 4/4 swing with triplets | |
| 1.8 4/4 swing with triplets and rests | |
| 1.9 3/4 swing with triplets | |
| 1.10 3/4 and 4/4 swing, triplets and rest | |
| 1.11 6/8 | |
| 1.12 6/8 with rests | |
| 1.13 6/8, with rests and ties | |
| 1.14 4/4 straight with eighths and sixteenths. | |
| 1.15 3/4 and 4/4 straight with rests | |
| 1.16 6/8 with sixteenths | |
| 1.17 6/8 with sixteenths and ties | |
| 1.18 6/8 with sixteenths, rests and ties | |
| 1.19 6/8 with sixteenths. 2 bars. | |
| 1.20 6/8 with sixteenths and ties. 2 bars. | |
| 1.21 6/8 with sixteenths, rests and ties | |
| 1.22 Medium upswing, quarter notes, eighths and rests | |
| 1.23 Up-tempo swing, quarter notes, eighths and rests | |
| 1.24 Medium upswing, with rests and ties | |
| 1.25 Up-tempo swing, with rests and ties | |
| 1.26 Medium upswing, quarter notes, eighths and rests. | |
| 1.27 Up-tempo swing, tempo 200. Two bars | |
| 1.28 Medium upswing, with rests and ties. Two bars | |
| 1.29 Medium upswing, 2 bars, with quarter note triplets | |
| 1.30 Up-tempo swing, rests and ties. | |
| 1.31 Up-tempo swing, with quarter note triplets | |
| 1.32 Sixteenths swing. One bar | |
| 1.33 Sixteenths swing with sixteenth note triplets | |
| 1.34 Sixteenths swing with triplets and ties | |
| 1.35 Sixteenths swing with sixteenth note triplets | |
| 1.36 Straight rhythms with 16th and 32nd notes | |
| 1.37 Rhythms with 16th and 32nd notes and ties | |
| 1.38 Up-tempo swing with quarter note triplets. Two bars | |
| 1.39 Up-tempo swing with rests. Two bars | |
| 1.40 Up-tempo swing with more eighths. Two bars. | |
| 1.41 Up-tempo swing with quarter note triplets. 3 bars! | |
| 1.42 Up-tempo swing with rests. 3 bars. | |
| 1.43 Swing eighths with straight sixteenths. | |
| 1.44 Swing eighths with straight sixteenths and rests. | |
| 1.45 Sixteenths swing. 2 bars. | |
| 1.46 Sixteenths swing with triplets and ties. 2 bars. | |
| 1.47 Up-tempo swing with more eighths. | |
| 1.48 Swinging eighths and straight sixteenths. | |
| 1.49 Swinging eighths, straight sixteenths and rests. | |
Jazz Workshops - Rhythm Error Detection |
|
1: Module 1 |
|
| 1.1 4/4 swing, one bar, one error | |
| 1.2 4/4 swing, 2 bars, 2 errors | |
| 1.3 4/4 swing with rests | |
| 1.4 4/4 swing with rests, 2 bars, 2 errors | |
| 1.5 4/4 swing, faster tempo | |
| 1.6 4/4 swing, 2 bars, 2 errors | |
| 1.7 3/4 swing, 2 bars, 2 errors | |
| 1.8 3/4 and 4/4 swing, 2 errors | |
| 1.9 4/4 swing with eighth note triplets, 2 errors | |
| 1.10 4/4 swing with triplets, 2 errors | |
| 1.11 4/4 swing with triplets, 3 errors | |
| 1.12 4/4 swing with triplets and rests, 2 errors | |
| 1.13 4/4 swing with triplets and rests, 3 errors | |
| 1.14 3/4 swing with triplets, 2 bars, 2 errors | |
| 1.15 3/4 and 4/4 swing, triplets and rests, 4 errors | |
| 1.16 6/8, 2 errors | |
| 1.17 6/8, 2 errors | |
| 1.18 6/8 with rests, 2 errors | |
| 1.19 6/8 with rests, 3 errors | |
| 1.20 6/8 with rests and more eighths, 2 errors | |
| 1.21 6/8 with rests, 4 errors | |
| 1.22 4/4 with straight eighths and sixteenths, 2 errors | |
| 1.23 4/4 with straight eighths and sixteenths, 4 errors | |
| 1.24 3/4 and 4/4 straight, with rests, 2 errors | |
| 1.25 3/4 and 4/4 straight, with rests, 4 errors | |
| 1.26 6/8 with sixteenths, 2 errors | |
| 1.27 6/8 with sixteenths, 3 errors | |
| 1.28 6/8 with sixteenths, 2 errors | |
| 1.29 6/8 with triplets, 3 errors | |
| 1.30 Medium upswing | |
| 1.31 Medium upswing | |
| 1.32 Sixteenths swing | |
| 1.33 Sixteenths swing | |
| 1.34 Sixteenths swing with sixteenth note triplets | |
| 1.35 Sixteenths swing with sixteenth note triplets | |
| 1.36 Straight rhythms with 16th and 32nd notes #1 | |
| 1.37 Straight rhythms with 16th and 32nd notes #2 | |
| 1.38 Straight rhythms with 16th and 32nd notes #3 | |
| 1.39 Up-tempo swing #1 | |
| 1.40 Up-tempo swing #2 | |
| 1.41 Up-tempo swing #3 | |
| 1.42 Swing eighths with straight sixteenths | |
| 1.43 Swing eighths with straight sixteenths | |
Jazz Workshops - Rhythmic Dictation |
|
1: Module 1 |
|
| 1.1 4/4 swing, half-, quarter- and eighth notes | |
| 1.2 4/4 swing with rests | |
| 1.3 4/4 swing, quarter notes and eighths, faster tempo | |
| 1.4 3/4 swing, quarter notes, eighths and rests | |
| 1.5 3/4 and 4/4 swing - two bars! | |
| 1.6 4/4 swing with eighth note triplets | |
| 1.7 4/4 swing with triplets | |
| 1.8 4/4 swing with triplets and rests | |
| 1.9 3/4 swing with triplets | |
| 1.10 3/4 and 4/4 swing, triplets and rest | |
| 1.11 6/8 | |
| 1.12 6/8 with rests | |
| 1.13 6/8, with rests and ties | |
| 1.14 4/4 straight with eighths and sixteenths. | |
| 1.15 3/4 and 4/4 straight with rests | |
| 1.16 6/8 with sixteenths | |
| 1.17 6/8 with sixteenths and ties | |
| 1.18 6/8 with sixteenths, rests and ties | |
| 1.19 6/8 with sixteenths. 2 bars. | |
| 1.20 6/8 with sixteenths and ties. 2 bars. | |
| 1.21 6/8 with sixteenths, rests and ties | |
| 1.22 Medium upswing, quarter notes, eighths and rests | |
| 1.23 Up-tempo swing, quarter notes, eighths and rests | |
| 1.24 Medium upswing, with rests and ties | |
| 1.25 Up-tempo swing, with rests and ties | |
| 1.26 Medium upswing, quarter notes, eighths and rests. | |
| 1.27 Up-tempo swing, tempo 200. Two bars | |
| 1.28 Medium upswing, with rests and ties. Two bars | |
| 1.29 Medium upswing, 2 bars, with quarter note triplets | |
| 1.30 Up-tempo swing, rests and ties. | |
| 1.31 Up-tempo swing, with quarter note triplets | |
| 1.32 Sixteenths swing. One bar | |
| 1.33 Sixteenths swing with sixteenth note triplets | |
| 1.34 Sixteenths swing with triplets and ties | |
| 1.35 Sixteenths swing with sixteenth note triplets. | |
| 1.36 Straight rhythms with 16th and 32nd notes | |
| 1.37 Rhythms with 16th and 32nd notes and ties | |
| 1.38 Up-tempo swing with quarter note triplets. Two bars | |
| 1.39 Up-tempo swing with rests. Two bars | |
| 1.40 Up-tempo swing with more eighths. Two bars. | |
| 1.41 Up-tempo swing with quarter note triplets. 3 bars! | |
| 1.42 Up-tempo swing with rests. 3 bars. | |
| 1.43 Swing eighths with straight sixteenths. | |
| 1.44 Swing eighths with straight sixteenths and rests. | |
| 1.45 Sixteenths swing. 2 bars. | |
| 1.46 Sixteenths swing with triplets and ties. 2 bars. | |
| 1.47 Up-tempo swing with more eighths. | |
| 1.48 Swinging eighths and straight sixteenths. | |
| 1.49 Swinging eighths, straight sixteenths and rests. | |
Jazz Workshops - Rhythmic Sight-Reading |
|
1: Module 1 |
|
| 1.1 4/4 swing, half-, quarter- and eighth notes | |
| 1.2 4/4 swing with rests | |
| 1.3 4/4 swing, quarter notes and eighths, faster tempo | |
| 1.4 3/4 swing, quarter notes, eighths and rests | |
| 1.5 3/4 and 4/4 swing - two bars! | |
| 1.6 4/4 swing with eighth note triplets | |
| 1.7 4/4 swing with triplets | |
| 1.8 4/4 swing with triplets and rests | |
| 1.9 3/4 swing with triplets | |
| 1.10 3/4 and 4/4 swing, triplets and rest | |
| 1.11 6/8 | |
| 1.12 6/8 with rests | |
| 1.13 6/8, with rests and ties | |
| 1.14 4/4 straight with eighths and sixteenths. | |
| 1.15 3/4 and 4/4 straight with rests | |
| 1.16 6/8 with sixteenths | |
| 1.17 6/8 with sixteenths and ties | |
| 1.18 6/8 with sixteenths, rests and ties | |
| 1.19 Medium upswing, quarter notes, eighths and rests | |
| 1.20 Medium upswing with rests and ties | |
| 1.21 Sixteenths swing | |
| 1.22 Sixteenths swing with sixteenth note triplets | |
| 1.23 Sixteenths swing with triplets and ties | |
| 1.24 Straight rhythms with 16th and 32nd notes | |
| 1.25 Rhythms with 16th and 32nd notes and ties | |
| 1.26 Up-tempo swing | |
| 1.27 Up-tempo swing with rests | |
| 1.28 Up-tempo swing with more eighths | |
| 1.29 Swing eighths with straight sixteenths. | |
| 1.30 Swing eighths with straight sixteenths and rests. | |
Du kannst Partituren in die Musikbibliothek von EarMaster importieren, indem du dafür das MusicXML-Dateiformat verwendest. Insbesondere beim Einsatz von EarMaster Cloud im Unterricht ist diese Funktion extrem nützlich, da importierte Noten einfach als Grundlage für das Erstellen eigener Lerninhalte eingesetzt werden können. So kannst du z. B. den MusicXML-Import zum Erstellen von Übungen aus folgenden EarMaster-Bereichen verwenden:
- Vom-Blatt-Singen und ‑Spielen
- Melodiediktat
- Melodien nachsingen/
nachspielen - Rhythmen lesen
- Rhythmusdiktat
- Rhythmen klatschen/
klopfen - Rhythmusfehler erkennen
Was ist MusicXML?
MusicXML ist ein digitales Austauschdateiformat für Musik. Das Formt ermöglicht es, notierte Musik zwischen verschiedenen Anwendungen auszutauschen: Notationsprogramme, Sequenzerprogramme, Musik-Lernprogramme, Musikdatenbanken u. s. w. Du kannst also notierte Musik in einem dieser Programme erstellen und via MusicXML problemlos in ein anderes Programm übertragen — und umgekehrt.
Wie fange ich an?
1. Vorbereitung der Partitur
Erstelle mit deinem Notationsprogramm (z. B. mit Dorico, Sibelius, Musescore oder Finale) eine Partitur. Du kannst auch ein Notenerkennungsprogramm wie SmartScore dazu verwenden, um gedruckte und PDF-Noten schnell zu digitalisieren. Wenn du fertig bist, speichere oder exportiere deine Partitur als MusicXMl-Datei. Die Funktion dazu findet sich bei den meisten Programmen im Menü DATEI.
Auch zahlreiche Online-Plattformen und ‑Musikbibliotheken bieten eine Vielzahl bereits fertig eingerichteter Partituren im MusicXML-Dateiformat an, so etwa:
Musescore library - https://musescore.com/sheetmusic
IMSLP Petrucci Music Library - https://imslp.org/
ChoralWIKI - https://www.cpdl.org/wiki/
Hymnar- https://hymnary.org
NEUMA - http://neuma.huma-num.fr
Damit EarMaster die MusicXML-Datei lesen kann, muss sie folgende Voraussetzungen erfüllen:
- Keine Taktartwechsel. Nur eine Taktartangabe im Partiturdokument.
- Keine Tonartwechsel. Unterstützt werden Tonarten mit maximal 6 b- und 5 #-Vorzeichen.
- Nur monophone Stimmen (keine Zwei- oder Dreiklänge etc.). Um ein Harmoniegerüst verwenden zu können, sollten die Töne auf verschiedene Stimmen/
- Maximal 8 monophone Stimmen, von denen eine mit Akkordsymbolen versehen sein kann.
- Unterstützte Schlüssel: Violinschlüssel, Bassschlüssel und Altschlüssel.
- Unterstützte Notenwerte: Ganze bis 32stel-Note, einschließlich punktierte Noten, Bögen, Triolen, Quintolen und Septolen
EarMaster ist dazu in der Lage, die Stimmen der importierten MusicXML-Datei automatisch zu transponieren. Es spielt also keine Rolle, in welcher Tonart du die Notation anlegst. Du kannst die Tonart, in die EarMaster transponieren soll, nach dem MusicXML-Import und beim Einrichten der Übungen auswählen.
Bitte bedenke stets, dass MusicXML-Dateien nur dann importiert werden können, wenn die darin enthaltenen Funktionen, Werte und Definitionen auch von EarMaster unterstützt werden. Nicht unterstützte Funktionen werden entweder von EarMaster ignoriert oder durch ähnliche Werte ersetzt. So wird z. B. die nicht unterstützte Taktartangabe 6/4 durch eine 12/8-Taktartangabe ersetzt.
2. Import deiner Partitur in EarMaster
Rufe zunächst die Musikbibliothek von EarMaster auf. Du findest den entsprechenden Button bei den Lehrer-Tools in der Teacher-Ansicht. Klicke oben rechts auf das Register Partituren und dann auf den Button + MusicXML importieren, um deine Noten zur Partiturliste hinzuzufügen.
3. Importierte Partituren für eigene Übungen verwenden
Wenn du im Kurseditor von EarMastern eigene Übungen erstellst, kannst du im Bereich Quelle des musikalischen Materials das Optionsfeld Partiturbibliothek aktivieren. Anschließend klickst du auf Liste der Fragen. Nun kannst du eine der zuvor von dir importierten Partituren auswählen.
Klicke dazu im rechten Block unterhalb des Titels "Liste der Fragen" auf das Plus-Zeichen (+), um die Liste der verfügbaren Partituren anzuzeigen. Danach kannst du für deine Übung bestimmte Taktbereiche durch "trimmen" festlegen oder z. B. auswählen, welche Stimme in der Übung abgefragt und ausgewertet werden soll und welche Stimmen nur als Begleitung innerhalb der Übung fungieren sollen. Klicke abschließend auf OK, um dieses Setup als erste Frage deiner Übung hinzuzufügen.
Willst du weitere Fragen hinzufügen, kannst du den zuvor beschriebenen Vorgang wiederholen oder du klickst auf das Dublizieren-Icon und änderst lediglich bestimmte Parameter der neuen Frage.
Wiederhole diese Vorgänge, bis du alle Fragen für deine eigene Übung zusammengestellt hast.
Häufige Fragen (FAQ)
F: Kann ich die Musikbibliothek von EarMaster exportieren?
A: Ja, die Musikbibliothek kann als EarMaster-Datenbank-Datei exportiert und dann in ein andernorts installiertes EarMaster-Programm wieder importiert werden. Verwende dazu in der Musikbibliothek die Import/
Q: Ich habe eine Partitur importiert, jedoch klingt und sieht diese anders aus wie im Original. Was ist da los?
A: Der MusicXML-Standard enthält Tausende von Funktionen und Definitionen, die in EarMaster schlicht und einfach nicht benötigt werden. Daher kann es bei manchen Importvorgängen dazu kommen, dass Partituren bis zur Unkenntlichkeit verändert werden. Wir arbeiten fortlaufend an der Verbesserung der MusicXML-Importfunktion in EarMaster. Wenn du also ein Problem beim MusicXML-Import feststellen solltest, sende uns bitte die fragliche MusicXML-Datei sowie eine Beschreibung des Problems. Wir werden dann versuchen, eine Lösung zu finden und die Importfunktion dahingehend zu verbessern.
Q: Kann ich auf dem iPad auch MusicXML-Dateien importieren?
A: Leider nicht. Diese Fujnktion steht nur auf PC und Mac zur Verfügung.
Q: Kann ich eigene Übungen, die auf Grundlage der Musikbibliothek erstellt wurden, speichern?
A: Ja, aber nur bei Verwendung des Kurseditors, der ausschließlich EarMaster Cloud-Nutzern zur Verfügung steht, die über einen Zugang als Lehrkraft verfügen.
")
")
")
")